
 |
|
|
Into the Light
(Tired, foot-sore and down to low HP, our heroes arrive at Little Rock. Not THAT Little Rock!)
Little Rock
|
Duplicator Mini Carrot Dragon Fossil Heal Berry Name Tag Gimel Coin |
I bet that Inn is looking really inviting right about now, huh? Head north to the Saloon (called the Rolling Stone), and as you enter, you'll see Martina. Chat with her, then talk to the guy over the counter and choose Stay. Note that by talking to this same man and choosing "Listen" will allow you to listen to most (but not all) of the music tracks you have heard in the game so far. Keep visiting throughout the game to hear more! After resting, check the barrels in the room for a Gimel Coin, then head outside. Talk to everyone in town, particularily the guy in yellow named Kovahn. He knows the location of the Guardian Shrine that we are supposed to go out and protect. For fun, talk to people with Jet as the lead character. Remember Pike from Jet's intro? This was his hometown, meaning Doomed to Obscurity is nearby. Now, check the crates in the southwest part of town for a Duplicator, then enter the ARMsmith's shop and check the barrel for a Mini Carrot. Next, go to the mine shaft on the east side of town and check the barrel to the east of the sandbags for a Dragon Fossil. Next, head up the stairs near the saloon and check the barrels under the "roof" for a Heal Berry, then head back west and enter the shaft to the north, checking the barrels inside for a Name Tag. Finally, notice the treasure chest that's across from the broken down walkways. You can't reach that yet, but I'll let you know when you can. Chat with Roykman and buy a Call Whistle off of him. Save your game, and when you're ready, head out of town. |
Little Rock - Doomed to Obscurity
| Name: | HP: | EXP: | Gella: | Halved: | Resistant: | Weakness: | Active: | Absorbed: |
| Cursed Corpse | 320 | 28 | 30 | EARTH, WATER, WIND, THUNDER, ICE | DARK | LIGHT | NONE | NONE |
| Trilobite | 240 | 19 | 22 | NONE | NONE | ICE | NONE | NONE |
| Strategy: You might want to skip encounters entirely in this area. Cursed Corpse enemies are fairly generic enemies who can be defeated by straight shooting, but they have a rarely used attack called Fear Touch that causes paralysis. Trilobites, on the other hand, use Insect Breath to reduce the target's HP to 1, then sometimes attack with Dried Out to finish you off! If you choose to fight, use your strongest attacks to take the enemies down as soon as you can, taking care of Trilobites first (try Refrigerate on them!) Arcana is pretty ineffective on Cursed Corpses, but that's because you don't have Arcana they are weak to... yet. | ||||||||
|
5000 Gella |
I know we are supposed to be heading to the Guardian Shrine, but trust me, this detour is certainly worth your time. Call your horsies, then ride them north around the huge canyon walls. Check co-ordinates X: 782 Y: 13852 for a nice treat of 5000 Gella, then keep going north until you reach the edge of the land. From there, head west along the edge until you reach co-ordinates X: 23935 Y: 16103, and search. |
Doomed to Obscurity
|
Migrant Seal |
Remember this place? Sure you do! Ignore the front door, and take the stairways up the pyramid-like structure. When you reach the top, take the stairs into the pyramid. Now, do you remember this room? Remember when we tried to grab the chest, but the floor gave away? Well, this time, stand near the edge of the hole and use the Steady Doll to grab the treasure chest containing a Migrant Seal! Leave the dungeon, and climb back on your horsies. |
Doomed to Obscurity - Glimmering Emblem
| Head back to town and rest if you need to, then head to X: 25363 Y: 15489. Search there to uncover the Guardian Shrine. Save your game, and prepare for a tough dungeon! |
Glimmering Emblem
| Name: | HP: | EXP: | Gella: | Halved: | Resistant: | Weakness: | Active: | Absorbed: |
| Fairylight | 30 | 10 | 12 | LIGHT | NONE | DARK | NONE | NONE |
| Hobgob | 160 | 20 | 24 | NONE | NONE | NONE | NONE | NONE |
| Strategy: Be thankful the enemies here have low HP. Hobgobs are brawlers that occasionally counterattack, and do a fair amount of damage. In addition, the Hobgobs have a very mean attack that they rarely use called Go Gob-to-Gob! This attack does damage equal to the amount of damage you have dealt to all of the Hobgobs on the battlefield. Kill the Gobs as quickly as you can to try and prevent this. Fairylight is a lot less dangerous, but is also not to be taken lightly. They will either waste their turn making funny faces, or they will attack one person with Bright Blast, which does light-elemental damage. They die fairly easy, but they also tend to dodge your attacks from time to time, so use Arcana with Virginia and Gallows, while shooting the Hobgobs with the other two. If you are really lucky, they might drop Light Rings! | ||||||||
|
4200 Gella Mini Carrot Heal Berry X 2 Gella Card X 3 Lucky Card X 2 Growth Egg Duplicator Gimel Coin |
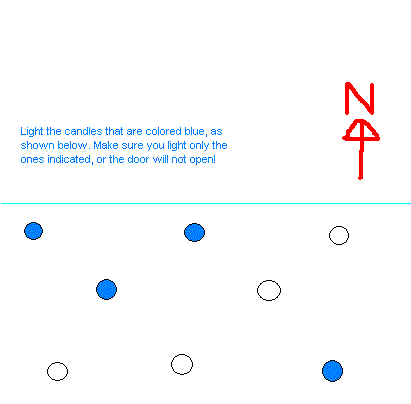
This dungeon is pretty tough when it comes to enemies, and the puzzles are no laughing matter either. Begin by heading north to the next room, and read the hard to see glass slate protuding from the ground. Our goal is to activate those two crystals, but we'll have to go upstairs to do so. Head back to the first room, and take the western staircase; we'll do this one first. In the next room, you'll notice a raised part of the floor with blocks all around. Use the Steady Dolls to push one of those blocks aside and reveal a crystal switch! From here, toss Jet's Boomerang at the switch (rotate the camera to a favorable position first), and the door to the next room will open! Head on in, and in the next room, note the design of the room. There are two lowered parts of the floor divided by a raised part, and both parts have three blocks and a staircase up. Mirror image? Light? Does it make sense? This dungeon is all about mirror and light puzzles! 8P Now, pull the blocks on the floor to the northern "niche" to construct a three block bridge connecting the raised parts of the floor. Walk across, and notice how the blocks on the other side have been placed in the same arrangement! These types of blocks are mirror blocks, and they "synchronize" with blocks on the other side of the room. Walk across the second bridge, then take the exit out of the room. Grab the chest in the next room for a Gella Card X 3, then head north and approach (but do NOT jump off) the edge. See that grimy window? Time for a little Windex! Spray the window with the Freezer Doll (don't question the logic, just do it!) and the window will be wiped clean, shining light on the crystal below! A-ha! Now jump down, head back to the center room, and take the staircase to the east. In the next room, grab the chest for 4200 Gella, then ascend the next staircase and enter the next room for a tricky puzzle. See the candles on the floor? Now, see the candles on the other side? You have to create a mirror image, so light the candles as seen the image below (be aware that the Tindercrest will keep going if it lights a candle and might activate more; use the Freezer Doll to put other candles out), and the door should open!
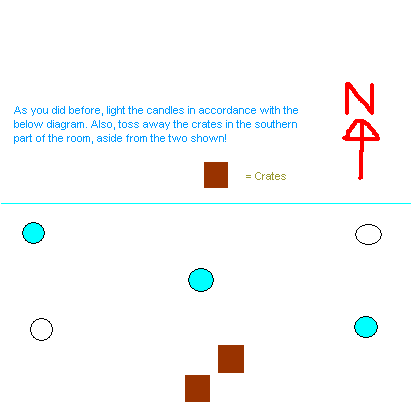
 Now run through the mirror, and... it shatters. You didn't expect another dimension, did you? Head through the newly opened door, and use the Steady Doll to grab the chests for a Mini Carrot and a Heal Berry X 2. Go through the next door, and spray the window to clean it up. Jump down, and head through the newly opened door! In the next room, collect the gems and dash through the mirror to shatter it, then head north one more room. Guess what? Another set of puzzles awaits us! In the room north of here, a large two-part wall is in the way, so we'll have to climb the ladders on the left and right sides to reach the switches to lower the walls. Start by climbing the left ladder, and make sure you open the chest containing the Lucky Card X 2. Head into the next room for another mirror block puzzle. This time, you need to build a bridge with the blocks while making sure you keep one of the blocks on the button on the floor to hold the door open. To accomplish this, build the bridge FIRST, cross over to the other side, THEN move one of the blocks so that the block on the other side hits the button. Finally, make a two block bridge to cross over the two space hole in the floor (keep one on the button!), and leave the room. In the next room, stand near the staircase and use the Steady Dolls to knock the blue block down and off the raised part of the floor, then head across the raised part to the southern part and use the Dolls again to knock the other blue block down. Next, toss the Doll into one of the higher parts of the raised platform to stop it, then move it over to the chest and open it up for a Growth Egg! Finally, use the blue blocks to connect the part of the floor you are on to the raised part on the eastern side of the room. Walk across and exit the room. Hit the switch in this room to lower the first part of the wall. Now drop down and head back to the room with the ladders, this time taking the opposite ladder. After climbing the ladder, head through the door to a room with another puzzle. A raised platform contains a mirror block and a floor button, while a mirror block lies in a lower section of the floor. Move the lower block so that the higher block covers the switch, then enter the next room. Now, dash through the mirror and take a look of the formation of the candles. Use the Tindercrest to make the mirror reflection of that torch formation (as shown in the picture below), but then.. something's missing. Head to the opposite side of the room and look at the two blocks. We have to copy THAT too, so head to the southern side of the room and toss the northwestern crate. Door open! Go in!
 Grab the chests in the room for a Duplicator and a Gimel Coin. Exit the room through the new exit, and you'll spot the switch you need to flip. Flip away, then jump down and head through the newly opened passageway. Save your game, because something that's not really all that difficult is coming up. 8P Now head north a couple of rooms, dashing through a mirror in the way. Looks like we were too late... but we do get a new Medium for visiting! Flash Hit is one of the best Mediums in the game, and the Arcana it grants you are some of the best spells in the game. Spectre does light elemental damage to a target, but that's small potatoes compared to the Valiant spell. Valiant raises the target's attack power by the target's Max HP minus the target's current HP, so the less life you have, the more attack you get! This really makes a difference in later boss battles, so get used to using it now! Equip it on Gallows! Of course, the enemy has sent something to deal with you, but with your new Medium, it's a joke. |
| Boss Name: | HP: | EXP: | Gella: | Halved: | Resistant: | Weakness: | Active: | Absorbed: |
| 2000 | 900 | 1100 | NONE | DARK | LIGHT | NONE | NONE | |
| Boss' Attacks: Eyeball (physical attack to one) Dark Matter (dark-elemental damage to one) | ||||||||
How To Win:Meanwhile, expect retaliation from... well, not much at all. Mono-eye only has two fairly weak attacks, and he can only hit one character at a time. You have very little to worry about. If your HP starts to sink, Gallows should be able to heal any damage dealt to you. It's really that easy! | ||||||||
| After an awfully easy victory, head north a screen and examine the huge machine. Kinda makes you sick, doesn't it? But don't let it get you down. After all, you'll need your strength for the boss that's waiting for you outside of the door. |
| Boss Name: | HP: | EXP: | Gella: | Halved: | Resistant: | Weakness: | Active: | Absorbed: |
| 2400 | 1200 | 1400 | NONE | LIGHT | DARK | NONE | NONE | |
| Boss' Attacks: Eyeball (physical attack to one) Dark Matter (dark elemental magic damage to one or all targets, used as a counterattack) | ||||||||
How To Win:No problem, right? Use the first few turns to get FP up for a Mystic + Lucky Card and to get Gallows' FP up to 36. Try to hold off on attacking with Clive and Jet, because Hecto counterattacks with Dark Matter every time you hit him. Once Gallows hits 36 FP, have him start casting Reflect on your team members, beginning with Clive. What this will do will is allow your team members to attack, and when Hecto retaliates, his Dark Matter will bounce off the Reflect spell and hit him! A few Dark Matters later, and victory is yours! | ||||||||
| Now give yourself a pat on the back. You've earned the Flash Hit Medium, and completed one of the tougher dungeons in the game. From this point forward, boss battles will be a fair bit easier with clever use of the Valiant spell, and the Spectre spell works very well on lots of enemies, so you will have the upper hand for a while. You've made it through the grinder; and if you keep being stingy with your Heal Berries and healing every few battles with Arcana, the rest of the game should go smoothly. Just remember; save those berries by healing only when absolutely necessary, fight all your battles and then some, and you'll do fine. Above all else... never give up! You're about to reach the point where the game starts to get really fun! Watch the scene that plays, then ride your horsies back to Little Rock. Along the way, try out your Spectre spell on the Cursed Corpses for a bit of fun! You've earned it! 8P |
|
|