
 |
|
|
Crossing the Sea of Sand
After listening to our team's latest conversation, you'll appear back in the Honey of Roses Saloon. Talk with Claudia again, and ASK about the waterway. Talk with the other people in town for more information on this waterway, which is where we are heading next. And MAKE SURE you talk to Cormano (who dresses in bright colors just like Cormano in Sunset Riders!) for information on a mining town known as Little Rock.
Before you leave, do a little bit of ARM upgrading if you can. When you're all good and ready, leave town. We're heading for the waterway.
Little Twister - Sand Canal
| Sand Canal is ridiculously easy to find; take your horse northwest up the span of cliffs to the co-ordinates X: 4123 Y: 10942. It's hard to miss; there's a large narrow land mass that looks like it's "reaching" over to the other side. When the land fails and you need to get to the other side of a body of water, you build a canal, right? Before entering, save your game, because your enemies have beaten you to the canal and are waiting for you. |
Sand Canal
| Name: | HP: | EXP: | Gella: | Halved: | Resistant: | Weakness: | Active: | Absorbed: |
| Cave Taurus | 280 | 22 | 25 | THUNDER | EARTH | WIND | NONE | NONE |
| Mimic | 800 | 150 | 200 | NONE | NONE | NONE | NONE | NONE |
| Strategy: Variety takes a vacation in Sand Canal; Cave Taurus is the only enemy you will be fighting aside from the Mimic hidden in a particular treasure chest. Cave Taurus wins the award for stupidest enemy in Wild ARMs 3; taking combat lessons from Dark Cloud, it only uses one attack over and over ad nauseaum. Take advantage of its weakness with a Vortex spell on the first turn, and have everyone else attack. It hits for a fairly small amount of damage, which can be easily healed by Gallows. | ||||||||
| As soon as you enter the Sand Canal, you'll catch something creepy and green out of the corner of your eye. Proceed a little further, and you'll find the reason why I told you to save your game prior to entering the canal. |
| Boss Name: | HP: | EXP: | Gella: | Halved: | Resistant: | Weakness: | Active: | Absorbed: |
| 840 | 120 | 140 | NONE | NONE | NONE | NONE | NONE | |
| 840 | 120 | 140 | NONE | NONE | NONE | NONE | NONE | |
| 840 | 120 | 140 | NONE | NONE | NONE | NONE | NONE | |
| Jasna's Attacks: Deathbringer (instant death to one target if it hits) Wizardry Brand (physical attack to one) Heal (recovers about 100 HP to Jasna) | ||||||||
| Vendidurt's Attacks: Wizardry Brand (physical attack to one) Brass Zapper (physical attack to one) | ||||||||
| Wisrapt's Attacks: Wizardry Brand (physical attack to one) Brass Zapper (physical attack to one) Protect (doubles target's MGR) Weasel Size (cancels target's turn) |
||||||||
How To Win:On the first turn, cast Fragile on Jasna and attack with everyone else. If someone is killed by Deathbringer, you might want to reset the game and try again. On the second turn, have Virginia Mystic a Lucky Card if she has enough FP, and again have everybody else attack. Jasna will attempt to heal this turn, but he can only heal around 100 HP, and you should be doing much more than that each turn. If you can take Jasna down in the second combat round, give yourself a pat on the back! Now it's just the other two. Take care of Wisrapt the same way you did with Jasna (he's the annoying one), and ignore Vendidurt. Use a Gella Card on one of the knights, and heal when necessary. Continue with the physical attacks, and the knights will fall rather quickly. If Wisrapt and Vendidurt are bothering you, try casting Sleep on them. It has a 75% chance of working. | ||||||||
|
Holy Root Name Tag Lucky Card X 2 Gimel Coin |
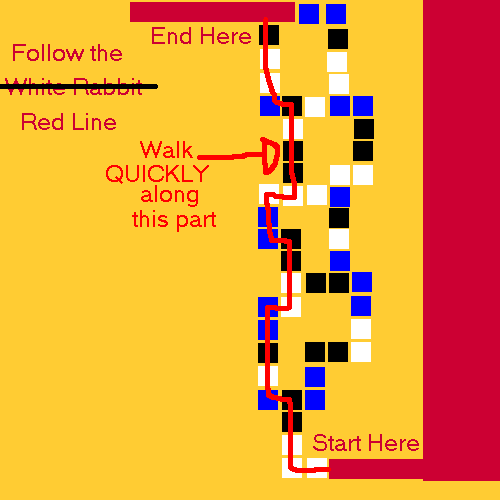
After the victory, the knights will retreat. Not completely, though, so be prepared to face them again. If you're hurting from the fight, head back to town and rest, then come back! Ready to proceed? Good! Head through the first room to the next one, which is full of flowing sand. Gallows will be your savior for most of this dungeon, so keep him as the lead. Now head over to the canal, and you'll notice a switch out on a small block in the "waterway". See the white block floating in the sand beside it? That switch makes that block move. A lot of puzzles in this dungeon involve riding blocks across the sand, and this one is no exception. Stand on the white block, and CAREFULLY position Gallows so that he is facing the switch diagonally, then throw the Steady Doll. Wheeee! On the other side, you'll see a Duplicator Door. Open up, then step inside for 2 chests; a Holy Root and a Name Tag. Leave the room, then walk along the walkway to the next room. Move those crates out of the way in the next room and proceed until you see a crystal switch out in the sand. Toss the boomerang at the switch (it's a little tricky with the stone pillar in the way), then go through the door. In the next room, head to the end of the room and open the chest for a Lucky Card X 2, then head over to the raised bridge. There's no switch or anything for moving this bridge (and no Engrish talking lizard duo to battle), so position yourself in front of the wide part of the bridge and run top speed into it. You may suffer some short term memory loss, but hey, you can walk across! Now head into the next room, past the impressive sand waterfall, and over to the other side of the room, where you'll find a few crates surrounding a treasure chest. Chuck the crates into the sand (it's not a crime if no one sees it, right?) and open the chest for a Gimel Coin. Yes, there's a boss nearby, so save your game. When you're ready, head for the next room, which is under the waterfall. Walk in a bit, and you'll be attacked again. |
| Boss Name: | HP: | EXP: | Gella: | Halved: | Resistant: | Weakness: | Active: | Absorbed: |
| 840 | 120 | 140 | NONE | NONE | NONE | NONE | NONE | |
| 840 | 120 | 140 | NONE | NONE | NONE | NONE | NONE | |
| 840 | 120 | 140 | NONE | NONE | NONE | NONE | NONE | |
| Jasna's Attacks: Deathbringer (instant death to one target if it hits) Wizardry Brand (physical attack to one) Heal (recovers about 100 HP to Jasna) | ||||||||
| Vendidurt's Attacks: Wizardry Brand (physical attack to one) Brass Zapper (physical attack to one) | ||||||||
| Wisrapt's Attacks: Wizardry Brand (physical attack to one) Brass Zapper (physical attack to one) Protect (doubles target's MGR) Weasel Size (cancels target's turn) | ||||||||
| Wisrapt's Attacks: Wizardry Brand (physical attack to one) Khordah Avesta (big magical damage to entire target) |
||||||||
How To Win:The second part is different, however. A FOURTH knight shows up, and he is really quite dangerous. His Khordah Avesta attack does about 150-200 damage to your whole party, and he will use it often. However, before you go filling him with lead, keep in mind that Jasna is still your primary concern, and Jasna must be defeated first. If Jasteuch is bothering you, hold off on using the Lucky Card (it's okay if you miss doubling Jasna's EXP), and have Virginia get enough FP (32) to cast Sleep. Sleep has a 100% chance of working on Jasteuch, and you can concentrate on taking down Jasna this way. When Jasna is defeated (and he actually dies this time!), focus on Jasteuch, then the other two. Keep your HP up just in case, and you'll come out of this battle victorious. | ||||||||
|
Gella Card X 2 Heal Berry 4000 Gella Duplicator Seed Powder X 2 Gimel Coin Soul Feather | After the battle, head north and exit the room. In the next room, grab the gems and head through the room, keeping your eyes peeled for a door on the western side. Head inside for two chests containing a Heal Berry and a Gella Card X 3, then go back out and head up the stairs and through the door to the next room. In this room, step on the switch on the floor. The white blocks will start moving! Now follow these steps CAREFULLY. - With careful timing, step onto the eastern block, and when it reaches the other moving block, walk off and onto the other block. This will take you to a small platform with a chest containing 4000 Gella! - Dive into the sand to get back to the start of the room, then ride the northern block. When it intersects with two other blocks, head to the northernmost one and ride THAT block to another 2 intersecting blocks. Ride the eastern one there to reach a small island and a treasure chest with a Duplicator, then get back on the block and head back south. Take the west moving one this time, and then ride north twice to reach a chest with a Seed Powder X 2. - Dive back into the sand, then take the north block until it hits the other two blocks, then take the western one. From there, take the western block until you reach another block going north. Take that to a stone platform, and take another northern block to reach a floor switch. Step on it, and dive into the sand. Now the black blocks are moving! - Ride the north block at the beginning until it hits the first "intersection" again, then ride the black block. Keep riding black blocks over to the northeastern part of the room to reach another floor tile. Now the blue ones move! - From the start of the room, ride the blue block to the exit. Phew! That was dizzying, wasn't it? Now, in the next room, you have to cross a bridge made of blue, black and white blocks. The problem is; the blocks keep rising and sinking! Only two colors of blocks will be "up" at a time:
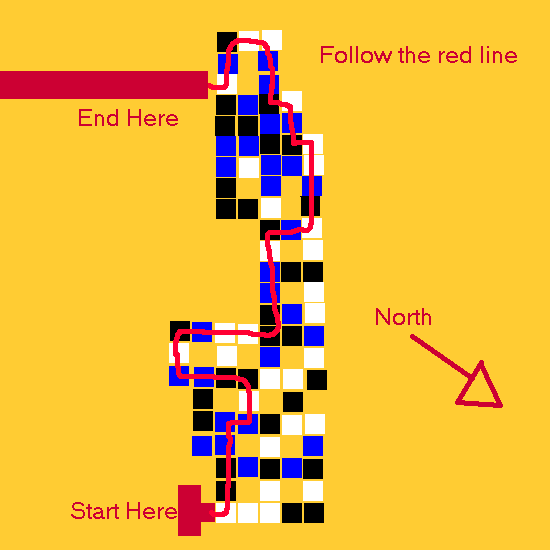
 When you finish, head through the door to the west, and in the next room, and walk past the first doorway you see to reach a duo of treasure chests containing a Gimel Coin and a Soul Feather. You're going to have to fight a Mimic for the Soul Feather, so be prepared! When you get the chests, head back to the doorway and enter. ANOTHER one of these puzzles! Use the picture I've provided for help, and when you reach the end, hit the switch.
 Head up the stairs, and take note of the doorway with the switch beside it. We can't open that yet; we'll be returning much later in the game for it! Use a Gimel Coin to save, and head through the northern door. |
| Boss Name: | HP: | EXP: | Gella: | Halved: | Resistant: | Weakness: | Active: | Absorbed: |
| N/A | 0 | 0 | NONE | NONE | NONE | NONE | NONE | |
| Boss' Attacks: Dark Spear (physical attack to one, counterattack) Proton Beam (magical attack to one) Ultranegative Rainbow (lowers entire team's HP to 1, sometimes kills.) | ||||||||
How To | ||||||||
Sand Canal - Little Rock
| Your party may be sore and tired after the battle, or they may be on full HP, depending on how much VIT was used at the end of the last battle. Either way, your goal is to get to Little Rock as soon as possible. Skip the battles, and travel west to an area that appears to be surrounded by a huge rock formation, and look for a niche at X: 25324 Y: 12503. Search there to find Little Rock and solace for your sore feet. |
|
|