 |
|
|
Paying Respects
Check your inventory for an item named Map Shred, and take a look at it. It points out the location of the next dungeon we are to visit. However, the first thing we are going to do is get ourselves another Medium, so board your Sandcraft parked on the beach west of Baskar Village, and autopilot back to Jolly Roger.
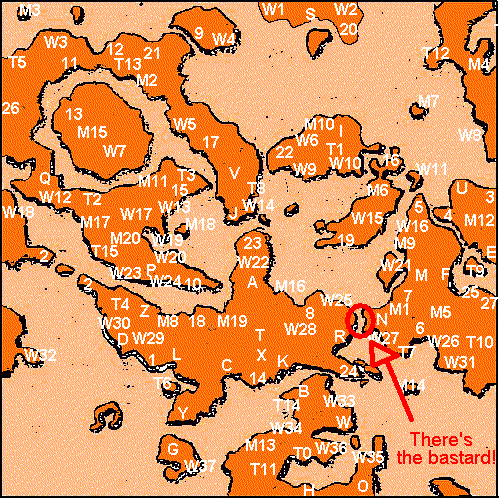
| If you do not have the most powerful cannon for the Sandcraft yet, PURCHASE THE ARK SMASHER NOW. That's an ORDER. You should have enough Dragon Fossils now, so buy it and MAKE SURE YOU SET IT IN SHOP! Chat with Emilia in town, and she will tell a sad tale. Her sweetie was onboard a merchant ship attacked by the ferocious Balal Quo Naga, who rules the Sea of Sand. She wants you to avenge her dearly departed boytoy, and with the Sandcraft she built! Since it's on the way, we'll go ahead and do it. Now, board your Sandcraft, and take it to the spot circled on the map.  Time to face off with the scourge of the seas; Balal Quo Naga! |
| Boss Name: | HP: | EXP: | Gella: | Halved: | Resistant: | Weakness: | Active: | Absorbed: |
| 100000 | 20000 | 24000 | NONE | NONE | NONE | NONE | NONE | |
| Boss' Attacks: Critical Heal (fully restores HP) Current Spark (instantly destroys the Sandcraft) | ||||||||
How To Win:
As soon as your Gunner gets their turn, Fire All Ammo. You win. Fail to kill it, and he will fully heal. Then you lose. I cannot make it any simpler than that. Luckily, Fire All Ammo should be doing more that 200000 damage. | ||||||||
| Balal is destroyed, more or less. Love has prevailed, and Virginia even gets a cool Suitcase from the wreckage! Don't open it; it's not yours! Instead, take the Suitcase to Emilia and Chat with her. Inside is the Goddess Idol! Now head to Fallen Sanctuary! |
Fallen Sanctuary
| This time, head for the monolith in the north-west corner of the outdoor room. Save your game, and then stand in front of the stone monolith and select the Goddess Idol.
|
| Boss Name: | HP: | EXP: | Gella: | Halved: | Resistant: | Weakness: | Active: | Absorbed: |
| 16000 | 8400 | NONE | NONE | NONE | NONE | NONE | NONE | |
| Boss' Attacks: Silver Fleuret (physical attack to one), Copy Ability (used on first turn to teach Raftina all of your team's attack Arcana), Weaken (forces all elemental weaknesses on your team), Sacred Blood (heals Raftina for 4001 HP), Various elemental attack Arcana on all characters | ||||||||
How To Win:Raftina sure knows how to kick ass! Attempting to fight Raftina without a well thought-out strategy can result in fatalities. However, follow my strategy below; it works like a charm! I don't mean it only gives you luck if you believe in it... I mean it works really well! Spend the first turn by Mysticing a Mini Carrot, casting Fragile, defending with Gallows and defending with Clive. On the second turn, have Virginia Mystic a Lucky Card to the team while Gallows casts Extension + Valiant and everyone else blocks. Before the third turn, go to the Mediums menu and disable all Elemental Ward Personal Skills (trust me on this one!), then switch the team order so that Gallows goes first. Have everyone shoot, except for Gallows, who should use Extension + Reflect. What this will do will allow Raftina to do enough damage to almost half-kill your team, but it will also cast Reflect so on the next turn, her Arcana will not be able to hit you! In the meantime, you will be shooting Raftina, doing a LOT of damage in the process. Turn 4 should be devoted entirely to shooting retaliation free. On the fifth turn, have everyone Gatling. This should do enough damage to win the fight. If not, just keep attacking for a few turns. | ||||||||
| Good job! Now, head back to Jolly Roger and rest up. Invoke your new Medium and set some of your new Personal Skills up, particularily SOS FP Boost! Raftina is a great summon; use her to heal your entire party! More FP equals more healing!
|
Jolly Roger - Ruins of Dreams
| Name: | HP: | EXP: | Gella: | Halved: | Resistant: | Weakness: | Active: | Absorbed: |
| Grabsk | 770 | 153 | 160 | ICE | WATER | THUNDER | NONE | NONE |
| Kobold | 1280 | 120 | 130 | THUNDER | NONE | WIND | EARTH | NONE |
| Strategy: Grabsks have an annoying habit of cancelling your turn, so zap them first with Inspire. | ||||||||
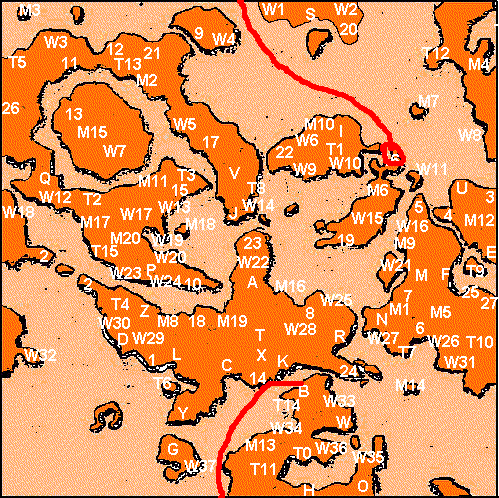
| Simply board your Sandcraft and follow the map below.
 You'll see a small island with a beach here. Land on the beach, and search co-ordinates X: 20141 Y: 16768 to find it. If it doesn't appear, use the Map Shred then try again! |
Ruins of Dreams
| Name: | HP: | EXP: | Gella: | Halved: | Resistant: | Weakness: | Active: | Absorbed: |
| Grabsk | 770 | 153 | 160 | ICE | WATER | THUNDER | NONE | NONE |
| Imitator | 350 | 180 | 100 | NONE | NONE | NONE | NONE | NONE |
| Myconid | 550 | 108 | 110 | WATER | EARTH | FIRE | NONE | THUNDER |
| Zaebos | 630 | 122 | 130 | NONE | NONE | WIND, ICE | NONE | NONE |
| Strategy: The enemies here can be dangerous if given half a chance. Grabsks have an irritating habit of cancelling turns, so cast Inspire to take them down, fast as lighting! Myconids are a definite hazard; being able to cause Confusion status to your entire party at once. Take them down quickly, and summon Moor Gault on groups of them. Zaebos have a powerful attack called Bloodsucker, so don't let them use it! Take them down with Vortex and Refrigerate Arcana. Last and certainly least is the Imitator, which is just a stronger (hardly!) version of the Mimic enemy, and guards the chest containing the Amulet. | ||||||||
|
Gella Card X 2 Revive Fruit 12000 Gella Lucky Card Duplicator Potion Berry Name Tag Amulet Mini Carrot Gimel Coin Grab Bag |
Though I will question the reasoning behind the name, I won't disagree that this dungeon is lots of fun. Let's begin! From the start, walk under the cage, and have Jet use the Radical Sneakers to jump up and hang on. Swing upwards to the top, and enter the west and east rooms for treasure: a Gella Card X 2, Revive Fruit, 12000 Gella, Lucky Card, and a Duplicator! Drop down and enter the next room, where a door is locked and a valve rests nearby. Let's see if you remember what to do! Got it? No? Turn the valve clockwise! Head through the room, and proceed down the stairs. Keep going, and you'll eventually spot a pathway blocked by laser beams. Attempting to walk through results in first degree burns to the pelvic area, so head east instead. In this room, climb the stairs to find a pile of crates. Take a crate, rotate the camera a bit, and you'll see a bluish triangular prism thing in the "pit" below. Take the crate down the stairs and stand at the far west end of the bottom of the stairs, then toss the crate straight. Direct hit! Now head into the newly opened door, and you'll see a group of machines here. Those are the laser mechanisms that power the barrier, so bomb the machines to turn off the lasers below. Bet they didn't see THAT coming! Head back downstairs and walk through the laser-free hall. In the next room, climb the staircase and hop up to the fence (pressing X will do), then flip on up and get the Potion Berry from the chest, then drop down, walk underneath the second cage and Radical Sneakers jump up. Swing up and Boomerang the switch, then drop down and enter the next room. Descend the stairs, and dash into the wall button to open the door. Watch the scene in the next room, and MAKE SURE you take the door to the east before continuing! Grab the treasures in there; a Name Tag, a Mini Carrot, and an Amulet! Hold onto that Amulet; you'll need it for the boss fight! Now head into the room down the stairs, and grab the chest containing a Gimel Coin in the corner. Walk over to the north side of the room, and drop down off the cage onto the floor below. See that button? You have to jump up to the cage, then drop down off the cage onto the button. In the next room, switch to Jet and give him the Boomerang, then walk across the narrow platform. The floor will begin to retract into the wall! Quickly rotate the camera so that you can see the southeast corner of the room, then toss your Boomerang at the switch there! Walk into the next room, and save your game. Now make sure your Fallen Ward Personal Skill is set to full, and equip any Amulets you have on other characters and activate the Status Guard Personal Skill. The next room provides an important plot point, and a very tricky boss.. |
| Boss Name: | HP: | EXP: | Gella: | Halved: | Resistant: | Weakness: | Active: | Absorbed: |
| 13800 | 10000 | 12000 | NONE | NONE | ALL | NONE | NONE | |
| Boss' Attacks: Head Butt (physical attack to one) The stench of death! (does nothing, but signifies that he will use Humbaba Curse next turn) Humbaba Curse (instantly kills entire party) | ||||||||
How To Win:Humbaba has weak physical attacks, but this isn't the problem. The problem is that every 3 turns, he will use Humbaba Curse, which kills your entire team. Fallen Ward will prevent this. But only one character has Fallen Ward, right? Well, there's one more thing that can help you; Status Guard. This Personal Skill allows you to completely block out status ailments as long as you are guarding, and if you've gotten all the treasure up to this point, you should have 3 Amulets, which contain this wonderous skill. Give one to each person on your team (except the guy with Fallen Ward), and activate the skills. Now, when Humbaba gives the cue that he's going to use the Curse attack, have everyone but the guy with Fallen Ward defend for the next turn, and you'll survive! On other turns, make sure you cast Fragile, Mystic a Lucky Card sometime, use a Gella Card, and attack with attackers and use Arcana with the rest. Humbaba is weak to every element. | ||||||||
| Before you head down the stairs after killing the boss, take the other door. There's a treasure chest there containing a Grab Bag, so don't miss it! The dungeon will end after descending the stairs and entering the other room. Board your Sandcraft and Autopilot back to Jolly Roger. |
|
|