
 |
|
|
The Two-Headed Serpent of a Dungeon
Upon completing Infinitum, we are entrusted with the Time Guardian's powers. Equip this magnificent new Medium on Jet, then board your Sandcraft and head back to Baskar Village, which is a short hover east of here.
Baskar Village
| It's time to move in and attack the Prophets on their own wretched turf. However, their base is surrounded by a natural fortress of impossibly tall mountains, and to make matters worse, it's on an island! But don't fret. There's a way there via a two headed serpent. This may not make much sense to you, but if you have been reading the books and talking to people during the game, you will have heard the tale of a 2 headed beast named Nidhogg. This beast existed in the olden days of Filgaia, and was quite a ferocious beast as they say, but the story has deeper meaning. Namely, there is a duo of underground routes that lead under the mountain range and into Prophet territory! Speak to everyone in town for a few clues, then leave town and head to Little Twister any way you can. |
Little Twister
| Go on over to the Saloon. You remember Claudia, don't you? Well, she's quite knowledgeable about Nidhogg Pass and how to point it out. Speak with Claudia, and she will tell you the location of the two "giants" who went out to slay Nidhogg. These "giants" are statues located on the World Map, and both of them appear to be "facing" something on the World Map. The point where their point of vision intersects is where Nidhogg Pass is! Our next goal is to find those statues. Now head back to Jolly Roger. |
Jolly Roger
|
Of course, we have to find the statues first. Here's a map of where they are.
 Now, before we head out, I'm going to make a helpful suggestion. Get your Dragon Fossil total up to 50, then buy the Ark Smasher in Jolly Roger. There are Sandcraft enemies coming up that don't take no guff, so you'll need to be willing and able to kill them quickly. The Ark Smasher will certainly help you. You should have a high Dragon Fossil total already, but if you need more, fight Gobs around the Midland Station area. They almost always drop a Dragon Fossil after a battle, and they're easy to take down, to boot! Get 50 Fossils, then purchase the Ark Smasher. Done? Okay then! Consult the map below for help with finding the statues.
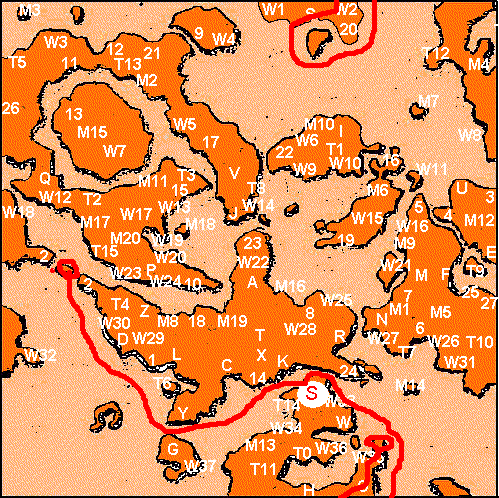 One of the statues is north of Boot Hill at co-ordinates X: 19733 Y: 3204. The other statue is on a small island BETWEEN the Sand Canals at co-ordinates X: 3473 Y: 11489. Upon discovering a statue, check it with X. Check them both, and the path to Nidhogg will become quite clear. Of course, we still have to find the dungeons. |
To Nidhogg Pass
|
To get to the Prophets' base, we must complete both of the Nidhogg Pass dungeons. You see, they both lead to each other in the end, and each one has a switch at the end. We must travel to the end of each Pass and flip the switch to open the door to the third Nidhogg Pass, which leads to the enemy's hideout. It's a little tricky to understand, but follow my walkthrough and the maps enclosed, and you'll do fine. 8)
Of course, heal up before you go. When you're ready, board your Sandcraft from Jolly Roger, and follow the path below. 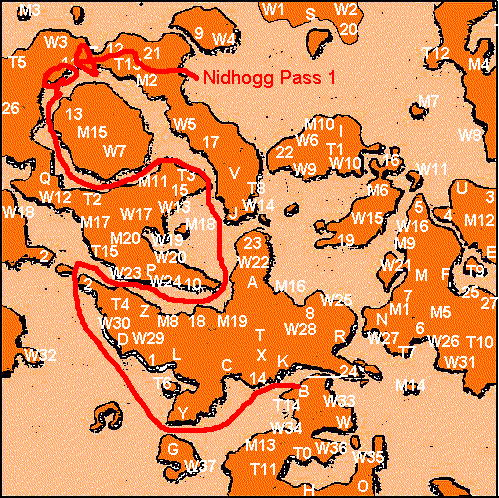 Once there, land your sandcraft on the beach and search the forested area. Nidhogg Pass should appear! Take a deep breath, save your game, and then enter! |
Nidhogg Pass Part 1
| Name: | HP: | EXP: | Gella: | Halved: | Resistant: | Weakness: | Active: | Absorbed: |
| Amduscias | 520 | 111 | 120 | ICE | NONE | FIRE | NONE | NONE |
| Helterskelter | 485 | 104 | 110 | EARTH, WATER, WIND, THUNDER, ICE | DARK | LIGHT | NONE | NONE |
| Mushussu | 580 | 52 | 26 | FIRE | NONE | ICE | NONE | NONE |
| Strategy: Danger, Will Robinson! Amduscias enemies must be taken down swiftly and with extreme prejudice! They have a mean attack called Lance Thrust that instantly kills the target if it connects! They don't use this TOO often though, but you'd be better safe than sorry, so take them down first and foremost with your strongest attacks and Arcana. Helterskelters are powerful warriors that use Geist Gust to attack, but you can stop them from using it by casting Eraser on them. Use Spectre to wipe them out. Mushussus are nothing special, though they may try to put your characters to sleep. Freeze them with Refrigerate. | ||||||||
| Go ahead... try and walk to the next room. I DARE you! Heh, just kidding around. Once you walk halfway through the first room, you'll be attacked by the Nidhogg. Don't worry; he's pretty easy. |
| Boss Name: | HP: | EXP: | Gella: | Halved: | Resistant: | Weakness: | Active: | Absorbed: |
| 8000 | 4000 | 4400 | NONE | NONE | LIGHT, DARK | NONE | NONE | |
| Boss' Attacks: Mow Down (physical attack to one) Luminous Moss (confusion to one target) Downhearted (causes Misery status to one target) | ||||||||
How To Win:Start the battle with a Mystic + Lucky Card, a Fragile, a Gella Card, but hold off on the Valiant. Why? Because Nidhogg has a very hard time actually getting your team to critical HP. Nidhogg is weak to Light, so cast Spectre to hit him where it hurts. You can also cast Grav, but it only works 50% of the time, but then again, Virginia has nothing better to do other than to cure status ailments. He takes a while to beat, but just keep attacking and casting the aforementioned Arcana, and clearing up statuses as soon as you can, and the battle will go over smoothly. | ||||||||
|
Migrant Seal Mini Carrot Adventure Book 4 Gella Card X 3 Potion Berry Revive Fruit | Now, head south through this room and the next to reach a room with an unstable looking rock bridge. Tiptoe across slowly, but when you reach the halfway point of the bridge, allow it to collapse. There's a Duplicator Door down here! Open it and go inside, then climb the stairs to find 3 boxes of goodies. Open them to add a Migrant Seal, a Mini Carrot and an Adventure Book 4 to your items. Exit this room through the top. See, doesn't it help to be a klutz sometimes? Now drop down and take the door facing west, where you'll find with the bridge, only you're on the other side. Grab the chests here for a Potion Berry and a Gella Card X 3 (use the Steady Doll), then leave the way you came and follow the southern path and enter the door. A simple block puzzle awaits us here. Switch to Clive, and grab the block on the ledge with the Mighty Gloves, then stack it beside the other one to build a bridge. Cross over, grab the Revive Fruit from the chest, and enter the door. Flip the switch in the next room, and you've completed the first Nidhogg Pass! Now leave the dungeon the way you came, then autopilot back to Jolly Roger. |
To Nidhogg Pass Part 2
Heal up in town, because you'll need your stamina for the next Pass. When you're ready, board your Sandcraft from Jolly Roger, and follow the path below.
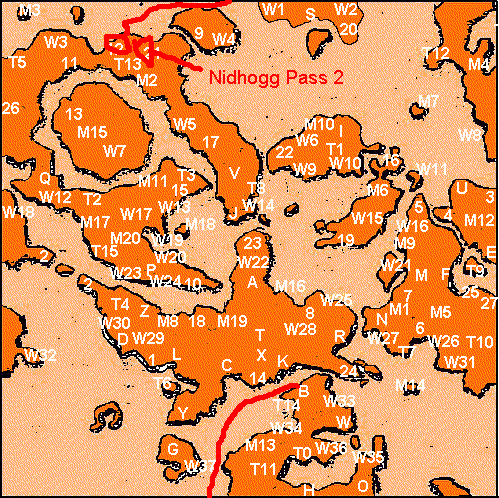 Once there, land your sandcraft on the beach and search the forested area. Nidhogg Pass should appear! Take a deep breath, save your game, and then enter! |
Nidhogg Pass Part 2
| Name: | HP: | EXP: | Gella: | Halved: | Resistant: | Weakness: | Active: | Absorbed: |
| Amduscias | 520 | 111 | 120 | ICE | NONE | FIRE | NONE | NONE |
| Helterskelter | 485 | 104 | 110 | EARTH, WATER, WIND, THUNDER, ICE | DARK | LIGHT | NONE | NONE |
| Mimic | 800 | 150 | 200 | NONE | NONE | NONE | NONE | NONE |
| Mushussu | 580 | 52 | 26 | FIRE | NONE | ICE | NONE | NONE |
| Strategy: Danger, Will Robinson! Amduscias enemies must be taken down swiftly and with extreme prejudice! They have a mean attack called Lance Thrust that instantly kills the target if it connects! They don't use this TOO often though, but you'd be better safe than sorry, so take them down first and foremost with your strongest attacks and Arcana. Helterskelters are powerful warriors that use Geist Gust to attack, but you can stop them from using it by casting Eraser on them. Use Spectre to wipe them out. Mushussus are nothing special, though they may try to put your characters to sleep. Freeze them with Refrigerate. | ||||||||
| This dungeon opens pretty much the same way as the first Nidhogg Pass. In fact, another Nidhogg awaits, so be prepared for another battle. |
| Boss Name: | HP: | EXP: | Gella: | Halved: | Resistant: | Weakness: | Active: | Absorbed: |
| 8000 | 4000 | 4400 | NONE | NONE | LIGHT, DARK | NONE | NONE | |
| Boss' Attacks: Mow Down (physical attack to one), Luminous Moss (confusion to one target), Downhearted (causes Misery status to one target) | ||||||||
How To Win:Nidhogg's physical attacks are weak. However, he is capable of messing with your party by causing Confusion and Misery status. Cure Confusion right away, and cure Misery if your magic users are affected by it. Start the battle with a Mystic + Lucky Card, a Fragile, a Gella Card, but hold off on the Valiant. Why? Because Nidhogg has a very hard time actually getting your team to critical HP. Nidhogg is weak to Light, so cast Spectre to hit him where it hurts. You can also cast Grav, but it only works 50% of the time, but then again, Virginia has nothing better to do other than to cure status ailments. He takes a while to beat, but just keep attacking and casting the aforementioned Arcana, and clearing up statuses as soon as you can, and the battle will go over smoothly. | ||||||||
|
Lucky Card X 3 Grab Bag Tiny Flower Name Tag X 2 | Here's where the differences come in. Walk through the first room, and in the next room, you'll spot a large pond. The door is barricaded in this room! Where's the switch to open it? Well, the switch is hidden pretty well; rotate the camera around and you'll spot it hiding down near the pond. Perhaps it's sunbathing? Stand on the edge of the cliff, making sure you're directly in line with the barrel over on the side. Now, face the water, hold UP, and toss the Boomerang as you hold it. This will cause the Boomerang to do a 180 and fly into the wall, bouncing off it and hitting the switch. Enter the door, and pass through the room. The next room features a lot of crazy terrain, but make sure you don't miss the chest with 3 Lucky Cards over to the south of the door! Drop down the ledges heading south and enter the door. In the next room, don't miss the Duplicator Door to the south. Inside you'll find chests containing a Grab Bag, a Tiny Flower (Mimic guarded), and a Name Tag X 2. Leave the room, and head back to the previous one. Here's an easy puzzle; light the various braziers with the Tindercrest, but each one is on a different level. Stand on ground level to light the lowest, stand halfway up the stairs to light the second, and stand about 3/4 up the stairs to light the third. That will open the door. Inside, flip the switch to complete Nidhogg Pass 2, and watch as Nidhogg Pass 3 opens up! Go on in! |
Nidhogg Pass Part 3
|
Duplicator Galecrest (TOOL) 8500 Gella Amulet Potion Berry Gimel Coin Full Carrot |
The enemies in this final stretch of Nidhogg Pass are the same as the ones before, so I won't repeat the info again. From the start, you'll notice a few raised platforms with one-space gaps in between them. Believe it or not, we'll be crossing over those, but first we need the appropriate tool! Head south and enter the door, and open the chests for a Duplicator and the Galecrest Tool! This wondrous Tool is used to breeze you over small gaps (no larger than one space), but keep in mind that once you use it, you won't stop going till you hit something! Try it out; exit the room, face directly east, and use the Tool! You'll teleport over the pit and over to the other side, where the exit to the room is! Now head through the next room, even using the Galecrest to zoom through if you want (though I like to fight the battles.) The room afterwards has a somewhat tricky puzzle to solve. See, there's a giant block in the room that we can use to create a Galecrest suitable area, but we need another one. There's one we can use, but there's a switch we need to hit to get it. First, head south through the room, ignoring the button (this will be a problem later), then grab the chest for 8500 Gella, then head to the southwest corner of the room and flip the switch. This moves the block into place. Now, head back to the start of the room, but MAKE SURE YOU GALECREST OVER THE FLOOR BUTTON! This button moves the block back to where it started, and you don't want that! Climb back up the stairs and Galecrest your way across to the other side of the room. In the next room, we'll have to use our Galecrest and our Mighty Gloves. Begin by tossing the crates out of the way, then step on the floor button. Now, use the Mighty Gloves to build a 2-block bridge over to the central platform, then Galecrest over to the door. The next room features 3 shoddy bridges, so Galecrest across the bridges to hit the floor tile, grab the chests containing the Potion Berry and Amulet, and finally exit the room. Galecrest across the pit in the next room, and keep going. Now HERE's a tricky puzzle. In the center of the room, you'll find an ice block, a pushable block, and a Mighty Glove block. What you must do is set them up in a way so that you can reach the door on the other side of the room. First, push the Ice Block south, then west. Push it south again, then finally give it a good shove west to get it right where we want it; the corner of the room. Next, grab the Mighty Glove block and place it a space away (not beside) the ice block. Finally, push the last block a space away (not beside) the ice block. It should look something like this:  Now, Galecrest across the first two blocks, then Galecrest across the last one, hitting the candle. Walk slowly around it and in the door. Pretty clever! The next room is fairly simple. Start by Galecresting over the pit to the west, then enter the door and open the chests (use a Duplicator for one) to obtain a Gimel Coin and a Full Carrot. Save your game now, then head back a room and drop down. We need to make a Galecrest suitable bridge over to the other side, so begin by tossing the wooden crates out of the way. Next, head up the stairs and Galecrest into the block on the raised platform. Drop the block down with the Mighty Gloves, then drop down yourself and stack one block against the platform at the start of the room, and the other a space away (not beside) that block. Now, head back upstairs to the start of the room, drop down onto the first block, and Galecrest across! A boss fight awaits in the next room, so it's a good thing you saved. |
| Boss Name: | HP: | EXP: | Gella: | Halved: | Resistant: | Weakness: | Active: | Absorbed: |
| 5000 | 4300 | 4500 | NONE | NONE | NONE | NONE | NONE | |
| Boss' Attacks: Watching Your Move (does nothing, performed every turn) Rule of Vengeance (each time you hit Leehalt, the amount of damage the hit did is also done to whoever hit him) | ||||||||
How To Win:
The strategy for defeating Leehalt is simple; make sure you never hit him for more than your current HP! Start the battle with a Mystic + Lucky Card and Gella Card, but don't cast Valiant! Sure, you'll do a lot of damage with it when your HP runs low, but so will he! Now, you have 2 choices. Either defeat him slowly but surely by doing a bit of damage at a time (having everyone attack each round, then using a Mystic Potion Berry when your life runs low), or you can take a chance by counting how much damage you do to him, and attempting to "finish him off" with a strong Valiant attack. The first way is slower, but much safer, and will keep you in good condition for the fight after this, so I suggest that. Note that if you use Gatling, Leehalt will only return the damage of the first hit. | ||||||||
| After a dramatic scene, the lone Prophet escapes, leaving you to deal with an extra from the movie Mars Attacks! |
| Boss Name: | HP: | EXP: | Gella: | Halved: | Resistant: | Weakness: | Active: | Absorbed: |
| 3200 | 2270 | 2400 | NONE | NONE | NONE | NONE | NONE | |
| Boss' Attacks: Outer World (halves entire team's HP and makes Balazs invincible until end of turn) Agony Effect (non-elemental damage to target) | ||||||||
How To Win:If you've been following the story, you're probably wondering: "How the hell does this thing keep a low profile?". Yet, as stupid looking as it may be, Balazs is a very tricky fight. His Outer World ability is incredibly strong, as it halves your entire team's HP and makes him invincible until the turn ends. The worst part is that he's faster than everyone but Virginia! And if your team's HP get to around 250, he'll start to pick your party members off with Agony Effect. However, he doesn't have much HP, so try out this strategy. Begin by Mysticing a Lucky Card, using a Gella Card, casting Valiant on Virgina and guarding with Clive. You'll be nailed by Outer World, but don't fret! Now all you have to do is defend with all your team members EXCEPT Virginia, who should shoot every turn. When Virginia's HP hits about 350, use a Heal Berry on her, and have the other team members heal each other should they hit about 250 or so. Meanwhile, attacking with low HP with Valiant cast will make short work of this troublesome foe. | ||||||||
| Another scene plays, and this one is quite sad. After a few more scenes (including one that hints that something big is going to happen), our team finds themselves in a small location called Greenlodge. This is a safe haven outside of the Prophet's dungeon, and you can heal fully anytime by using the First Aid Kit. By the way... for the entire next dungeon, Virginia is cursed by a permanent status effect that stops her from using or acquiring VIT points, so her HP will not fill up after battle. You'll have to take very good care of her. |
|
|