
 |
|
|
Walkthrough
From your starting point at Ashley's cell head north. Examine the console and "kill" the door. It will open and you'll be able to enter a room with lockers and a machine gun. Blast the machine gun with your fire rod and examine the lockers to pick up a Cute Ribbon and a Heal Berry. Equip the ribbon and exit the room. Head down the stairs. Cross the bridges while slagging machine guns along the way. Once you've crossed the bridge go to the next area and head west and go up the ramp...past the door atop the hill and down to the other side. Enter the door at the bottom of the hill then cross the bridges in this room while slagging machine guns long the way. Go up the stairs and head south. Kill the door. Head through the opened door. Destroy the machine guns and then "kill" the next door. Examine the lockers. You'll pick up Ashley and Brad's stuff. As well as a Jail Card Return to Ashley. Have him heal you then open his cell using the Jail Card. Return to the hill and enter the door on the top. Head North up the stairs then out the room. In this room you'll see a guard on the floor below. Line yourself up with him and toss a knife at the wall. If you're properly aligned the knife will bounce off the wall and "knock him out". So you can now make it past the area he was guarding. Head North. Gun are hidden behind the pillars so change the camera angle so you can see them. Then toss a knife or shoot a fire ball at them. Continue north. Head up the hill and past the rusted door at the top and down the other side. Destroy the guns along the bridge...then up the stairs and into a new level of cells. Brad is in one of them. Open his cell door and he'll join your team. Have Brad kick the console to open the closed door. In the room is a Mini Carrot and a heal berry. Now return to the hill with the rusted door on the top of it and have Brad kick the door down. Enter the door and make your way to the room with the warden in front of the door and a door to the west. In the western door is a heal berry. Now return to the room with the Warden in it and talk to the warden. He will summon the fourth boss. As usual...strategies in the boss section. Once you defeat the boss you'll be finished here. Thats the end of this section of the game
You'll be informed of your next mission pretty quickly. You are to go to Under Traffic and investigate it a recent cave in. The cave is directly south of the Chateau on the face of the squarish cliffs. Just search and you should find it pretty quickly. Anyway...enter "Under Traffic" and head west. Kick the Box with Brad and then fry it as Lilka. Head the through the newly blown open entrance. In the next room do the same thing. Then head through the blown open door and into the first actual puzzle in the cave. Ignore the first crate. Blow up the other two then return to the first crate and kick it east twice. Then 9 times south, as far as it can go east then one more south kick. It should now be in front of the bolder. Blow it up and you'll have destroyed the rock and you can continue. Then head south through the door. Just keep heading south until you are in a room filled with water. Stand on the rafts and have Brad kick the wall or the pillar of rock to make it move. On the middle platform are two rafts. Get on the eastern one and have Brad kick to reach Ashley's MULTIBLAST bayonet cartridge. Return to the middle platform and get on the other raft to reach the exit of the room. Blow the crate and follow the path of gems. Continue heading south. Kick the box off the cliff then kick it seven times north and blow it up to reveal a room with a CREST and a Moon stone in it. Kick the now regenerated crate off the cliff and once south. Then blow it to destroy the rock. Kick the second box off the cliff. Three times south and then blow it up. Grab the MAPSCOPE and then leave and re-enter the room. Kick the crates off the cliff so they form a bridge. Cross and head south. Save at the save block and you're now near the exit to Under Traffic. Continue heading in the same direction until you encounter a man unconscious on the ground. Examine him and you'll end up having to take him to Damzen. To the south-east near a couple squarish mountainy things. Search and you'll find Damzen relatively quickly. Take the guy to the clinic. It has a big red cross on it and says CLINIC on it. If you miss it...then you are really not paying any attention to your surroundings and will FAIL on an upcoming section of a dungeon which is even a bitch for me to complete and I've beaten this game 8 times! Anyway...talk to the doctor to get rid of your excess baggage. Once you've dropped the guy off you will (I'm not asking I'm telling)enter a house near the Clinic. Talk to the people inside and they will tell you about the "Telepath Tower"! It's been sabotaged and Irving tells you to go and check it out. Then Telepath tower is south east of Damzen. It's not hard to find. Just search around near the cliff face to the south east. And now...you enter the tower...
May it be said right now that I HATE this area. I want to burn it in the fires of Hades. This dungeon is blatantly easy except for one area which is NOT easy. It's one of the hardest
puzzles in the whole stinking game. There are three switch blocks in this room. Just pick up the crates and stand one square away from the ones on the ledge and toss the crate at the switch.
That should activate those two switches. Take three steps from the switch in the pit and then turn and throw and that should activate the switch in the pit. With this done just go through the
newly opened door and head on to the next area. Make your way along the path until you reach a door to the next area. Continue through this room. Go around the large platform in the center of
the room and continue through the door. Head up the path until you reach the door to the next area. Once you go through the door you'll find that you are on a bridge above the platform in the
room you were just in. Drop down onto the platform and throw the switch. Drop down and make your way back up to the bridge. Cross the newly formed bridge and into the next area. You're now in
a room with a save point. If you wish you can save your game before heading any further. Anyway...there is a metal door and a doorway next to it. You'll probably recognize these pathways by now.
But instead of going up..go down. Pull the switch then return to the room with the save block. Enter the metal door. You'll discover it's an elevator. Choose the third floor to get the "BOOTY CALL"
tool for Ashley. Go back into the elevator and choose the fifth floor. Once you get off go to the door that would have led to this area had there not been a large gash in the floor on the pathway up
to this level. You'll find three treasures. Grab 'em and go. Go back to the fifth floor and enter the room to the right of the elevator. You are now in the room I hate sooooo much. So much so that
I want to make Wild Arms 2 burn in HADES! Anyway...you're in a room of switches and barriers that looks something like this:
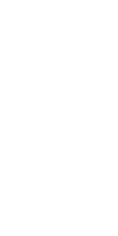
I know what you're thinking...thats pathetic. Well whatever. I'm really really bad with tables and html I'm not an html wizard. If you can do better good for you. Go ahead and submit the html code
that you say will work. And I'll throw it our the window. Anyway the X is Brad's PINEAPPLE ARM. Ok here are the instructions to get through this hellish room and get Brad's next ARM. Ok to start off
pull Switch 1, 2, 5, 3, 2, 4, 8, 7, 3, 2, 1, 4, 8. Thats to get out of the area. To get Brad's ARM follow my previous instructions then exit and re-enter the room and follow these steps: Pull switches:
9, 7, 6, 4, 2. Then you should be able to reach the ARM. Kick the chest then leave the room and head up the stairs. Keep on heading up the stairs until you reach the top floor. You'll go through a scene
and then you'll face a boss. Defeat the Boss and you're finished the Telepath Tower dungeon.
|
|