
 |
|
|
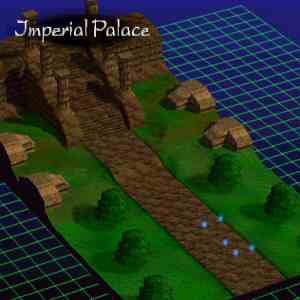
Mission 41: Battle for Tomorrow
It's time to take down Faulkner.. now or never!
Annihilate all enemies. |
|
 |
Cecilia (Vedocorban ATAC) | HP: 158 | Level: 26 | Money: 4400 | |||||
| BAS: 19 | POW: 16 | DEX: 23 | AGL: 32 | DEF: 15 | WEP: 19 | Spirit: 93 | Range: 7 | Speed: 10.94 | |
| Equipment: Widowmaker, Jade, Dex. Ring | Attacks: Slash, Thrust, Str. Slash, Str. Thrust, Tornado, Turbulence, Wind Strike, Somersault | Dormant Abilities: Assassinate, Front Menace, Stealth Motion, Rapid Motion | |||||||
 |
Imperial 1 (Sharking ATAC) | HP: 226 | Level: 22 | Money: 18000 | |||||
| BAS: 13 | POW: 19 | DEX: 17 | AGL: 19 | DEF: 19 | WEP: 26 | Spirit: 81 | Range: 5 | Speed: 7.58 | |
| Equipment: Ginsunami, Dark Eye, Knight Coat-of-Arms | Attacks: Slash, Str. Slash, Cutting Wheel | Dormant Abilities: Mass Menace | |||||||
|
Imperial 2 (Sharking ATAC) | HP: 226 | Level: 22 | Money: 18000 | |||||
| BAS: 13 | POW: 19 | DEX: 17 | AGL: 19 | DEF: 19 | WEP: 26 | Spirit: 81 | Range: 5 | Speed: 7.58 | |
| Equipment: Ginsunami, Dark Eye, Knight Coat-of-Arms | Attacks: Slash, Str. Slash, Cutting Wheel | Dormant Abilities: Mass Menace | |||||||
 |
Duyere (Sarbelas ATAC) | HP: 212 | Level: 25 | Money: 12000 | |||||
| BAS: 23 | POW: 19 | DEX: 21 | AGL: 23 | DEF: 13 | WEP: 20 | Spirit: 90 | Range: 6 | Speed: 8.94 | |
| Equipment: Mystaria, Sardonis, Power Tiara (girly man is STILL wearing one!) | Attacks: Slash, Thrust, Quicksand, Earthquake, Gaia Blade | Dormant Abilities: Assassinate, Mental Vision, Hoverjets, Second Attack, Stealth Motion, Forest Motion | |||||||
 |
Zakov (Sharking ATAC) | HP: 252 | Level: 25 | Money: 18000 | |||||
| BAS: 18 | POW: 24 | DEX: 14 | AGL: 17 | DEF: 25 | WEP: 29 | Spirit: 90 | Range: 5 | Speed: 7.30 | |
| Equipment: Ginsunami, Evil Eye, Rainbow Gem | Attacks: Slash, Str. Slash, Cutting Wheel | Dormant Abilities: Reflect Attack, Assassinate, Hoverjets | |||||||
 |
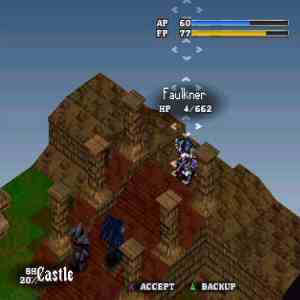
Faulkner (Zulwarn ATAC) | HP: 662 | Level: 30 | Money: 20000 | |||||
| BAS: 28! | POW: 29! | DEX: 31! | AGL: 29! | DEF: 27! | WEP: 29! | Spirit: 105 | Range: 5 | Speed: 10.58 | |
| Equipment: Soulstab, Black Diamond, Devil's Horn | Attacks: Slash, Tackle, Long Thrust, Str. Slash, Str. Thrust, Shadow Binding, Dark Thunder, Shadow Blade, Heaven's Gate | Dormant Abilities: Parry, Second Attack, Mass Menace | |||||||
| Important Battlefield Events: |
| - Bastion begins this mission with only 2/3 of his maximum HP. |
| Faulkner is ungodly powerful in this mission.. take a glance at his stats. And he's backed by some of the strongest combatants in the game.. well, not really. This mission is much easier than the Kingdom ending mission, and pales in comparison to the mission you just completed. Anyway, the key to winning is to be aggressive... REALLY aggressive. That, and enter the battle prepared. Surrounding Faulkner and chipping away at his life a bit at a time is the way to win, or you can step at him, use Turbulence, then step back. But before we can do that, we have to take care of Faulkner's cronies. Cecilia will begin the battle by striking Bastion down to 2/3 of his Max HP. Ouch. Retaliate by attacking her with everything you have, so that you can take her down quickly. She's awfully hard to hit, but sooner or later you'll get lucky and connect with a good hit. Her DEF isn't high, so it won't take too many hits to do. Try and get rid of her before Imperials 1 and 2 move in. After defeating Cecilia, take down Imperials 1 and 2 one at a time by dizzying and attacking from behind. You may be short on manpower, but you should be more than a match for even Sharkings at this point. Take them down as soon as you can, preferably before Duyere gets a Gaia Blade in. If Duyere does move in too close, consider taking him down first. Be prepared for Zakov as well, who will also be moving in. Hopefully, you have kept your team bunched up fairly well, as the enemy AI generally chooses not to use Cutting Wheel when your team is together. Take down one enemy at a time to utilize the strength in numbers ideal, and don't let any of your team members fall. When Zakov, Duyere, Cecilia and the Imperials fall, it's time to switch gears. Perform an in-mission save now.
Now, take a deep breath. We're going in. Move your entire team forward a bit, making sure not to touch the second staircase on the series of staircases leading to Faulkner. Make sure everyone is 5 spaces away from Faulkner, and bunch your team members up in the 2X3 (with one empty space) formation. Bastion goes in the center, with Turbulence users in the front. Understood? Now, since Faulkner does not move from his perch, and there are no more enemies coming, prepare for tough times. Take as many turns as you need to FULLY restore everyone's FP and HP... you'll need it. When that is done, begin casting support spells on your team if you wish for that extra advantage. Wait for Faulkner to take his turn, and when Sadira gets her turn... ATTACK! Start with Turbulence to get his FP up (Faulkner recovers FP phenominally fast, and his attacks have no FP cost). Faulkner will not attack if his FP is above 60, regardless of cost, so the key is to not let him attack. If he DOES attack, you might have to say goodbye to someone. Faulkner usually counters with Heaven's Gate, which is just too powerful to take; it's very highly damaging, almost never misses, has a range of 2, has Knockdown, and he uses it TWICE per turn. Always block Heaven's Gate. What you have to do is make sure Faulkner never gets to attack by hitting him with as many Knockdown attribute attacks as you can as constantly as you can. Eventually, you WILL get him dizzied, and that's your chance to use Soaring Dance to whittle down his HP by larger amounts. When he regains his senses, begin the FP boosting again. Do NOT let one of your team members go dizzy at any cost, ESPECIALLY Bastion. Alternately, you can try this boring and tedious, but effective strategy. Step one of your Turbulence characters 5 spaces away from Faulkner and wait. When they get a turn, have them move 1 space, use Turbulence to do a bit of damage, then move back on the same turn. You will very SLOWLY kill Faulkner, but you will also never take a hit. |
Now that the mission is complete..
- Empire Branch: Sadira Ending complete!
- Music unlocked in the Options Menu!
Did you have fun? I sure did! If you haven't completed the Kingdom Branch yet, you should now. Well, get the other girl's ending out of the way first, and then head for the Kingdom Branch. 8)
And congratulations. You have completed the Empire Branch of Vanguard Bandits, the hard-to-reach, but not as tough to beat branch. If you've played both the Kingdom and Empire branches, I suggest you try for the Ruin Branch now, because you probably have a very good understanding of how to win at Vanguard Bandits, and the Ruin Branch is the hardest route through the game, as well as the funniest to see. Go ahead and give it a shot; you won't be dissappointed.
|
|