
 |
|
|
Mission 4: Araba Reclaimed
Araba Castle was once territory of the Kingdom, but the Empire recently took over, and they are holding Galvas hostage. Reyna and Ione will sneak in and break him out of prison while we engage the Imperial troops in a false attempt to retake the castle. Zeira and his men will take the big guys, while Bastion, Devlin and Barlow tackle the Imperials on the bridge. When Galvas is freed, we flee, UNLESS an opportunity arises. If you wish to take revenge, Bastion, wait until Galvas is safe and sound. Though Faulkner and the Imperials who slayed your father may be here, it would be best to wait and fight another day! But if you insist...
Rage around showily. Later, becomes Occupy Araba Castle. Basically, that means cause a scene with the Imperials on the bridge. |
|
 |
Bodyguard 1 (Einlager ATAC) | HP: 87 | Level: 6 | Money: 5000 | |||||
| BAS: 10 | POW: 9 | DEX: 5 | AGL: 5 | DEF: 5 | WEP: 8 | Spirit: 33 | Range: 5 | Speed: 4.10 | |
| Equipment: Gradius, Garnet | Attacks: Slash, Thrust | Dormant Abilities: NONE | |||||||
|
Bodyguard 2 (Einlager ATAC) | HP: 85 | Level: 5 | Money: 5000 | |||||
| BAS: 10 | POW: 9 | DEX: 4 | AGL: 4 | DEF: 5 | WEP: 7 | Spirit: 30 | Range: 5 | Speed: 3.86 | |
| Equipment: Gladius, Garnet | Attacks: Slash, Thrust | Dormant Abilities: NONE | |||||||
|
Bodyguard 3 (Einlager ATAC) | HP: 81 | Level: 5 | Money: 5000 | |||||
| BAS: 9 | POW: 8 | DEX: 6 | AGL: 6 | DEF: 3 | WEP: 7 | Spirit: 30 | Range: 5 | Speed: 4.30 | |
| Equipment: Gladius, Garnet | Attacks: Slash, Thrust, Str. Slash | Dormant Abilities: NONE | |||||||
|
Bodyguard 4 (Einlager ATAC) | HP: 79 | Level: 4 | Money: 5000 | |||||
| BAS: 9 | POW: 8 | DEX: 4 | AGL: 4 | DEF: 4 | WEP: 7 | Spirit: 27 | Range: 5 | Speed: 3.82 | |
| Equipment: Gladius, Garnet | Attacks: Slash, Thrust | Dormant Abilities: NONE | |||||||
 |
Duyere (Sarbelas ATAC) | HP: 118 | Level: 4 | Money: 12000 | |||||
| BAS: 10 | POW: 6 | DEX: 9 | AGL: 7 | DEF: 4 | WEP: 16 | Spirit: 27 | Range: 6 | Speed: 4.58 | |
| Equipment: Mystaria, Sardonis | Attacks: Slash | Dormant Abilities: Forest Motion | |||||||
 |
Faulkner (Solarus ATAC) | HP: 126 | Level: 12 | Money: 8000 | |||||
| BAS: 13 | POW: 14 | DEX: 9 | AGL: 8 | DEF: 12 | WEP: 14 | Spirit: 51 | Range: 5 | Speed: 4.94 | |
| Equipment: Darkblade, Ruby | Attacks: Slash, Thrust, Tackle, Str. Slash, Kick, Fireball, Melting Flare | Dormant Abilities: Parry, Mass Menace | |||||||
 |
Imperial 1 (Barbatos ATAC) | HP: 58 | Level: 4 | Money: 3500 | |||||
| BAS: 5 | POW: 5 | DEX: 6 | AGL: 4 | DEF: 3 | WEP: 8 | Spirit: 27 | Range: 4 | Speed: 3.66 | |
| Equipment: Gladius, Onyx | Attacks: Slash, Thrust | Dormant Abilities: NONE | |||||||
|
Imperial 2 (Barbatos ATAC) | HP: 62 | Level: 4 | Money: 3500 | |||||
| BAS: 6 | POW: 4 | DEX: 5 | AGL: 4 | DEF: 4 | WEP: 8 | Spirit: 27 | Range: 4 | Speed: 3.70 | |
| Equipment: Gladius, Turqouise | Attacks: Slash, Thrust | Dormant Abilities: NONE | |||||||
|
Imperial 3 (Barbatos ATAC) | HP: 54 | Level: 4 | Money: 3500 | |||||
| BAS: 4 | POW: 5 | DEX: 5 | AGL: 5 | DEF: 4 | WEP: 8 | Spirit: 27 | Range: 4 | Speed: 3.86 | |
| Equipment: Gladius, Onyx | Attacks: Slash | Dormant Abilities: NONE | |||||||
|
Imperial 4 (Barbatos ATAC) | HP: 58 | Level: 4 | Money: 3500 | |||||
| BAS: 5 | POW: 4 | DEX: 5 | AGL: 5 | DEF: 4 | WEP: 8 | Spirit: 27 | Range: 4 | Speed: 3.90 | |
| Equipment: Gladius, Turquoise | Attacks: Slash, Thrust | Dormant Abilities: NONE | |||||||
|
Imperial 5 (Barbatos ATAC) | HP: 58 | Level: 4 | Money: 3500 | |||||
| BAS: 5 | POW: 5 | DEX: 5 | AGL: 4 | DEF: 3 | WEP: 9 | Spirit: 27 | Range: 4 | Speed: 3.66 | |
| Equipment: Gladius, Onyx | Attacks: Slash, Thrust | Dormant Abilities: NONE | |||||||
|
Imperial 6 (Barbatos ATAC) | HP: 58 | Level: 4 | Money: 3500 | |||||
| BAS: 5 | POW: 6 | DEX: 5 | AGL: 4 | DEF: 3 | WEP: 8 | Spirit: 27 | Range: 4 | Speed: 3.66 | |
| Equipment: Gladius, Turquoise | Attacks: Slash, Thrust | Dormant Abilities: NONE | |||||||
|
Imperial 7 (Barbatos ATAC) | HP: 62 | Level: 4 | Money: 3500 | |||||
| BAS: 6 | POW: 4 | DEX: 5 | AGL: 4 | DEF: 4 | WEP: 8 | Spirit: 27 | Range: 4 | Speed: 3.70 | |
| Equipment: Gladius, Onyx | Attacks: Slash, Thrust | Dormant Abilities: NONE | |||||||
|
Imperial 8 (Barbatos ATAC) | HP: 62 | Level: 4 | Money: 3500 | |||||
| BAS: 6 | POW: 5 | DEX: 5 | AGL: 4 | DEF: 3 | WEP: 8 | Spirit: 27 | Range: 4 | Speed: 3.70 | |
| Equipment: Gladius, Turquoise | Attacks: Slash, Thrust | Dormant Abilities: NONE | |||||||
 |
Zakov (Einlager ATAC) | HP: 97 | Level: 9 | Money: 5000 | |||||
| BAS: 11 | POW: 11 | DEX: 8 | AGL: 6 | DEF: 7 | WEP: 12 | Spirit: 42 | Range: 5 | Speed: 4.38 | |
| Equipment: Preshuze, Sapphire | Attacks: Slash, Thrust, Tackle, Str. Slash, Kick, Ice Shards | Dormant Abilities: NONE | |||||||
 |
Avalon 1 (Glaive ATAC) | HP: 70 | Level: 6 | ||||||
| BAS: 7 | POW: 7 | DEX: 5 | AGL: 6 | DEF: 5 | WEP: 9 | Spirit: 33 | Range: 4 | Speed: 4.22 | |
| Equipment: Gladius, Emerald | Attacks: Slash, Thrust | Dormant Abilities: NONE | |||||||
|
Avalon 2 (Glaive ATAC) | HP: 66 | Level: 6 | ||||||
| BAS: 6 | POW: 6 | DEX: 5 | AGL: 6 | DEF: 7 | WEP: 9 | Spirit: 33 | Range: 4 | Speed: 4.18 | |
| Equipment: Gladius, Emerald | Attacks: Slash, Thrust | Dormant Abilities: NONE | |||||||
 |
Kingdom 1 (Haizuron ATAC) | HP: 73 | Level: 5 | ||||||
| BAS: 7 | POW: 8 | DEX: 5 | AGL: 5 | DEF: 5 | WEP: 8 | Spirit: 30 | Range: 5 | Speed: 3.98 | |
| Equipment: Gladius, Jasper | Attacks: Slash, Thrust | Dormant Abilities: NONE | |||||||
|
Kingdom 2 (Haizuron ATAC) | HP: 81 | Level: 5 | ||||||
| BAS: 9 | POW: 8 | DEX: 4 | AGL: 4 | DEF: 5 | WEP: 8 | Spirit: 30 | Range: 5 | Speed: 3.82 | |
| Equipment: Gladius, Jasper | Attacks: Slash, Thrust | Dormant Abilities: NONE | |||||||
 |
Ganlon (Waiban ATAC) | HP: 112 | Level: 9 | ||||||
| BAS: 11 | POW: 9 | DEX: 7 | AGL: 11 | DEF: 6 | WEP: 15 | Spirit: 42 | Range: 6 | Speed: 5.58 | |
| Equipment: Dragontail, Ruby | Attacks: Thrust, Long Thrust, Str. Thrust | Dormant Abilities: NONE | |||||||
 |
Zeira (Toreadore ATAC) | HP: 144 | Level: 9 | ||||||
| BAS: 14 | POW: 11 | DEX: 8 | AGL: 8 | DEF: 10 | WEP: 17 | Spirit: 42 | Range: 7 | Speed: 4.98 | |
| Equipment: Gunganir, Royal Jade | Attacks: Slash, Thrust, Tackle, Str. Thrust | Dormant Abilities: NONE | |||||||
 |
Sadira (Sylpheed ATAC) | HP: 114 | Level: 4 | Money: ???? | |||||
| BAS: 9 | POW: 4 | DEX: 5 | AGL: 13 | DEF: 4 | WEP: 16 | Spirit: 27 | Range: 7 | Speed: 5.98 | |
| Equipment: Steelburn, Star Diamond | Attacks: Slash, Thrust | Dormant Abilities: NONE | |||||||
 |
Franco (Korbelan ATAC) | HP: 85 | Level: 7 | Money: ???? | |||||
| BAS: 9 | POW: 8 | DEX: 6 | AGL: 7 | DEF: 4 | WEP: 8 | Spirit: 36 | Range: 6 | Speed: 4.54 | |
| Equipment: Gladius, Emerald | Attacks: Slash, Thrust, Str. Slash | Dormant Abilities: NONE | |||||||
 |
Halak (Korbelan ATAC) | HP: 87 | Level: 8 | Money: ???? | |||||
| BAS: 9 | POW: 9 | DEX: 7 | AGL: 7 | DEF: 5 | WEP: 8 | Spirit: 39 | Range: 6 | Speed: 4.54 | |
| Equipment: Gladius, Emerald | Attacks: Slash, Thrust, Str. Slash | Dormant Abilities: Bad Back, Mass Menace | |||||||
| Important Battlefield Events: |
| - At the beginning of the mission, Devlin talks with Bastion and a choice comes up. Choose the first choice does nothing, but choosing the second increases Devlin's anger emotion, which makes him more powerful. - 36 turns after Duyere makes his first move, Zakov analyzes the situation and appears outside the castle entrance with Imperials 5-8. Ione and Reyna also join the battlefield under your control, and the objective changes to Occuby Araba Castle. - Eight turns after the previous event, Sadira, Franco and Halak appear in the eastern corner to observe the battle. They are neutral, so they will not attack you. Feel free to attack them and get EXP though! |
| This is an odd mission. What begins as a diversionary tactic becomes a rush to reclaim the castle. The Imperials you will deal with are small fry, but the Bodyguards and the big named soldiers fighting the real battle to the east are big and mean. They will always end up defeating the Kingdom troops, and even Zeira and Ganlon. Once they're done with the Kingdoms and Avalons, they turn to attack you. Though they will be weakened at this point, the combined threat of them AND Zakov's men from the castle is a serious threat.
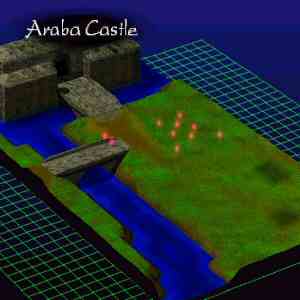
However, you don't need to really fight all that much. Simply eliminate the Imperials on the bridge and await the event. Once the event occurs, lure the Imperials and Zakov away from Bastion, and have Bastion make a beeline for the castle door. Only Bastion can reclaim the castle, and he must be standing on the space right in front of it to complete the mission. The screenshot here highlights the exact position; simply move onto that space with Bastion and end your turn. If you'd like to try and win the battle though, you can (I recommend it). Keep in mind that the Kingdom forces will usually go after the Bodyguards, so expect them to be dead or weakened, with the big bad guys still in good condition. It's tricky enough to defeat Zakov, but Faulkner is even more of a concern. Duyere is the same as Mission 3; if you can get him dizzy, he's screwed. In fact, if you are going to clear out the battlefield, concentrate on taking down the big guys first by constantly attacking them to keep them busy and possibly cancelling their attacks. However, deal with Zakov and his men first! The Imperials will probably gang up on the Kingdom guys, ESPECIALLY when they are dizzied, so sneak up behind them and pop them one. Don't worry about who kills what, but try and make sure your characters share EXP. Faulkner is pretty easy to dizzy, but it's dangerous. He will counter your moves with Fireball, which costs a LOT of FP to use, let alone counter with. If you can take the hits, dizzy him and kill him for LOTS of EXP! The incredibly resourceful player will be able to knock off everything on the battlefield. Save Sadira and her aides for last, as they do not move, and do not attack back! However, they are also not worth very much. |

Now that the mission is complete..
- You now control 1 more team member; Galvas. Galvas pilots the Serata ATAC.
- Zeira joins you as a CPU-Controlled ally in the Toreadore.
- You move on to Mission 5
Before beginning Mission 5, save your game and load stats from the Options screen, and head to the Interview screen. Devlin is a grump, so talk with him if he's looking sad. I suggest going to the Equipment screen and moving Devlin from the Ratatosk to the Serata.
A shop is open. Take advantage of it, and purchase new weapons for everyone. Go for the cheaper, yet more effective Preshuze over the Quicksilver, then purchase new stones for everybody, even Galvas. Sell some of your old stuff, but save a bit for equipment switching. When you're ready to move on, check the Briefing, and proceed to Mission 5: Nordilian Assault.
|
|