
 |
|
|
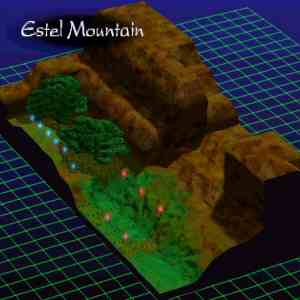
Mission 37: Refuge in Nordilian
We've been ambushed by Kingdom troops! Leading them into the fray are Ganlon and that stubborn old man, Galvas! If he STILL doesn't believe us about our intentions, then there's something seriously wrong with him!
Annihilate all enemies. |
|
 |
Galvas (Serata ATAC) | HP: 186 | Level: 22 | Money: 5000 | |||||
| BAS: 23 | POW: 24 | DEX: 14 | AGL: 13 | DEF: 15 | WEP: 17 | Spirit: 81 | Range: 5 | Speed: 6.54 | |
| Equipment: Darkblade, Kunzite, Power Tiara | Attacks: Slash, Thrust, Tackle, Str. Slash, Kick, Fireball, Melting Flare, Flare Bomb | Dormant Abilities: Reflect Attack, Chivalry | |||||||
 |
Ganlon (Waiban ATAC) | HP: 164 | Level: 21 | Money: 4000 | |||||
| BAS: 18 | POW: 15 | DEX: 12 | AGL: 19 | DEF: 18 | WEP: 17 | Spirit: 78 | Range: 6 | Speed: 7.78 | |
| Equipment: Dragontail, Ruby, Ranbow Gem | Attacks: Thrust, Long Thrust, Str. Thrust, Fireball, Melting Flare | Dormant Abilities: Stealth Motion | |||||||
 |
Kingdom 1 (Haizuron ATAC) | HP: 147 | Level: 18 | Money: 4000 | |||||
| BAS: 19 | POW: 16 | DEX: 13 | AGL: 14 | DEF: 11 | WEP: 13 | Spirit: 69 | Range: 5 | Speed: 6.62 | |
| Equipment: Preshuze, Olivine, Holy Headband | Attacks: Slash, Thrust, Tackle, Str. Slash, Kick, Tornado, Turbulence | Dormant Abilities: NONE | |||||||
|
Kingdom 2 (Haizuron ATAC) | HP: 147 | Level: 18 | Money: 4000 | |||||
| BAS: 19 | POW: 16 | DEX: 13 | AGL: 14 | DEF: 11 | WEP: 13 | Spirit: 69 | Range: 5 | Speed: 6.62 | |
| Equipment: Preshuze, Olivine, Holy Headband | Attacks: Slash, Thrust, Tackle, Str. Slash, Kick, Tornado, Turbulence | Dormant Abilities: NONE | |||||||
|
Kingdom 3 (Glaive ATAC) | HP: 132 | Level: 17 | Money: 3000 | |||||
| BAS: 17 | POW: 13 | DEX: 12 | AGL: 16 | DEF: 9 | WEP: 9 | Spirit: 66 | Range: 4 | Speed: 7.02 | |
| Equipment: Gradius, Aquamarine, Holy Headband | Attacks: Slash, Thrust, Tackle, Str. Slash, Kick, Ice Shards, Ice Storm | Dormant Abilities: None | |||||||
|
Kingdom 4 (Glaive ATAC) | HP: 132 | Level: 17 | Money: 3000 | |||||
| BAS: 17 | POW: 13 | DEX: 12 | AGL: 16 | DEF: 9 | WEP: 9 | Spirit: 66 | Range: 4 | Speed: 7.02 | |
| Equipment: Gradius, Aquamarine, Holy Headband | Attacks: Slash, Thrust, Tackle, Str. Slash, Kick, Ice Shards, Ice Storm | Dormant Abilities: None | |||||||
|
Kingdom 5 (Glaive ATAC) | HP: 132 | Level: 17 | Money: 3000 | |||||
| BAS: 17 | POW: 13 | DEX: 12 | AGL: 16 | DEF: 9 | WEP: 9 | Spirit: 66 | Range: 4 | Speed: 7.02 | |
| Equipment: Gradius, Aquamarine, Holy Headband | Attacks: Slash, Thrust, Tackle, Str. Slash, Kick, Ice Shards, Ice Storm | Dormant Abilities: None | |||||||
|
Kingdom 6 (Haizuron ATAC) | HP: 131 | Level: 18 | Money: 3000 | |||||
| BAS: 15 | POW: 16 | DEX: 13 | AGL: 14 | DEF: 11 | WEP: 13 | Spirit: 69 | Range: 5 | Speed: 6.46 | |
| Equipment: Preshuze, Olivine, Warrior Coat-of-Arms | Attacks: Slash, Thrust, Tackle, Str. Slash, Kick, Tornado, Turbulence | Dormant Abilities: Front Menace | |||||||
|
Kingdom 7 (Glaive ATAC) | HP: 116 | Level: 17 | Money: 3000 | |||||
| BAS: 13 | POW: 13 | DEX: 12 | AGL: 16 | DEF: 9 | WEP: 9 | Spirit: 66 | Range: 4 | Speed: 6.86 | |
| Equipment: Gradius, Aquamarine, Warrior Coat-of-Arms | Attacks: Slash, Thrust, Tackle, Str. Slash, Kick, Ice Shards, Ice Storm | Dormant Abilities: Front Menace | |||||||
|
Kingdom 8 (Glaive ATAC) | HP: 116 | Level: 17 | Money: 3000 | |||||
| BAS: 13 | POW: 13 | DEX: 12 | AGL: 16 | DEF: 9 | WEP: 9 | Spirit: 66 | Range: 4 | Speed: 6.86 | |
| Equipment: Gradius, Aquamarine, Warrior Coat-of-Arms | Attacks: Slash, Thrust, Tackle, Str. Slash, Kick, Ice Shards, Ice Storm | Dormant Abilities: Front Menace | |||||||
|
Kingdom 9 (Glaive ATAC) | HP: 116 | Level: 17 | Money: 3000 | |||||
| BAS: 13 | POW: 13 | DEX: 12 | AGL: 16 | DEF: 9 | WEP: 9 | Spirit: 66 | Range: 4 | Speed: 6.86 | |
| Equipment: Gradius, Aquamarine, Warrior Coat-of-Arms | Attacks: Slash, Thrust, Tackle, Str. Slash, Kick, Ice Shards, Ice Storm | Dormant Abilities: Front Menace | |||||||
| Important Battlefield Events: |
| - 30 turns after the start of the battle, Galvas, Ganlon and Kingdom 6-9 join the battle. |
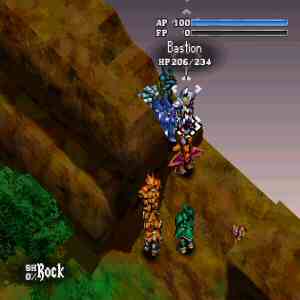
| This battle begins in an incredibly linear fashion. Not linear as in there's only one choice, but linear as in your team is in a straight line. Your first move should be to get your characters out onto the battlefield, but make sure you keep them relatively close to each other. I like to have Sadira hide in the little "niche" and use Spiral Dive on Kingdom 3 to get the battle off to a good start. A Turbulence from Cecilia and a Slash from Bastion later, and Kingdom 3 is no more. That was fast. No rest for the *hardly* weary; you want to take down the other Kingdoms as soon as you can. Allow them to come to you, and let them try and hit you with their feeble attacks. Chances are a few of them will point their backs towards you, which sets them up for easy kills.
The resourceful player will be able to take down Kingdom 1-5 before Galvas and his men arrive, and it makes things quite a bit easier. Don't worry too much about going dizzy when taking down the last few Kingdom soldiers; Galvas and the guys won't actually reach you for a turn or two if you're huddled up far away (which you probably will be). Galvas is your prime concern, but Ganlon must be dealt with too, as he can do a respectable amount of damage. Ganlon will also come down the hill first, so meet and greet him with Turbulence attacks, or Wind Strike attacks to the back if you can dizzy him. It's actually not to hard to eliminate him before Galvas gets a turn! And if that doesn't make the Kingdom Army look bad, observe as Galvas tries to attack you, but finds out Kingdom soldiers block his way, reducing him to have to use Melting Flare and Flare Bomb to take you out. Odds are he'll miss, leaving him open for long-range wind attacks. What a yutz. Let whoever is behind in levels bump him off. The rest of the battle is fairly easy, though you might want to let the girl who's ending you're NOT going for perish, to lower her morale. At this stage in the game, it's also very important to watch your FP, as Sharkings will be attacking your team soon. |
Now that the mission is complete..
- It's time for that big decision I warned you about!
- You move on to Mission 38
Before beginning Mission 38.. a story scene with Sadira occurs and a choice comes up which greatly affects Sadira's morale. Choose "Alright, Sadira. Good night." to lower her morale by a significant amount, or choose "Please tell me what's wrong!" to increase it by quite a bit.
Now that you've made the big choice, save, load stats from Options screen and then Interview, making sure to please the girl who's ending you seek.
|
Then stop for a second. We're at the big decision point of the game, and the game will finally branch off onto either the Sadira route or the Cecilia route when you complete the next mission. There is no time to prepare for this except for now, so that's what we are going to do. Since you've probably been working on making the girl you like happy, you SHOULD know which ending you're going to come across. Both endings require special planning and preparation in order for the last 4 missions to go smoothly. However, both endings share one thing in common; they are quite difficult. These next missions are the hardest on the entire Empire Branch, and there are several things that you should be concerned about while completing them. 1.) There are some good Dormant Abilities and attacks to learn. Among the most important are each character's special move, and the Dormant Ability called Second Attack, which lets you attack twice in one turn (Bastion and Sadira should learn this if they haven't already). By this point in the game, you should be well on your way to having every corresponding attack and every Dormant Ability for each character. Since the Empire Branch gives you only 6 team members, it's not hard to learn everything for everyone. At this point, Bastion should be a bit over Level 20, with Sadira, Claire and Cecilia around Level 20. Franco and Halak would do well around Level 18-20. At this point in the game, you may need a second healer, so consider raising Halak's BAS if you haven't already and equip her with a Tiger's Eye. 2.) FP is getting more and more important. Bigger and better attacks will be used by both you and the enemy, specifically in Missions 40 amd 42. Sharkings are now common foes, and even a single Sharking can be tough to take down, so think twice about having Sadira use Spiral Dive twice a turn; it's powerful, sure.. but it also dizzies her, and Sharkings will not hesitate to slice you to ribbons. Remember, Knockdown attribute attacks such as Turbulence and Wind Strike are essential for taking down Sharkings. 3.) Make use of your Support Abilities! If Bastion isn't fighting too much, have him use Holy Light to cure up any weakened allies, or have Halak use Earth Heal for a weaker, yet still useful effect. These abilities are the reason why grouping your team up is a good idea. Also, depending on which girl's ending you're going to get, you'll want to make the following preparations at the Shop. Sadira Ending: Outfit your team members with new weapons and Level 4 stones, perhaps even Cecilia for her Somersault attack. Don't get too carried away buying equipment for Cecilia though, as she will be leaving your team when you complete Mission 38. Cecilia Ending: Outfit your team members with new weapons and Level 4 stones, MAKING SURE Cecilia gets a Jade Stone. Somersault will be very helpful in the missions ahead, and it certainly makes the final mission a bit easier. Even though your team will be leaving you at the end of Mission 43, buy them the best stuff you can anyway, as you need them at full power for the next few missions. |
Now, check the Briefing. The next mission is a very tricky one if not handled correctly. You'll be pitted against a tough team of Sharkings, and you'll need your team firing on all cylinders to win. Keep everyone grouped up for the assist factor and for easy healing, and you'll be okay. Fight carefully, but make sure you enjoy yourself while you play, as the later missions will treat you what VB has to offer. Turn on Battle Animation now and then to see the cool attacks, allow yourself to get caught up in the dialogue and the story, and the game will really start to grow on you. And you'll really begin to enjoy it, maybe as much as I do. Good luck, and good fun!
When you're ready, check the Briefing for an overview of what's next, and when you're ready, head to Mission 38: Sharking Attack!
|
|