 |
|
|
Mission 22: Capital Clash
Faulkner isn't here... but we're surrounded by Imperials! Imperials in Sharkings, no less! We're in for a rough fight...
Annihilate all enemies. |
|
 |
Zakov (Sharking ATAC) | HP: 244 | Level: 23 | Money: 18000 | |||||
| BAS: 17 | POW: 23 | DEX: 13 | AGL: 16 | DEF: 24 | WEP: 28 | Spirit: 84 | Range: 5 | Speed: 7.02 | |
| Equipment: Ginsunami, Evil Eye, Rainbow Gem | Attacks: Slash, Str. Slash, Cutting Wheel | Dormant Abilities: Reflect Attack, Assassinate, Hoverjets | |||||||
 |
Imperial 1 (Sharking ATAC) | HP: 226 | Level: 22 | Money: 18000 | |||||
| BAS: 13 | POW: 19 | DEX: 17 | AGL: 19 | DEF: 19 | WEP: 26 | Spirit: 81 | Range: 5 | Speed: 7.58 | |
| Equipment: Ginsunami, Dark Eye, Knight Coat-of-Arms | Attacks: Slash, Str. Slash, Cutting Wheel | Dormant Abilities: Mass Menace | |||||||
 |
Imperial 2 (Sharking ATAC) | HP: 226 | Level: 22 | Money: 18000 | |||||
| BAS: 13 | POW: 19 | DEX: 17 | AGL: 19 | DEF: 19 | WEP: 26 | Spirit: 81 | Range: 5 | Speed: 7.58 | |
| Equipment: Ginsunami, Dark Eye, Knight Coat-of-Arms | Attacks: Slash, Str. Slash, Cutting Wheel | Dormant Abilities: Mass Menace | |||||||
 |
Imperial 3 (Sharking ATAC) | HP: 226 | Level: 22 | Money: 18000 | |||||
| BAS: 13 | POW: 19 | DEX: 17 | AGL: 19 | DEF: 19 | WEP: 26 | Spirit: 81 | Range: 5 | Speed: 7.58 | |
| Equipment: Ginsunami, Dark Eye, Knight Coat-of-Arms | Attacks: Slash, Str. Slash, Cutting Wheel | Dormant Abilities: Mass Menace | |||||||
 |
Imperial 4 (Sharking ATAC) | HP: 226 | Level: 22 | Money: 18000 | |||||
| BAS: 13 | POW: 19 | DEX: 17 | AGL: 19 | DEF: 19 | WEP: 26 | Spirit: 81 | Range: 5 | Speed: 7.58 | |
| Equipment: Ginsunami, Dark Eye, Knight Coat-of-Arms | Attacks: Slash, Str. Slash, Cutting Wheel | Dormant Abilities: Mass Menace | |||||||
 |
Imperial 5 (Sharking ATAC) | HP: 226 | Level: 22 | Money: 18000 | |||||
| BAS: 13 | POW: 19 | DEX: 17 | AGL: 19 | DEF: 19 | WEP: 26 | Spirit: 81 | Range: 5 | Speed: 7.58 | |
| Equipment: Ginsunami, Dark Eye, Knight Coat-of-Arms | Attacks: Slash, Str. Slash, Cutting Wheel | Dormant Abilities: Mass Menace | |||||||
 |
Imperial 6 (Sharking ATAC) | HP: 226 | Level: 22 | Money: 18000 | |||||
| BAS: 13 | POW: 19 | DEX: 17 | AGL: 19 | DEF: 19 | WEP: 26 | Spirit: 81 | Range: 5 | Speed: 7.58 | |
| Equipment: Ginsunami, Dark Eye, Knight Coat-of-Arms | Attacks: Slash, Str. Slash, Cutting Wheel | Dormant Abilities: Mass Menace | |||||||
 |
Imperial 7 (Sharking ATAC) | HP: 226 | Level: 22 | Money: 18000 | |||||
| BAS: 13 | POW: 19 | DEX: 17 | AGL: 19 | DEF: 19 | WEP: 26 | Spirit: 81 | Range: 5 | Speed: 7.58 | |
| Equipment: Ginsunami, Dark Eye, Knight Coat-of-Arms | Attacks: Slash, Str. Slash, Cutting Wheel | Dormant Abilities: Mass Menace | |||||||
 |
Imperial 8 (Sharking ATAC) | HP: 226 | Level: 22 | Money: 18000 | |||||
| BAS: 13 | POW: 19 | DEX: 17 | AGL: 19 | DEF: 19 | WEP: 26 | Spirit: 81 | Range: 5 | Speed: 7.58 | |
| Equipment: Ginsunami, Dark Eye, Knight Coat-of-Arms | Attacks: Slash, Str. Slash, Cutting Wheel | Dormant Abilities: Mass Menace | |||||||
 |
Imperial 9 (Sharking ATAC) | HP: 226 | Level: 22 | Money: 18000 | |||||
| BAS: 13 | POW: 19 | DEX: 17 | AGL: 19 | DEF: 19 | WEP: 26 | Spirit: 81 | Range: 5 | Speed: 7.58 | |
| Equipment: Ginsunami, Dark Eye, Knight Coat-of-Arms | Attacks: Slash, Str. Slash, Cutting Wheel | Dormant Abilities: Mass Menace | |||||||
 |
Imperial 10 (Sharking ATAC) | HP: 226 | Level: 22 | Money: 18000 | |||||
| BAS: 13 | POW: 19 | DEX: 17 | AGL: 19 | DEF: 19 | WEP: 26 | Spirit: 81 | Range: 5 | Speed: 7.58 | |
| Equipment: Ginsunami, Dark Eye, Knight Coat-of-Arms | Attacks: Slash, Str. Slash, Cutting Wheel | Dormant Abilities: Mass Menace | |||||||
| Important Battlefield Events: |
| - The battle begins with Imperials 1, 2, 3, 4, 5 and 6. Defeating 3 or 6 causes Imperial 8 to come out of the northeast set of hedges. After that, defeating 3, 6 or 8 causes Imperial 7 to come out of the northwest set of hedges. - Defeating Imperial 4 causes Imperial 10 to come out from the east set of hedges. Defeating Imperial 5 causes Imperial 9 to come out from the west set of hedges. - Late into the battle, Zakov's mood changes to angry, increasing his attack power. Ouch. |
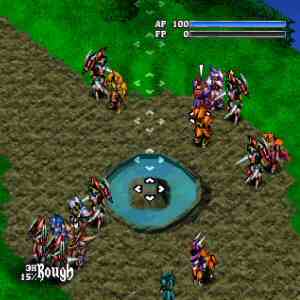
| This battle comes off looking pretty tough to start, what with Zakov and 2 Imperials in Sharking ATAC. It then switches to "holy crap, we're in for it" mode when Imperials 3, 4, 5, and 6 surround your party. And to make matters even worse, your team members are separated from one another, and they react AFTER the Sharkings use Cutting Wheel to cut your team down. And to make matters WORSE, there are re-inforcements! Suck it up at the beginning; you're going to take a lot of damage no matter what, with some characters like Reyna reduced to half HP. But after the Sharkings get their hits in, it's your chance to strike. See how your team is aligned? Those are the "teams" we will be using to overwhelm the Sharkings. Zeira and Andrew should Turbulence the Sharkings to the south (using Turbulence is a great idea, as Sharkings will NOT counterattack with Cutting Wheel). Have Nana, Reyna and Dionne gang up on the western Sharking, have Alden, Milea, Devlin and Barlow assault the eastern Sharking, and have Bastion handy to use Holy Light on your weakened allies. Don't worry about Sharking 1-2 or Zakov just yet.
The key to beating Sharkings, other than overwhelming them, is to not use long-range attacks, unless they are Knockdown attribute attacks. Sharkings have a tendency to counter anything that's not close range with Cutting Wheel, and you do NOT want to be hit by that. Instead, hit them with Knockdown attacks from a distance (Turbulence, Earthquake, most special moves), and build their FP up so that they won't counterattack when you hit them close-range. If you're feeling a little daring, try using Blinding Light or Mirage Mist on a Sharking. You'll do little damage and PROBABLY invoke the Cutting Wheel (not if you stand up close.. you'll just get Str. Slashed), but the Sharking's accuracy will be reduced, which is a great help. Dionne's help couldn't have come at a better time. His Bursting Fire attack is great for softening up the Sharkings, but at a great FP cost. BE CAREFUL WITH IT; having your FP maxed out at this point in the game is fatal. Nana's Terra Shock is also incredibly useful (but Nana was always incredibly useful), so use this as well. Keep in mind that these are Knockdown attacks, and will not be countered, and usually blocked. As you defeat Sharkings, more will appear. But this time you will be ready for them. You might want to watch what order you kill them in though; you can avoid ambushes this way. If you MUST use attacks like Melting Flare to lower DEF, move in close so that you aren't countered by Cutting Wheel. Take care not to take TOO much damage; you don't want to lose anyone on this mission. Keep your HP up with Earth Heal and Holy Light (making sure you've kept a healer handy), and you just might make it through this mission safely. Zakov and his two Imperials are the least of your problems once you've taken care of the Imperials from the bushes. One more thing... NEVER try to counterattack a Sharking when they use Str. Slash. Their version of Str. Slash is a Knockdown attack, so your efforts will be wasted. Also, attacking a Sharking from the back is hard; in this mission, they have Mass Menace, so it is rather difficult to move around them and still have sufficient AP to attack. |
Now that the mission is complete..
- Sadira joins your team as a CPU controlled ally
- You move on to either Mission 23 or 24, 23 being the Good Ending mission, 24 being the Bad Ending mission.
Before moving on, watch the story scene. The first choice affects Sadira's morale (doesn't actually do anything), and the second choice has no effect on the game aside from text, so choose what you will. Afterwards, save your game and load stats from the Options screen, and head to the Interview screen. Do any last interviewing that you can, then check the Briefing. Mission 23 and 24 are almost entirely identical, aside from how the battle actually plays out. You won't know what ending you'll get until you start the mission and read the opening line. If Faulkner says "And here they are.", you have gotten the bad ending (on to Mission 24). If he says "Warm greetings, my foolish foes.", you have gotten the good ending (on to Mission 23).
If you get the bad ending your first time through, don't sweat it. I got it the first time, and you have to anyway to get all 56 missions complete. Besides, Mission 24 (bad ending mission) is fun to play.
Now, start the mission, and take note of his opening line. Hopefully, everyone should be Level 20, with a few characters at Level 25.
|
|

