
 |
|
|
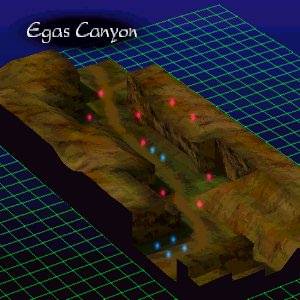
Mission 2: Bandit Brigade
A caravan crossing the Egas Canyon has been attacked! It's not really our problem, but we've got to help them out, right? For all we know, these could be rogue Imperial soldiers! And I for one wouldn't be able to live with myself if I let innocent people be slaughtered by those Junaris pigs!
Annihilate all enemies. |
|
 |
Bandit 1 (Barbatos ATAC) | HP: 74 | Level: 6 | Money: 3500 | |||||
| BAS: 8 | POW: 8 | DEX: 6 | AGL: 3 | DEF: 5 | WEP: 7 | Spirit: 33 | Range: 4 | Speed: 3.54 | |
| Equipment: Gladius, Onyx | Attacks: Slash, Thrust, Str.Slash | Dormant Abilities: NONE | |||||||
|
Bandit 2 (Barbatos ATAC) | HP: 68 | Level: 5 | Money: 3500 | |||||
| BAS: 7 | POW: 7 | DEX: 5 | AGL: 4 | DEF: 4 | WEP: 7 | Spirit: 30 | Range: 4 | Speed: 3.74 | |
| Equipment: Gladius, Onyx | Attacks: Slash, Thrust | Dormant Abilities: NONE | |||||||
|
Bandit 3 (Andoras ATAC) | HP: 49 | Level: 4 | Money: 2000 | |||||
| BAS: 4 | POW: 4 | DEX: 4 | AGL: 9 | DEF: 3 | WEP: 8 | Spirit: 27 | Range: 4 | Speed: 4.82 | |
| Equipment: Hand Axe, Onyx | Attacks: Slash | Dormant Abilities: NONE | |||||||
|
Bandit 4 (Andoras ATAC) | HP: 53 | Level: 4 | Money: 2000 | |||||
| BAS: 5 | POW: 6 | DEX: 5 | AGL: 4 | DEF: 3 | WEP: 9 | Spirit: 27 | Range: 4 | Speed: 3.66 | |
| Equipment: Hand Axe, Turquoise | Attacks: Slash, Strike | Dormant Abilities: NONE | |||||||
|
Bandit 5 (Andoras ATAC) | HP: 57 | Level: 4 | Money: 2000 | |||||
| BAS: 6 | POW: 6 | DEX: 4 | AGL: 3 | DEF: 3 | WEP: 10 | Spirit: 27 | Range: 4 | Speed: 3.46 | |
| Equipment: Hand Axe, Opal | Attacks: Slash, Strike | Dormant Abilities: NONE | |||||||
|
Bandit 6 (Andoras ATAC) | HP: 53 | Level: 4 | Money: 2000 | |||||
| BAS: 5 | POW: 7 | DEX: 4 | AGL: 4 | DEF: 3 | WEP: 9 | Spirit: 27 | Range: 4 | Speed: 3.66 | |
| Equipment: Hand Axe, Beryl | Attacks: Slash, Strike | Dormant Abilities: NONE | |||||||
|
Bandit 7 (Andoras ATAC) | HP: 47 | Level: 3 | Money: 2000 | |||||
| BAS: 4 | POW: 5 | DEX: 4 | AGL: 4 | DEF: 3 | WEP: 9 | Spirit: 24 | Range: 4 | Speed: 3.62 | |
| Equipment: Hand Axe, Onyx | Attacks: Slash | Dormant Abilities: NONE | |||||||
|
Bandit 8 (Andoras ATAC) | HP: 55 | Level: 3 | Money: 2000 | |||||
| BAS: 6 | POW: 4 | DEX: 4 | AGL: 3 | DEF: 3 | WEP: 9 | Spirit: 24 | Range: 4 | Speed: 3.46 | |
| Equipment: Hand Axe, Turquoise | Attacks: Slash, Strike | Dormant Abilities: NONE | |||||||
|
Bandit 9 (Andoras ATAC) | HP: 51 | Level: 3 | Money: 2000 | |||||
| BAS: 5 | POW: 5 | DEX: 4 | AGL: 3 | DEF: 3 | WEP: 9 | Spirit: 24 | Range: 4 | Speed: 3.42 | |
| Equipment: Hand Axe, Opal | Attacks: Slash, Strike | Dormant Abilities: NONE | |||||||
 |
Kamorge (Barazaph ATAC) | HP: 77 | Level: 10 | ||||||
| BAS: 8 | POW: 10 | DEX: 6 | AGL: 9 | DEF: 12 | WEP: 11 | Spirit: 45 | Range: 4 | Speed: 4.98 | |
| Equipment: Gladius, Onyx | Attacks: Slash, Thrust, Str. Slash | Dormant Abilities: Reflect Attack, Parry, Chivalry, Mass Menace | |||||||
 |
Devlin (Ratatosk ATAC) | HP: 60 | Level: 5 | ||||||
| BAS: 5 | POW: 7 | DEX: 4 | AGL: 4 | DEF: 6 | WEP: 8 | Spirit: 30 | Range: 4 | Speed: 3.66 | |
| Equipment: Gradius, Opal | Attacks: Slash, Thrust | Dormant Abilities: Snow Motion (ATAC) | |||||||
 |
Barlow (Ratatosk ATAC) | HP: 58 | Level: 4 | ||||||
| BAS: 5 | POW: 5 | DEX: 4 | AGL: 4 | DEF: 6 | WEP: 7 | Spirit: 27 | Range: 4 | Speed: 3.66 | |
| Equipment: Gladius, Turquoise | Attacks: Slash, Thrust | Dormant Abilities: Snow Motion | |||||||
 |
Sadira (Sylpheed ATAC) | HP: 102 | Level: 2 | ||||||
| BAS: 7 | POW: 4 | DEX: 3 | AGL: 12 | DEF: 4 | WEP: 15 | Spirit: 21 | Range: 7 | Speed: 5.66 | |
| Equipment: Steelburn, Star Diamond | Attacks: Slash, Thrust | Dormant Abilities: NONE | |||||||
 |
Franco (Korbelan ATAC) | HP: 85 | Level: 7 | ||||||
| BAS: 9 | POW: 8 | DEX: 6 | AGL: 7 | DEF: 4 | WEP: 8 | Spirit: 36 | Range: 6 | Speed: 4.54 | |
| Equipment: Gradius, Emerald | Attacks: Slash, Thrust, Str. Slash | Dormant Abilities: NONE | |||||||
 |
Halak (Korbelan ATAC) | HP: 87 | Level: 8 | ||||||
| BAS: 9 | POW: 9 | DEX: 7 | AGL: 7 | DEF: 5 | WEP: 8 | Spirit: 39 | Range: 6 | Speed: 4.54 | |
| Equipment: Gradius, Emerald | Attacks: Slash, Thrust, Str. Slash | Dormant Abilities: Bad Back, Mass Menace | |||||||
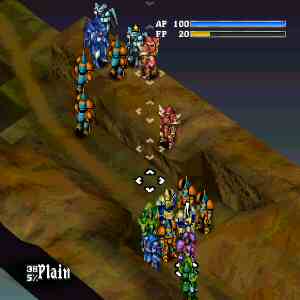
| Important Battlefield Events: |
| - On Kamorge's first turn, he walks up to Bandit 7 and gives him a good Str.Slash. Devlin and Barlow, seeing this, move south 3 spaces. Devlin and Barlow are always back to back, and always choose to defend. Therefore, there is a very small chance that they will perish in this mission. - After Bandit 6's first turn, Franco, Halak and Sadira enter the battle. They will stay in one spot until attacked, after which they will seek out and attack the bandits. |
| Though the enemy numbers may be much higher, this mission is similar to Mission 1; easy to complete. Your main goal is to grab as much EXP as you can, without the CPU controlled allies beating you to the kills.
If you are shooting for the Empire branch, ignore Reyna and concentrate on getting kills for Bastion ONLY. Reyna and Ione can still be used to soften up the bandits (Reyna is ideal with her long range), but make sure they don't do enough damage to allow Kamorge to knock them off. A few of the bandits will be preoccupied with beating up Devlin and Barlow, exposing their backsides to you. You know what to do! |
 If you are taking the Kingdom Branch through the game, it would be best to assure that Reyna and Bastion get most of the EXP. Let Ione sit the battle out, since no matter what branch you take, she won't be around for long. Follow the same strategy as before, making sure Kamorge doesn't get any kills. Of course, the Bandits in the higher up parts of the canyon are hard to kill (specifically Bandit 2), so don't waste too much time and sanity trying to kill them; Sadira, Franco and Halak usually get there first. Bandit 1 isn't so hard to reach, so keep that in mind. Make sure Reyna gets 2 kills during this mission; this will advance her a level. Remember; balance out your kills, and your whole team will grow as a whole.
Now that the mission is complete..
- You now control 2 more team members; Devlin and Barlow. Both pilot Ratatosk ATAC
- You move on to Mission 3
Before beginning Mission 3, save your game and load stats from the Options screen (do this after every mission to be safe), and head to the Interview screen. Devlin is always in a bad mood, it seems, so you might want to talk to him 3 times if you're going for the Kingdom Branch (Ione and Kamorge are leaving; don't speak with them!) If you're going for the Empire Branch, talk to whomever you want, since they're all leaving anyway. Check the Briefing for an overview of what's next, and when you're ready, head to Mission 3: Tragic Farewell.
|
|