
 |
|
|
Mission 15: The Deadliest ATAC
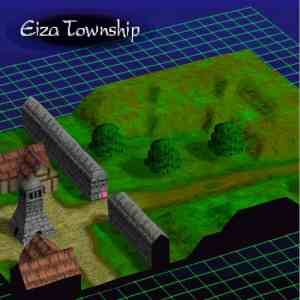
Eiza Village has been occupied by the Empire, but we're here to liberate it! Someone will distract the guards while Zeira and Andrew move in to secure the town. It's up to us to hold off any other Imperials.
Annihilate all enemies. |
|
 |
Imperial 1 (Barbatos ATAC) | HP: 82 | Level: 8 | Money: 3500 | |||||
| BAS: 9 | POW: 8 | DEX: 7 | AGL: 6 | DEF: 4 | WEP: 9 | Spirit: 39 | Range: 4 | Speed: 4.30 | |
| Equipment: Gladius, Turquoise | Attacks: Slash, Thrust, Str. Slash | Dormant Abilities: NONE | |||||||
|
Imperial 2 (Barbatos ATAC) | HP: 82 | Level: 8 | Money: 3500 | |||||
| BAS: 9 | POW: 8 | DEX: 7 | AGL: 6 | DEF: 4 | WEP: 9 | Spirit: 39 | Range: 4 | Speed: 4.30 | |
| Equipment: Gladius, Turquoise | Attacks: Slash, Thrust, Str. Slash | Dormant Abilities: NONE | |||||||
|
Imperial 3 (Dantarius ATAC) | HP: 93 | Level: 14 | Money: 2000 | |||||
| BAS: 10 | POW: 12 | DEX: 10 | AGL: 12 | DEF: 10 | WEP: 13 | Spirit: 57 | Range: 5 | Speed: 5.78 | |
| Equipment: Shimmerswrd, Olivine | Attacks: Slash, Thrust, Str. Slash, Str. Thrust, Tornado | Dormant Abilities: NONE | |||||||
|
Imperial 4 (Dantarius ATAC) | HP: 93 | Level: 14 | Money: 2000 | |||||
| BAS: 10 | POW: 12 | DEX: 10 | AGL: 12 | DEF: 10 | WEP: 13 | Spirit: 57 | Range: 5 | Speed: 5.78 | |
| Equipment: Shimmerswrd, Olivine | Attacks: Slash, Thrust, Str. Slash, Str. Thrust, Tornado | Dormant Abilities: NONE | |||||||
|
Imperial 5 (Dantarius ATAC) | HP: 93 | Level: 14 | Money: 2000 | |||||
| BAS: 10 | POW: 12 | DEX: 10 | AGL: 12 | DEF: 10 | WEP: 13 | Spirit: 57 | Range: 5 | Speed: 5.78 | |
| Equipment: Shimmerswrd, Olivine | Attacks: Slash, Thrust, Str. Slash, Str. Thrust, Tornado | Dormant Abilities: NONE | |||||||
|
Imperial 6 (Barbatos ATAC) | HP: 92 | Level: 13 | Money: 3500 | |||||
| BAS: 9 | POW: 10 | DEX: 14 | AGL: 9 | DEF: 8 | WEP: 13 | Spirit: 54 | Range: 4 | Speed: 5.02 | |
| Equipment: Preshuze, Jasper | Attacks: Slash, Thrust, Str. Slash, Fireball | Dormant Abilities: NONE | |||||||
|
Imperial 7 (Barbatos ATAC) | HP: 92 | Level: 13 | Money: 3500 | |||||
| BAS: 9 | POW: 10 | DEX: 14 | AGL: 9 | DEF: 8 | WEP: 13 | Spirit: 54 | Range: 4 | Speed: 5.02 | |
| Equipment: Preshuze, Jasper | Attacks: Slash, Thrust, Str. Slash, Fireball | Dormant Abilities: NONE | |||||||
|
Imperial 8 (Barbatos ATAC) | HP: 92 | Level: 13 | Money: 3500 | |||||
| BAS: 9 | POW: 10 | DEX: 14 | AGL: 9 | DEF: 8 | WEP: 13 | Spirit: 54 | Range: 4 | Speed: 5.02 | |
| Equipment: Preshuze, Jasper | Attacks: Slash, Thrust, Str. Slash, Fireball | Dormant Abilities: NONE | |||||||
 |
Zakov (Sharking ATAC) | HP: 224 | Level: 17 | Money: 18000 | |||||
| BAS: 15 | POW: 21 | DEX: 11 | AGL: 13 | DEF: 15 | WEP: 28 | Spirit: 66 | Range: 5 | Speed: 6.22 | |
| Equipment: Slash, Str. Slash, Cutting Wheel | Attacks: Slash | Dormant Abilities: Reflect Attack, Hoverjets | |||||||
 |
Sadira (Sylpheed ATAC) | HP: 150 | Level: 12 | ||||||
| BAS: 14 | POW: 8 | DEX: 10 | AGL: 17 | DEF: 14 | WEP: 16 | Spirit: 51 | Range: 7 | Speed: 7.14 | |
| Equipment: Steelburn, Star Diamond, Rainbow Gem | Attacks: Slash, Thrust, Str. Slash, Str. Thrust, Tornado | Dormant Abilities: NONE | |||||||
 |
Franco (Korbelan ATAC) | HP: 119 | Level: 16 | ||||||
| BAS: 13 | POW: 12 | DEX: 15 | AGL: 12 | DEF: 12 | WEP: 17 | Spirit: 63 | Range: 6 | Speed: 5.90 | |
| Equipment: Darkblade, Olivine, Dex. Ring | Attacks: Slash, Thrust, Tackle, Str. Slash, Kick, Tornado, Turbulence | Dormant Abilities: Reflect Attack, Chivalry | |||||||
| Important Battlefield Events: |
| - After defeating the first two Imperials, Zakov and his men show up in the southeastern corner of the map. - After Zakov attacks one of your team members, Sadira and Franco appear in the northeast as allies. |
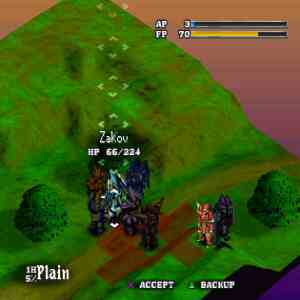
This is one of the tougher missions; not just because of your lack of manpower, but also because of the strength of the enemy. The first two Imperials are recent graduates of the Academy, and they'll chase Devlin down. He's more than powerful enough to prevail against the two would-be soldiers, but in this case, you should re-unite him with the rest of the team. Keep your team a few spaces southeast of the bush (as indicated in the screenshot), and take down the Imperials. Now here's where it gets TOUGH. Zakov and his men appear after trouncing the first two Imperials. The new soldiers are tough enough, but Zakov is piloting the Sharking ATAC; which has the power to fell most of your team in a few skillful hits. Ouch. With your position, though, it will take him a turn or two to reach your team, and when he does, he'll move in close, and won't use the Cutting Wheel attack, which is what you want to prevent. Before Zakov reaches you, you'll probably have carved through 1 or 2 of the Dantarius ATAC, so you don't have to worry as much about getting gang-tackled. Block the first hit he throws at you (avoiding probably won't work), then very CAREFULLY get his FP up. I like to have Bastion use Blinding Light for a cheap hit that reduces Zakov's hit percentage, while hitting him with any Knockdown attacks that you have. The CPU will normally attempt to block Knockdown attacks, so you don't have to worry about counterattacks, and Zakov will quickly build up FP trying to hold you off. Zakov still has high defense though, so have everyone take turns beating him up, as once he gets back to 0 FP, he's going to be PISSED. Finish him off first, regardless of any Imperials that might bother you; they should be held off by Galvas and Barlow. In fact, get Galvas' attack power up enough to teach him Flare Bomb; it's very helpful. You want to get as many kills as you can before Sadira and Franco reach your party. |
Now that the mission is complete..
- Zeira and Andrew are back!
- You move on to Mission 16
Before beginning Mission 16, save your game and load stats from the Options screen (do this after every mission to be safe), and head to the Interview screen and talk to your team.
|
Now stop for a minute. The game has just taken a turn for the difficult, and though the Kingdom seems to have a distinct advantage over the Empire at this point, the Empire is far from beaten. The next few missions are going to be difficult, and there are several things that you should be concerned about while completing them. 1.) There are some good Dormant Abilities and attacks to learn. Among the most important are each character's special move, and the Dormant Ability called Second Attack, which lets you attack twice in one turn. If you haven't begun raising your stats the proper way to correspond with their natural strengths, then you're in a lot of danger. Raising your stats the correct way and balancing your team is the key to winning Vanguard Bandits, and you may do well in the early missions with reckless behaviour, but the later missions will eat you alive. Remember the Sharking you just fought, and how tough it was? Try facing 11 of them in one battle while your team is separated. 2.) After completing Mission 14, if Bastion is less than Level 20, you will obtain an additional team member. 3.) Galvas will be leaving after Mission 14. From there on out, you will have no "temporary" team members; everyone on your team will stick with you until the end. 4.) FP is getting more and more important. Bigger and better attacks will be used by both you and the enemy. Soldiers will not hesitate to pick you off from a distance with Melting Flare and Tornado anymore, and certain opponents will blast you with special attacks. Also, the number of enemies is starting to grow.. battles will be more intense from now on. 5.) Make use of your Support Abilities! If Bastion isn't fighting too much, have him use Holy Light to cure up any weakened allies, or have Reyna use Cooling Mist for a FP reduction for your team. These abilities are the reason why grouping your team up is a good idea. Now, check the Briefing. The next mission is a very tricky one if not handled properly. As it becomes more apparent that strategy is important, you will find yourself losing team members more often. Try and keep these losses as low as you can to ensure you get the good ending, and do not be afraid to use in-mission save; it's not cheating at all. The game is getting to be much more trying, but this is also the point where the action picks up and the game gets really intense. Fight carefully, but make sure you enjoy yourself while you play, as the later missions will treat you what VB has to offer. Turn on Battle Animation now and then to see the cool attacks, allow yourself to get caught up in the dialogue and the story, and the game will really start to grow on you. And you'll really begin to enjoy it, maybe as much as I do. Good luck, and good fun! |
When you're ready, head to Mission 16: Norze Reclaimed
|
|