
 |
|
|
The Glory of Battle
 Alright, maggots! I've taught you the way of the world. I've prepared you for the great beyond, working you day and night both physically and emotionally until you maggots broke down to tears. I've moulded you from the sickly piles of waste matter that you are when you started this class into the fierce fighting machines you will become today! I have...
 You haven't done any of those things. First of all, we haven't been worked physically, aside from sitting in this cramped, non-airconditioned room for 2 hours a day. Also, the only reason most of us were crying was because the vents are open, and the onion fumes from the cafeteria next door got in. And we were NOT sickening piles of anything, sir! If you want us to work for you, you'd better treat us with a little more respect than that!
 I... I'm sorry.. I apologize to everyone. The reason I yelled at all of you and treated you poorly was because... I love every one of you. You are like my family, and every time you leave the classroom, I die inside a little. You complete me, men. It would give me great pleasure to be in the same unit together..


 !!! Sir.... we feel the exact same way! Let's fight together!
*sniffle* Ahh.. heh.. let's just finish today's lesson; battling.
Battling Basics Vanguard Bandits is a strategy RPG, with the meat of the game being the battling. Sure, there is management between missions and some decisions regarding story, but the goal of Vanguard Bandits is to complete the game via battling, and battle you shall.
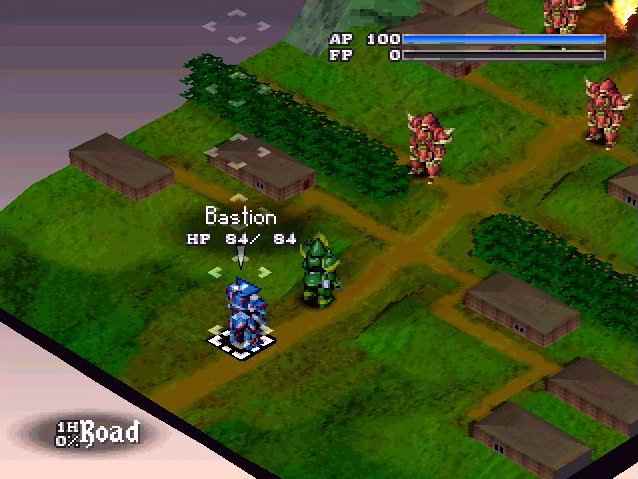
A battle takes place on a battlefield, which looks something like this:

The battle screen is made up of square spaces, as you can see. The object of the battle is to wipe out all of the enemy units while losing as few of your own as possible (if Bastion dies, you lose the mission). However, on rare occasions, the objective differs slightly. Sometimes you may have to protect a certain character in battle, or you may have to land on a certain space to finish the mission.
I'm assuming you know a bit about strategy RPGs before you play. Basically, the game involves the enemy and you taking turns commanding your units and choosing where you want them to move and what you want them to attack. You can attack once per turn, and move a certain amount of spaces as well. Each unit has an HP value, and if that unit hits 0 HP, they are defeated until the end of the battle.
- Cursor: Determines how the cursor moves. Choose from Right, Left or Center. The default is Right. |
Save Save your in-battle progress. You can jump to this screen instantly by PRESSING the Right Analog Stick (R3 Button).
Get to know the controls and functions of the game as early as you can so you don't have to worry about how to operate the controller at a pivotal moment.
How to Fight
Now it's time to actually fight. Battling is a little hard to explain, so I'll use a few pictures as examples and walk you through it.
|
It is Bastion's turn. He wishes to attack Imperial 4, who is hiding near the bush in that screenshot. See? Wave to him!
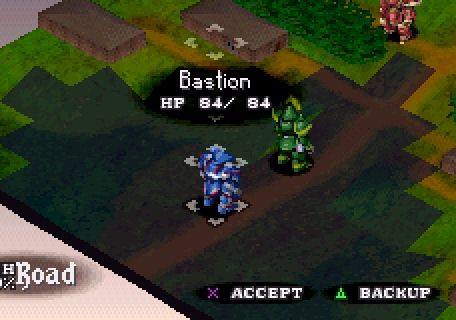
If you are in range to attack, the ATTACK command will be added to the small menu. Read on to learn how to attack.
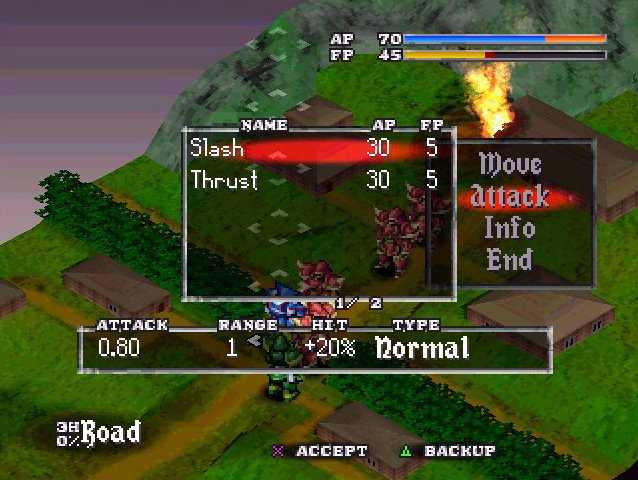
Attacking
Select Attack. A menu will be displayed that looks something like this.
Now, we want to Slash our enemy. Select Slash from the menu. A lot of information is displayed, which tells the statistics of that particular attack. But those are merely statistics, and we want an accurate portrayal of just how effective this Slash will be. So press X again. Now, select your target from any target within range (indicated by red squares). You will see this screen.
Some things you need to know:
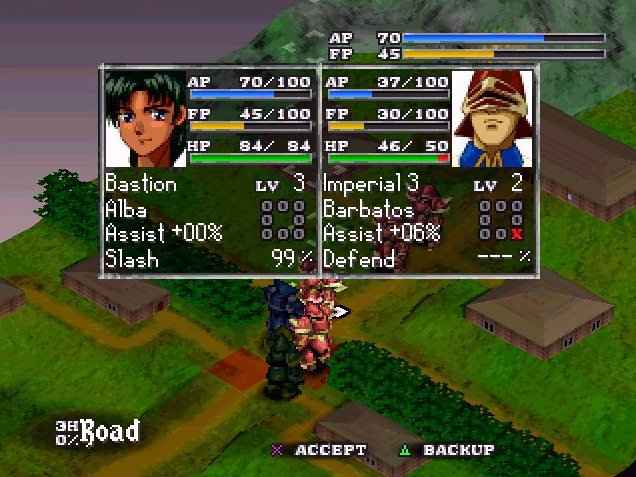
EXP:In Vanguard Bandits, EXP is given for getting a successful hit in during a combat round. The amount of EXP given depends on how hard you hit; you get more depending on how much damage you do. Also, your level and the enemy's level determine just how much EXP you earn, meaning that the higher your level is in comparision to the enemy's level, the less EXP you get. So if you are weaker than the enemy, you will earn more EXP.
FP:FP stands for Fatigue Points. Each command in VB other than moving adds FP to your FP meter. Once this meter reaches 100, that character becomes dizzy (indicated by a spinning star over their head) and will not be able to act for one whole turn. In addition, they will not be able to dodge, and will always take full damage from all attacks until undizzied. It is important to watch your FP, and to try and get the enemy's FP up to take advantage of them. IMPORTANI: If your FP is very high, choose simply to do nothing (End) on your turn. FP is reduced each turn in proportion to the unused AP you have on that turn.
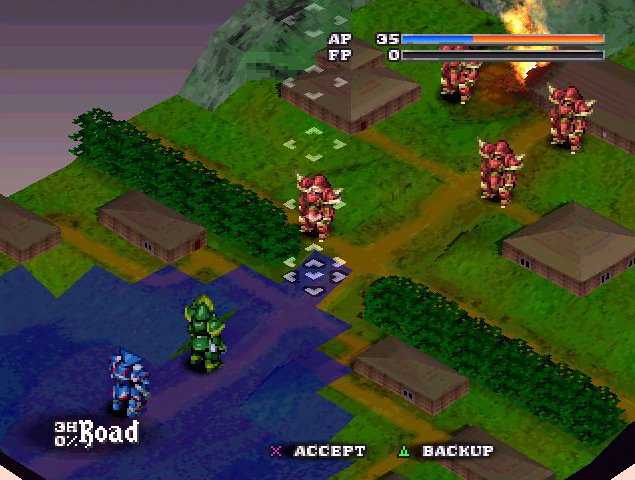
Attacking enemy from behind:If you attack an enemy from the back, expect two things. One: the enemy will only be able to avoid your attack. Two: the enemy will take more damage when struck from behind. Of course, the same thing applies to you. Try and keep your back covered at all times; never allow the enemy to hit you from behind if you can help it.And that's all you need to know about attacking. Being attacked will be covered in a bit. |
Support Abilites
A little later into the game, you may learn some Support Abilites. Support Abilities are basically support magic, without any FP cost. They still require an AP cost though, and that generally means you won't be able to move around much if you choose to use one during a turn. To activate a Support Ability, select Skill during your turn, then select the ability to bring up the move's range. Select a target, and it will activate.
Dormant Abilites
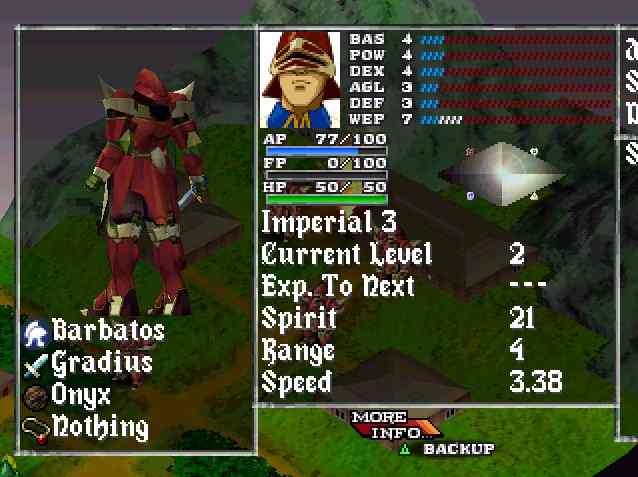
Though you can't actually use them, Dormant Abilities are important in battle. You don't select them and "target" with them; rather, they are special abilities that lie dormant in your character and give that character special skills, such as Second Attack (attack twice per round), Chivalry (do extra damage from the front) or Stealth Motion (move through enemy ATACs). Dormant Abilities can be viewed on the Info Screen, and each character has specific Dormant Abilities they can learn by raising their stats the proper ways.
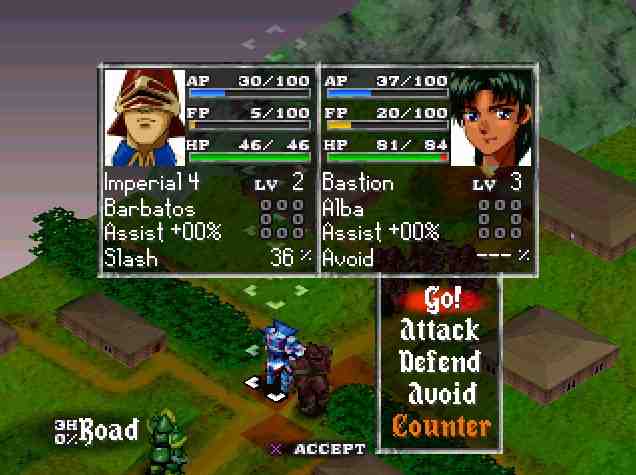
Go!: After selecting a command, select this to actually execute it.
Attack: Choosing Attack allows you to attack the enemy after he attacks you. After choosing Attack, choose which attack you wish to use on him. His accuracy and your accuracy will then be displayed; press X to confirm. This command consumes no AP, but adds the normal amount of FP that the attack would add, so be careful. These attacks have a higher rate of hitting than usual, because the enemy has just struck you, and his guard is down. Note that attempting this command to attack after your opponent hits with a Collision or Knockdown attack will result in you getting no attack in at all.
Defend: Adds 30 FP. Basically, this command ensures you will take the hit, but you will only take half damage. It is generally not a good idea to use this command very often, because you can more often that not avoid the oncoming attack. There are some cases where you will not be able to avoid, and Defending is the only way to save your life.
Avoid: Adds 20 FP. Basically, this command makes your ATAC dodge the oncoming attack. Has a high success rate, but if you are hit, you will take the full amount of damage. Avoid is usually your best choice, and your only choice when struck from behind.
Counter: Adds 20 FP. This command only shows up when attacked from the front, and not very often at that. It attempts to fully counter your enemy's attack by stabbing them as they rush in, and you will do a bit more damage than a Thrust attack if it works. However, it doesn't work too often, and it's generally not a useful technique. |
Please note that enemies have this same command list, aside from Counter. Also note that if you are attacked from behind, Avoid will be your only option.
Level Up!
Assist
When you are surrounded by allies (or when the enemy is surrounded by his cronies) and you enter combat, look for the Assist stat. This is basically a combat advantage that slightly alters your stats (or the enemy's) depending on how many friends who are surrounding you in the area. Each ally within an 8 space area represents a 6% stat increase. Therefore, it's good to keep your team together. Right?
Terrain and Movement
As explained earlier, different tiles in the game have different "terrain" properties. Each ATAC belongs to one of 6 "types", and each type performs better on certain terrains. For more details, check out the Terrain section of the shrine.
Morale
Morale is the mental state of your team members and your relationship with them. It can have an effect on the ending you get, and may (though I am not sure) affect how well your allies fight. Morale is raised by allowing your party members to participate in combat and get kills, and is lowered by your allies being KOed in battle or by not allowing your party members to participate in battle. More on Morale in the Interview section of the shrine.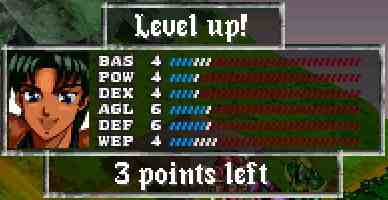
|
|
If you die...
Should a team member be defeated in battle, they will return at the end of battle. It can't be helped, but it can be prevented. Losing a character in battle is a huge morale loss, and should be avoided by hiding weaker characters when they are in peril. Put them somewhere safe and finish the battle as soon as you can. Of course, the next and final section of the How to Play section shall explain how to prevent this from happening very often.
If at any time Bastion dies, you get a Game Over. Therefore, it is imperative that you keep Bastion in good health at all times. He cannot heal himself, so watch his HP very carefully.
And that is that. You are now part of an elite fighting force, and you now possess the skills and knowledge to go far and to make the Kingdom Army proud! Today, we begin our first mission! Assemble outside in 1500 hours for briefing!
Sir, yes sir!
(At this point, I regret to inform you that High-Ranked Imperial and his men were never seen again. Well, actually, they got the wrong rendevous point co-ordinates and assembled in the woman's washroom. They have all been discharged and most have moved on careers in the exciting fields of salmon gutting, men's room attendants, assembly line workers, and reality TV show producers. Pray for each of their souls; they'll need it.)
There is one more section left, taught by me, Dalton of Zeal. Please read it; it's perhaps the most important of all.