
 |
|
|
Walkthrough
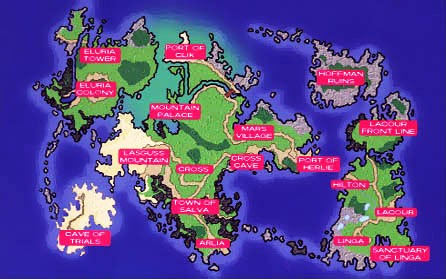
Energy Nede
Cave of Red Crystal
Field Of Intelligence
Field Of Power
Field Of Courage
Field Of Love / Fienal
Mihne Cavern / Other Stuff
Fienal
Walkthrough Part 1 (Claude's Scenario) | Walkthrough Part 1 (Rena's Scenario)
From here on in, the actual walkthrough, i.e. what to do next, is identical for Claude and Rena (however, many scenes will be different).
Items: Mind Ring, 50,000 FOL, Pet Food, Nature's Life Force
Enemies: *Synard
Once you finish with the long scene, you'll be on an entirely new planet. There's lots of things to see and do! About now is a good time to get into some serious item creation (you HAVE been building those skills up, yes?) and starting to use your SP for combat skills, since the difficulty level goes up in leaps and bounds now. If you have a magic user (Celine/Rena/Leon) who has a high Alchemy level, you'll want to invest all your money in a Lezard Flask, which you can buy in Central City's tool shop. Why? Instant cash! Using Identify All! (that HAS to be at level 10 by now, c'mon!) the Lezard Flask costs 84,000 FOL. But it means that you can use it to make Sage's Stones from Iron (which can be bought for 200 FOL in North City, north of Central City). Even with a horrible success rate, these can get you tons of cash (they sell for 80,000 FOL each)! And you'll want the cash, because Central City and North City have a huge amount of great weapons and armor to get. Start in North City and then return to Central City (North City has a few extra things) when buying weapons and armor.
Second, you now have no excuse to not Pickpocket people (although it is indeed a lot harder now). For starters, try Celine in the tool shop; she has a Holy Rod. The Skill Guild people all have great item creation support items. In City Hall, third floor, one of the editors has a powerful Treatise book for Leon. Et cetera. Check the Pickpocket List for the rest of 'em.
Third, do some Publishing immediately. Get at least one book from each character and sell them to the editor on the third floor of City Hall. Now whenever you return here, talk to him and you can get royalties (major major cash, too!)
Finally, before leaving, be sure to go to the west screen (not in a Private Action). You'll see a red-headed girl run away. This seems stupid, but you need to see it to get Chisato in your party.
OK, into North City. (There are a few PAs you can see here if you want.) Going north, you'll see the same redhead clumsily run away from you. Ignore her and go into the top right building, called "Home". There's a Skill Guild here if you missed any. Talk to the receptionist, then go into the north door (just left of the receptionists' desk). Another long scene, followed by a boss fight immediately (you don't get to enter your menu first).
The Synard is quite tough (and if you lose you have to sit through the whole scene again). It has 43000 HP, flies, and has a very nasty breath attack. Do your best to get behind it. Ashton and Precis are great for fighting it because they have good attacks for flying enemies. Precis' Hop Step is also useful. If Celine's in your party, use Thundestorm. Rena, as usual, should heal. When you win, you'll get a Mind Ring. After that, you'll end up back in Artis's office. Head left to enter the teleporter.
You'll have a conversation with Noel, after which he'll join you temporarily. If you have both Opera and Ernest, you'll have to choose between the last two characters, Noel and Chisato. Neither of them are awesome, but they both have good points. Your choice. If you don't want Noel, don't use him at all now, and de-equip him. Either way, head southwest to the Cave of Red Crystal.
Items: Dream Bracelet, Heraldry, ?MINERAL (Moonite), Resurrection Bottle, Cinderella Glass, Flying Hawk Robes, Fruit Syrup, ?MINERAL (Meteorite), Link Combo, Fairy Glass, Chisato's Job ID, Rune Codes
Enemies: Hellhound, Bang, Raystinger, Periton, *Arcmene
After a short scene, go north to enter the cave proper. The enemies here, as stated, are nasty. The Hellhounds have a large amount of HP and hit fast and hard. The Raystingers can paralyze you from a distance. But the nastiest bunch (and of course the ones you meet most often) are the Peritons, which have 12,500 HP, can cause every status effect using a long-range spread attack, fly, and give crappy EXP and FOL. Use Thunderstorm against them if Celine's in your party. You should definitely start building up the Familiar Specialty up; it's invaluable here.
The start of the cave has four upward-leading paths, but the middle two are connected. First go to the rightmost one and follow it all the way up for a measly Resurrection Bottle. Next take one of the middle two paths and follow it to the top right. Go down a bit and you'll see a path leading downwards with stairs, and a bright one to the left. Don't go down; it's just a huge circle (and enemies attack more often on this screen, apparently). Just head left and pick up a Dream Bracelet, Heraldry for Leon, and a ?MINERAL (Moonite). Go back to the start (and if you're smart, head out and save before going on).
Now take the left passage, which leads onwards. Your first intersection is a choice between up or lower-right. Ignore the lower-right one and go up. Pick up the Cinderella Glass and continue right and down (this is where the lower-right passage led to). Continue to the lower right. Now you're in a room with a crossover; the passage leading to the right ends up going down and below the passage leading down (which soon heads right). So, first go right then down, and start heading left. If you've done the two scenes with the redhead in Central and North Cities, you'll see another one play out now. Continue left to pick up a Flying Hawk Robes (great armor; give it to a magic user), then go back to the intersection and take the downward-pointing one. If you've seen the scene, pick up the shiny object; it's Chisato's Job ID. Continue right.
You can see the Synard here but can't get to it. You can go right or down; it doesn't matter which you take as they both lead to the same place. Follow the long path to the lower left, then go up (down) the stairs to reach a save point. To your lower right are two chests with a Fruit Syrup and a ?MINERAL (Meteorite). Save again, then head straight north. As soon as you enter the screen you'll start a boss fight.
The two Arcmenes have 40,000 HP each, but aren't all that tough as long as you keep them occupied ("Spread out and attack!" is a good strategy to have for your other fighter or two). And Celine/Noel/Leon can help out as well, of course. Just keep using regular attacks against them; unless you're using Ernest (who's slow as molasses), they should be fast enough to keep them from doing any real harm or from teleporting around. You'll get one or more Steel Armor/Reverse Dolls when you win, plus you'll get your own Synard! And you'll get the choice of whether you want Noel to join or not.
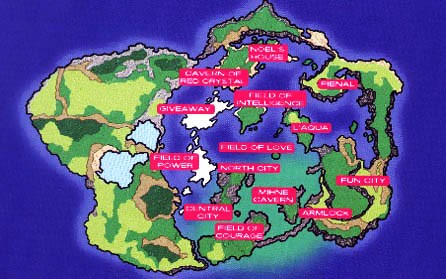
Now, of course, a large amount of places are open to you. First, though, if you have an extra space in your party, return to Central City. Go into City Hall and go up to the second floor, where you'll find (surprise) Chisato! Talk to her to get her to join you. You now have a full party! The world map isn't all that large. The cities you can get to are as follows: North City and Central City (same place as before, southwest of the map), Armlock (a lone city on a grassland continent), Giveaway (a snowbound city in the northwest), Fun City (has a coliseum prominent on it) and the Fake Gallery (it's hidden on a small snowy island shaped like a narrow "L", near the straight part of the L). You can also visit L'Aqua, but you can't get in just yet. There's only one free item in any of the cities; it's in the Giveaway University, and it's a Fairy Glass.
Now's a great time to build up Pickpocket if you haven't yet. The first person you should pickpocket is the Guildmaster in Armlock, who yields a Magician's Glove, the upgrade to Bandit's Glove, which makes subsequent pickpocketing much easier. Your next must-have item is the Bunny Shoes, which you can get from the Bunny in Fun City. Keep trying, because this item makes further battles ten times easier. You can also save tons of money by pickpocketing (for example, by stealing the 50,000-FOL Force Sword from Mirage in Armlock). Everyone should have a book under publishing in the Central City editors, as well; return often to get dividends.
You'll want to do some Alchemy, Customizing, and Blacksmithing if you can at all. Depending on your skill levels, you may find the next levels very easy or very tough. Do the best you can to build up those item creation levels! You should definitely splurge on a Lezard Flask (84,000 FOL with Identify All!) somehow, because you can make Sage's Stones using Alchemy with it, which can sell for 80,000 FOL each! If your item creation levels are low, you can just keep making the stones (Celine always seems to be good at alchemy) and sell them, then go to the Fake Gallery and buy stuff to your heart's content. You should definitely pick up a Magical Rasp while you're there, too. (If your alchemy levels are low, steal an Erlenmeyer Flask from the Guildmaster in Central City, and use Orchestra.)
When you're ready to continue onwards, go back to Central City and talk to Mayor Narl. You'll be sent on a "collect the jewels" quest involving four Fields. Narl will give you the necessary Rune Codes and another Link Combo. I'll follow these in the order the game tells you to go, so first is the Field of Intelligence, north of Central City.
Items: Jeanne's Helm, Alpha Box, Mirror of Wisdom, Rune Metal, Fruit Syrup, Great Punch, Fairy Glass, Rare Gauntlets, Cinderella Glass, Resurrection Mist (x2), Reverse Doll
Enemies: Ricki, Reflectguard, Controller, Wizard, *Magicbox, *Workbox, *Guardbox, *Magichand
Here's the basic idea. Your ultimate goal is to flip six switches which then open the way to the boss. The mirrors are two-way doors, and the squares are one-way doors: you step into the yellow squares and end up on the red ones. You'll work your way basically in a circle around the place. The enemies aren't too tough; the worst ones by far are the Wizards, who a) turn people to stone; b) cast Foehn and Cure All; and c) turn invisible (and hence invincible) a lot. Plus they have 20,000 HP each! It's best to let spellcasters deal with them. Turn Silence off, because it almost never works, but Rena/Noel will keep trying to use it instead of casting attack spells.
For starters, go into the top left mirror to pick up a Jeanne's Helm (only Precis, Chisato, and Opera can equip it). The yellow square leads to the first switch. (In every switch room, there's one yellow square and one red square. You land on the red square, flip the switch, and exit via the yellow square, which deposits you very near the place where you left, except in two cases, the first and last switches.) When you exit the first switch room, go up. The first yellow square leads to switch #2. Go right and into the mirror.
You'll land in a room that looks uncommonly like the one at the start. Pick up the Alpha Box and Mirror of Wisdom, then go into the center mirror to pick up a Rune Metal, Fruit Syrup, and Great Punch. Go back and into the top right mirror to continue. There are two more yellow squares (one on either side of you) which lead to switches. After flipping them, go back to the mirror room and return via the top left mirror to your original maze.
Go into the square at the top right for your fifth switch. Continue to the bottom left to end up at the last switch. Flip it, then exit via the yellow square to reach a platform with a Fairy Glass and a mirror. Enter the mirror to end up back at start. Exit, rest up if necessary, and save. Go back into the Field and enter the middle mirror, then enter the yellow square. The boss fight will begin as soon as you enter.
The main bad guy is the Magichand, in the back. He has four helpers: two Magicboxes, a Workbox, and a Guardbox. The hand does nothing by itself, but is "fed" programs by the boxes. The Magicboxes tell it to fire a spread attack or straight laser; the Guardbox makes it defend, and the Workbox heals it. I dunno, every time I end up here my other fighter and spellcasters whip the Magichand into submission right away, and the boxes do NOTHING when the hand is dead. So I never had any trouble with it. (Ian Kelley recommends you destroy the Guard and Workboxes first, then the hand, then the Magicboxes.) When you win, you'll get a Rare Gauntlets, a Cinderella Glass, two Resurrection Mists, and a Reverse Doll. After a scene, you'll also get your goal, the Jewel of Intelligence. Exit out.
Items: Marvel Sword, Blackberry, Rune Full Moon, Assault Bomb, Melting Lotion, Jeanne's Armor, ?GUARD (Mithril Helm), Atlas Ring, Protection Ring, Jewel of Power
Enemies: Insaneload, Darkcrusader, Atulatul, Ghast, *Yety, *Guardian
The Field of Power is just west of North City (on the snowy patch). You can't actually see the entrance; it's just a path up the mountain. The maze isn't too bad: what's bad is that the rooms are all HUGE and the enemies are tough. Especially watch out for the Ghasts, who hit REALLY hard and can kill a party member in two or three hits (plus it has 20,000 HP!). The knight enemies come in groups of up to 8 and can gang up on your spellcasters, so watch it! Celine is better than Leon for this dungeon, and if you're using Dias give him the Bunny Shoes you should have pickpocketed from Fun City.
At the start, you can go three ways: two paths leading up, or far right. Head to the far right. You'll see a Yety guarding a switch; it'll come towards you and start a fight with three of them. At all costs, keep them away from the switch at the right side of the battlefield! If one of them hits it, it'll cause an avalanche and block off the passageway. If it's getting desperate, use Provocation (press Select) if someone knows it; it might work. After beating the Yetys, keep going right. You can go right or up the stairs to the top right; they're both dead ends holding treasure (a total of three: an Assault Bomb, Melting Lotion, and up the stairs is a Jeanne's Armor - good for Precis, Chisato, or Opera). Head back to start. Exit and save if you wish.
Take the first (leftmost) path up. You can now go right or up; head up for now. Keep following the long path and you'll reach your prize: a Marvel Sword! It's even better than the Force Sword you can buy in Armlock; give it to Claude or Dias. Keep going right to go back outside. You can now go up a ladder, or right into another cave. Head right. Pick up the Blackberry, and continue to the top right to reach another Yety fight. Beat them, then continue right and exit down.
You can now go down the ladder, or right, where the path branches again to up or down. First go down the ladder to pick up a Rune Full Moon for Rena or Bowman, then go back up (down eventually leads back to the start). Head right, and take the upper path leading to the cave at the top right. Go straight to pick up a ?GUARD, which turns out to be a Mithril Helm. I'll call this point "Point A". You can now go left or right. Left leads backwards again, so go right.
Keep following the path to the outside, then to the top left and up the ladder. Go right across the bridge and you'll see two ladders. Take the right one to pick up an Atlas Ring, then go back down and take the left one. Cross the bridge to the left and go up the next ladder to reach a save point. Save, heal up (use Familiar to buy more Black and Blueberries if you need them) then head across the bridge to the top left. You'll eventually exit the screen and immediately start a LONG boss fight with the Guardian.
He has 130,000 HP and a nasty physical attack. Have Rena keep using Fairy Heal and/or Cure All, and have your fighters just keep pounding it (Bunny Shoes REALLY come in useful here!). It's weak against Darkness, so Leon might be better than Celine for this fight. After a while, the Guardian will collapse and stay on the floor in a small oblong piece. When this happens, take your fighters OUT of there! Go as far away as possible, then put them on "Do nothing". Have your spellcasters take it out from a distance with spells. If you manage to keep him dizzy long enough, though, he'll never reach this form. When you finally beat him, you'll get a Protection Ring.
Heal up (this is important) and continue along the path to the north. After another scene, you'll get the Jewel of Power. Go back south to the save point, heal, then go back down the ladders till you reach Point A again. The easiest way to reach the end (it's a long haul in any direction) is going left from here, fighting the Yetys, and continue left. Go down the ladder, left across the bridge, then down the next ladder. Head left into the cave to reach the point where you got the Marvel Sword. Now just go to the lower left (long walk) to reach the starting point of the dungeon. Exit to the lower left. Congrats!
Items: Sour Syrup, Spring Water, Jeanne's Shield, Scyther, Mithril Greaves, Stone Check, Protection Ring, Warrior Statue, Jewel of Courage
Enemies: Rikilo, Otif, Fenrilbeast, Darkcrusader, *Guardian
The Field of Courage is on a small island to the south of the world map. I found this to be the easiest Field, probably because it's the shortest and the enemies aren't so tough. The thing to realize here is that most of the exits of rooms will lead you back to where you came from. In other words, doors aren't two ways: if you enter a room then leave by the same way you came in, you'll end up further back. It's very straightforward if you remember that.
Enemy-wise, the Otifs can turn you to stone, so Rena's Dispel (or some Familiar-bought Spring Waters) come in useful. The only two enemy parties which should give you major trouble are the set of two Fenrilbeasts (the older-older brother of the Salamander; use the same tactics) and the set of eight Darkcrusaders, which surround you. Try to beat two or three of them near your spellcaster (Rena or Celine), then have them let go with Lunar Light or Light Cross as soon as they can.
Follow the instructions I give exactly; don't stray from the path. From the start, first head left and pick up a Sour Syrup, then go back right to the start. Head to the top left for a Spring Water, then go to the top left again. Pick up the Jeanne's Shield and continue to the top left. Go left from here and pick up the Warrior Statue, then go right to reach the room you were in before. Go right again to pick up a Scyther. Continue to the lower right and get the Mithril Greaves. Go to the lower right and pick up the Stone Check. Yep, that's all the treasure there is, so just head down to end up back at the start. Go out and save if you wish.
Head right twice, then go into the elevator to reach a save point. Save, then head right to get to the boss battle. (Told you it was short!) The Guardian is identical to the one in the Field of Power. When you beat him you'll get another Protection Ring, and (after a scene) the Jewel of Courage. Go back up the elevator, left twice, and down to exit.
Items: Serpent's Tooth, Resurrection Mist, Holy Rod, Hot Syrup, Jewel of Love
Enemies: Controlkey, Rikiha, NiquiaHG, Masterwizard, Gelatinblock, Breakwing, *Lover, Miel64, Takicodos, *Marsilio
The Field of Love is on a floating island at about the center of the map. It's the shortest of the fields, but fairly tough due to one enemy, the Masterwizard. He can cause all three status ailments, cast Shadow Flare, plus he has 35,000 HP. And of course he can float around invincible whenever he wants. The Gelatinblocks are rare and only appear one each, but they're a) extremely tough: they have huge attack and avoid stats and are immune to magic; b) can split, so you may end up fighting seven or eight of them (!); c) leave tons of experience. Running away from fights in this Field isn't anything to be ashamed of, by the way.
First head to the top left and pick up the Serpent's Tooth for Noel, then exit left and follow the path till you reach a red crystal orb. Ignore it and go north. Touch this orb and a path will open to two chests with a Resurrection Mist and a Holy Rod for Celine. Now go back down and touch the orb, then go across the new bridge west and then north. Get the Hot Syrup, then continue right and up. That's it! Save and go up for the boss fight.
Lover is pretty pushover-like. She has 60,000 HP. Her only two attacks are a multi-hit beam which takes a while to set up, and the ability to heal herself for 5,000 HP. Get rid of her first, then concentrate on the Breakwings, who can cast Star Flare (use "Spread out and attack" for your other fighter(s)). If Claude has the Eternal Sphere equipped, he'll absorb the Star Flares, so that'll make your life way easier. No prizes for winning other than the Jewel of Love. Save, then exit.
Head back to Central City and talk to Narl to initiate a very long scene. When it's over, you'll be on the world map near Fienal (the only place you couldn't get to via Synard). Enter and another long scene will play out, after which you fight two mechanical menaces. The large one can deal out some major damage with its repeating gun, so get rid of it first (if Chisato or Precis have Thunder-Elemental weapons, equip them and let them deal merry hell to it). Have Celine cast Thundercloud. The other one (Miel64) isn't very tough. After winning, you have to fight the battle all over again, then you're treated to an unwinnable boss fight with Marsilio; just have everyone lose to him. After one more scene, you end up back in Narl's office in Central City.
Items: Mind Ring, Mithril, Fruit Syrup, Fresh Syrup, ?MINERAL (Damascus), Encyclopedia, Smelling Salts, Mithril Mesh, Smith's Hammer, Spring Water, Meteorite, Wonder Drug, Lightning Gun, Dummy Doll, Aceras, Sacred Tear, Fallen Hope, Fairy Glass, Pyre Tear, Merlin Drink, The Key to Mihne Cave, LEA Metal, N.F.I.D., Void Matter
Enemies: Burst, Breakwing, Evilwater, *Bark, Darkcrusader, Takicodos, Rikiha, *Marsilio, *Shigeo, *Berle
Yep, I decided to just stick the next three/four segments into one part, because all but one of them are pretty short. So right now we're headed to Armlock. When you enter you'll see a short scene; head to the top left and talk to Narl. You'll end up in the Heraldry Weapons Laboratory. Go up and save, then enter the structure. Go right and take the first left to pick up a Mind Ring; that's the only treasure here. You can't get lost, but for completion's sake: Go back down and left, go up twice, take the first right, and continue up. A long scene will occur. Go all the way back to the start (the teleporter) and another long scene will occur.
You'll end up back in Armlock, and Mirage will give you The Key to Mihne Cave. The cave is directly west of Armlock, and there are some nasty enemies in it. Heal up, then head there. The first thing you should know is that the enemies attack very often in here, and they're TOUGH. The pairs of Evilwaters are pretty easy; just make sure Rena/Noel can cast Dispel. Whenever you meet Bursts, beat them as soon as you can (they have fairly low HP and defense) or they'll drain your MP like there's no tomorrow. But the nastiest (and most common) by far are the groups of three Breakwings, sometimes accompanied by a Burst. Silence actually seems to work pretty often, so make sure it's on and that Rena's on "Aid friends". Celine's Thundercloud also works great. Put your fighters on "Spread out and attack!" and try to equip armor which protects against Star.
The other thing to keep in mind is that once you beat the boss, you won't have any more random encounters! So just go straight up to get to the boss first. (At the first intersection, head to the top right instead of top left.) The boss isn't very tough, although the fight will definitely take a long time. He doesn't move. The main thing is to keep him dizzy as long as you can so he won't cast Lost Patience, which will severely cripple your characters, poison some of them, and kill off the weak ones. Put Rena on "Recover friends only" and use Resurrection Bottles to free her up to cast Cure All or Fairy Light. Multi-hit techs like powered-up Twin Slash or Dragon Howl, Hurricane Slash, Flame Thrower, or Bang-Bang Attack work well, as do regular attacks with the Eternal Sphere. After the long fight, you'll win a Mithril and the LEA Metal. Now you can explore without worrying about enemies.
Go back to the start. Going up, the first right has a Fruit Syrup, and the second right has a ?MINERAL (Damascus). Take the top left path. Pick up the Encyclopedia for Leon, then continue up the left path. Pick up the Fresh Syrup and go up again to get a Smelling Salts. Up some more is a Mithril Mesh, the chest at the top right has a Smith's Hammer, and there's a hidden chest to the lower-left of that which holds a Spring Water. Go back down and take the right path to pick up a Meteorite and a Wonder Drug. Go right to get a Lightning Gun. Go down then right for a Dummy Doll, then go up for an Aceras. You've cleaned the place out, so go back to Armlock. Talk to Mirage to get an N.F.I.D., which allows unlimited access to Fun City! You can't play just yet, though.
Fun City is north of Armlock. Save before entering. When you do, you'll get a long scene, followed by the Sacred Tear and Fallen Hope weapons for Claude and Rena (both weapons drop MP use to 1/2; it's great!) and the Void Matter, which lets you harm the Ten Wise Men. Talk to the man at the left to get a choice to train more, rest for free, or finish up and talk to Narl. Training pits you against fairly easy enemies which give you nice experience (you've seen them all already), with the exception of the Takicodos, which can do some damage and force you to rest after fighting them. When you're satisfied, rest, save nearby, and choose "Go talk to Narl". A battle will ensue.
If one character has Bunny Shoes, have him/her use Provocation and keep running away from Marsilio while everyone else pounds him. Alternatively, you can use a Skanda Compress on a character (or Skanda Ointment on all of them) to have the same effect as the Bunny Shoes. Long-range techs and spells work best. A long fight, but not that difficult. You'll win a Fairy Glass from him. You'll then end up one screen down. Go left to rest if you wish, then save and head out. Try to exit the screen for one more fight, this time with Shigeo. Again, speed is good. I found him much easier than Marsilio. Claude's Ripper Blast works well, as do other multi-hit techs and spells (spells do more damage against him than Marsilio), or regular attacks using Eternal Sphere. Equipping Fire-resistant armor is good as well. Watch out for his Infringement attack, which can hit you wherever you are and have a small chance of stoning you, as well! You'll win a Pyre Tear from him. Now exit Fun City (rest up at the inn if you wish) and head to Armlock. Save before entering.
As soon as you enter Armlock you'll have a scene, followed by a fight with Berle. This one is really tough. When he uses Meta-Guard, nothing will hurt him, so put all your fighters on "Stay away from the enemy!" When it goes down, switch back. Multi-hit techs can keep him from putting it up. His physical strength is very high, so Rena should be on "Recover allies only". If you surround him with fighters you can get quite a bit of damage before he manages to break away, and dizzying attacks like Flame Thrower are great. Spells don't do so much damage, so you may want to consider having a third fighter instead of Celine/Leon. You'll win a Merlin Drink from him when you're done. When you exit Armlock, another short scene will play out. You're now ready to enter the last dungeon (sort of, heh heh heh...)
Items: Reverse Doll (x3), Resurrection Mist, ?ITEM (Pet Food), Spark Whip, Nuclear Bomb, Left Cross, Mithril Shield, Heraldry Book, Lotus Eater, Beta Box, Mithril, Sylvan Boots, Titan's Fist, Atomic Punch, Rune Shoes, Fairy Tear, Pleiad Sword, Spring Water, Fresh Syrup, Spark, Clap Rod, Duel Helm, Sage's Stone, Aceras, Flash Pot, Goddess Statue, Duel Suit, Cure Stone
Enemies: *Ruprecht, *Jibril, *Nicolus, Kidnier, Riverside, Meduslizzard, Weirdavia, Miel64, Takicodos, Ericodos, NiquialM, Masterwizard, Darkcrusader, Succubus, *Vesper, *Decus, *Cyril, *Indalecio
Seeing as this is the last dungeon, you're gonna want to make some major preparations. First, an absolute necessity is to have someone with the Love of Animals talent with Familiar level 10, and buy 20 Pet Foods. You'll need them. Do some more item creation with the Magical Rasp (all those royalties from Publishing should be coming in by now); Reflection Armors, Duel Suits and Helms, Ishtar's Robes, and The Armband of Kali are welcome additions. If you have Precis or Chisato, make an Algol as well and equip it ASAP. You can use Metalwork to make some nice accessories as well, like Fairy Ring. Also, Compound some Skanda Ointments and Compresses, and use Art to make some Skandas; they'll be invaluable. Customize any awesome weapons you don't have yet.
One more thing you should do is go to the Fun City Bunny Races. Save before you enter, and bring a book or some homework. 8-) You want to get one more Bunny Shoes; this will make your life ten times easier. The problem is that winning it has a chance of about 1 in 50 or so; it usually takes an hour or longer to win it. Buy up 8 tickets, bet on Bunny Shoes every time (if they don't come up, try to get a Seltzer, since it's worth so much, or a Magical Drops). If (when, I mean) you lose all 8, restart and try again till you get your second Bunny Shoes. When you think you're ready to take 'em on, go to L'Aqua. Head inside then take the first right and talk to Narl. You'll end up near Fienal again. Enter again to fight not one, not two, but THREE of the Wise Men at once.
I was at a high enough level for this to not be a problem, so I'll tell you what Ian Kelley has to say on the matter. The HP of the Sages are: Nicolus 45,500; Jibril 85,200; Ruprecht 105,800. Ruprecht is the one with the tuning fork and weird lights on his head; Jibril is the one with the large black robe, and Nicolus is the other one. 8-) Their attacks are as follows: Ruprecht uses two powerful long-range attacks and can also cast Mind Absorber, and can teleport around the battlefield. Jibril also teleports a lot; his major annoyance is being able to swallow a character a la the Vissayer enemies from before. You have to attack him to get him to spit out the character. He can also cast Thundercloud and cause an explosion around him. Nicolus can use multi-hit long-range attacks which inflict all three status ailments, and can cast Delay and Noah.
Have Claude do an Air Slash right at the start, because otherwise Jibril will immediately teleport and do his explosion attack, which can kill one or more characters outright. If you're using Celine, have her cast Southern Cross; Leon can use Shadow Flare. Claude's Eternal Sphere regular attacks, or Dragon Howl Killer Move, work well against the Sages. Using a Skanda Ointment to speed everyone up is very useful (unless you've gotten another Bunny Shoes like I recommended). When you win, you'll get three Reverse Dolls and you get to enter Fienal proper. Exit and save, then do so.
If you're at a level below the high 60s and don't have the proper armor, you'll be slaughtered shortly. You WILL have to level up quite a bit. Use your SP first on Effort and then on battle skills. This place is quite complicated. There are 10 floors, and you navigate around them via teleporters. The enemies are very tough, so here's a basic rundown of the nastier ones:
Kidniers and Riversides: Like the Visseyers. Kidniers are beige and have more HP than the blue Riversides, but the Riversides are way faster. If you don't have two Bunny Shoes on, you're more or less dead meat; they'll swallow you. Pump up Celine's Motormouth skill and have her cast Lunar Light IMMEDIATELY when a battle with these guys start; it could be over in about two seconds with everyone inside a monster if you don't. Use a Skanda to escape if you're desperate.
Weirdavia: This huge monster has 100,000 HP! Its Master Attack can certainly kill anyone outright. If your levels are low, run away! If you think you can hack it, though, definitely go after it; it gives 40,000 EXP! It sometimes leaves a Flying Hawk Robes as well.
Ericodus and Takicodos: Have Celine use Thundercloud. These guys can jump around and use their Multiple Terrors to great effect, often killing people outright. Spread out so they can't hit more than one person at a time.
Okay, now you're ready to hit the dungeon. Dum-da-da-dahhh!
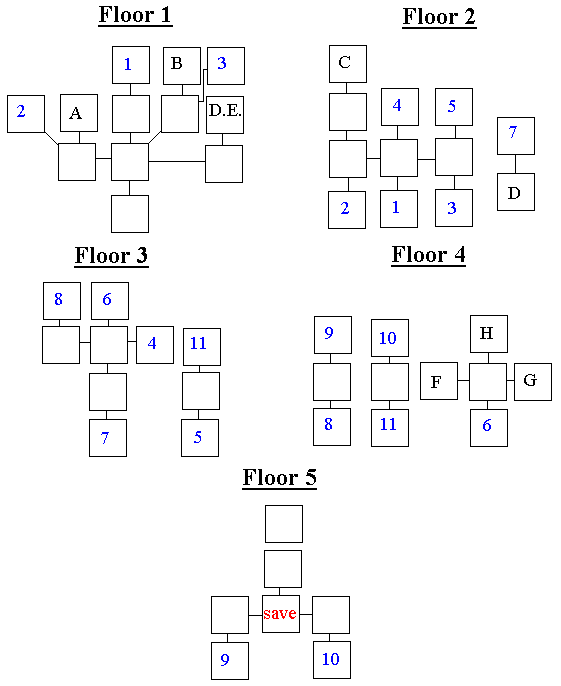
The blue numbers are teleporters; they're repeated twice because they join two floors together. The lettered rooms are treasure rooms. Again, the lines aren't exact (sometimes things join using diagonals, or there's a door pointing up at the left side of the room, etc, etc) but they give a pretty good idea of how to get where. So here's the basic way to get all the treasure and get to the fifth floor, where you'll reach a save point and the next boss.
Start by going up to the next room. Straight right is a dead end and straight up misses some treasure, so first use the door pointing up at the right side of the screen. Go up from here to room B, with a Mithril Shield and a Heraldry Book. Go back down and back left. Now take the left path and go up from there to get a Spark Whip, Nuclear Bomb, and Left Cross. Go back down and continue to the top left to reach your first teleporter (#2). Take it to the second floor.
Go up all the way to room C, which holds a Resurrection Mist and a ?ITEM (Pet Food). Go back down two screens, head to the upper right, and go up to another teleporter (#4). Take it to Floor 3. Go left into a four-way crossroad room. The two vertical paths lead to treasure; the left one leads on. First go up to reach a teleporter (#6) to Floor 4. Go up. The three doors here all lead to treasure rooms; left is an Atomic Punch, right are some Rune Shoes, and up is a Mithril, Sylvan Boots, and a Titan's Fist. Go back down to the teleporter and return to the four-way screen, then go down this time to reach another teleporter (#7). Take it to reach another treasure room with a Lotus Eater and Beta Box. Go back up to the four-way and take the left path. It leads to teleporter #8 to Floor 4. Now it's just straightforward; follow the path up through the next teleporter, then go up and circle right to reach the save point. Phew! Go up for another nasty fight with Vesper and Decus.
By the way, these people and the next one have voice clips which appear on the voice list. Anyhoo, to whit: Again I entrust you into the able hands of Ian Kelley. Vesper has two regular attacks: throwing bombs or using a multi-hit beam. He can also cast Tractor Beam, Blood Sucker, and Mind Absorber. His major attack, though, is Mind Blast, which can hit for major damage, poison or petrify its target, and never misses. Decus (man, that voice is annoying!) uses flame attacks: Explode, Eruption, and (brace for it) Spicule, which is NASTY. Try to equip Fire-resistant armor/accessories before coming into battle and your life will be much easier. If you have Leon, Noah does mucho damage to Decus. Multi-hit techs which have good chances of dizzying Decus work great here, e.g. Mirror Slice, Sword Dance, Cold Wind, Tear Gas, etc. Using Anti and Skanda Ointments will help, as usual. Concentrate on Decus first, then turn your attention to Vesper. You get a Fairy Tear when you win.
Go back and save, then go north to the next teleporter. When you reach the sixth floor proper, you won't be attacked by enemies for the duration of the floor, but you will have a nicely challenging puzzle to solve. Here's the picture.
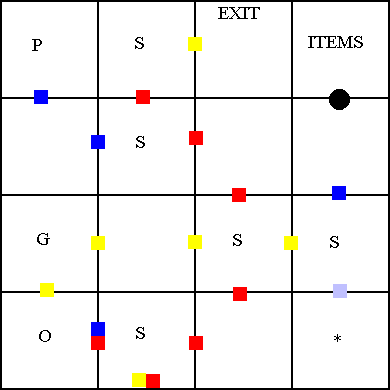
There are three "regular" switches, denoted by an S. All the switches are connected. The switch can be on red (left), yellow (middle), or blue (right). The colored doors will open when the correct color is switched (two of the doors will stay open if either of two different colors are on). The red/yellow door at the bottom is where you start. There are also four "special" switches: purple (denoted by P), Green (G), and Orange (O), and the final switch (*). The grey door (allowing you to switch *) is only openable once you switch G, P, and O. The black circle leading to the items will stay closed once you switch either G, P, or O, so be sure to go and get the items before starting to solve the maze. In baby-speak, here's the exact solution to get the treasure and get out:
Right, up, middle switch, right, right switch, up, up, get items. Down, down, switch middle, left, switch left, down, left, left, flip switch O. Right, right, up, switch middle, left, left, flip switch G. Right, right, switch left, up, left, switch right, left, up, flip switch P. Down, right, switch left, right, down, switch middle, right, down, flip * switch. Up, left, switch left, up, left, up, switch middle, right, up. And you're back in enemy land, so watch it.
Fienal itself is much more straightforward bashing now. First go left and follow it to get a Spark for Chisato, then head back and take the right path, which leads to another save point, and you know what that means... left and up, and we fight Cyril. Equipping wind-resistant armor (like Reflection Armor and Pallas Athena for fighters, Rune Shoes for spellcasters, Gale Earring for women, etc.) will make your life WAY easier. Either way, though, this fight will be LONG. Cyril has 300,000 HP. Ian again: Cyril can teleport, hit you where you stand via lightning, shoot out force fields, and cast Daemon's Gate or Word of Death. His worst attack, natch, is a Wind-Elemental spell called Wind of Destruction, which will certainly kill anyone weak (or even normal) against wind. Plus he's invincible during the few seconds it takes him to cast it! (However, you can use attack items to knock him out of it if you're quick enough.) If your fighters are fast enough, using multi-hit techs (or even just regular attacks, if you have the Slayer's Ring/Eternal Sphere) works unbelievable, since he can't teleport away and he'll just sit there. Even if you don't dizzy him, you'll usually be able to do upwards of 50,000 HP of damage before he manages to get away. When you finally win, go back and save, then head onwards.
One last intersection, left or right: go right to get a Clap Rod, then left and just keep going. The only door you see holds a Duel Helm and Sage's Stone; get 'em and keep going. You'll go back DOWN to the 8th floor from the 9th, but don't worry, you'll end up at floor 10 like you should. At the save point, don't go up yet, go left. The first door has an Aceras and Flash Pot, and the second has a Goddess Statue, Duel Suit, and Cure Stone. Go back to the save point and save. You can now finish the game, or go to the bonus dungeon. Let's assume you're finishing the game, yes?
Indalecio has 500,000 HP! If you haven't done the Filia PA in North City (and in order to see it, you have to save here first) he'll have his Limiter Off. With his Limiter on, he's nigh near impossible to beat without cheating or having ridiculously high levels (over 200). So we'll assume it's off. His most annoying attack in the first part of the battle is Divine Wave; this spreads out from him and intercepts any fighters coming in close, multi-hitting them and possibly killing them. If you see it, run away. If you manage to get in close, use multi-hit techs like Mirror Slash and Sword Dance and he's turkey meat. It'll still take a while, though... He can cast Star Flare as well, but won't if you keep him busy. After you get him down to 300,000 HP, he'll merge with Filia and the battle gets a whole lot tougher. For starters, he moves around WAY quicker, so multi-hit techs probably won't be able to hit. Dragon Howl, Alpha on One, Tear Gas, Bloody Mary, etc. i.e. fast but strong techs are more useful. In this form, he can cast nasty spells like Explode, Noah, Fairy Heal, and Southern Cross; plus he can use his VERY VERY nasty "Divine Song", which is devastating; make sure you have a high Body Control skill! Bunny Shoes/Skanda Ointments are quite useful (read: almost impossible to beat without 'em). If you manage to make him dizzy, keep going at him with multi-hit techs. Have Celine/Leon use all their best spells. And good luck!