
 |
|
|
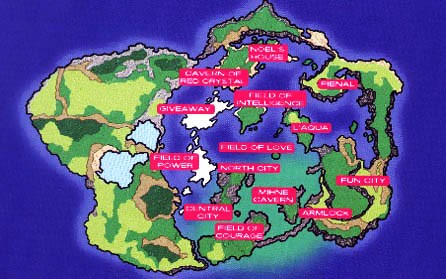
Fun City
Cooking Master
Battle Arena:
Duel Battle
Team Battle
Bully Battle
Survival Battle
Up at the top of Fun City is the Bunny Races stable. These guys get on your nerves after a while. 8-) You can order up to 8 tickets (at 1000 FOL each) from the big bunny mannequin. You have the option to look at the bunnies before the races, and you'll be told each of their three major stats:
Speed: Self-explanatory, no?
Stamina: Shows how much running the bunnies can take. A bunny with low stamina will have to stop and catch a few Z's if they tire themselves out.
Personality: The most important stat. An intelligent bunny will usually take first or second place because they know when to run and when to quit. A hot-headed one will tire himself out dashing around. A slow and steady one probably won't dash at all, which can be good or bad. Be careful in your picking, because usually a smart bunny with low speed and stamina can beat out a stupid one with high speed and stamina, but not always. Personally, though, I always just go for the best prize. 8-)
You have to pick both the first- and second-placing bunnies to win the race. The odds should be 1 in 16 for that, but depending on your prize it's really different; the odds of winning the Bunny Shoes, for example, seem to be about 1 in 50 or so. This is because the more of a long shot a bunny is to win, the better the prize will be awarded if he does. You can talk to Siggy the Tipster outside for a tip on the next race, but he's frequently wrong.
Bunnies have to go through two laps. A few things can happen here. Most importantly is if a bunny goes off on a dash. It'll dash for about two-thirds of a lap, then be forced to sit sweating (depending on its stamina, it might take longer till it gets up). Any bunnies it hits while dashing will be knocked down with a little angry scribble above it. Its temperament decides how long it takes to get up from that. Finally, a bunny might be forced to just catch some Z's if it loses all its stamina (stamina gets used up in a huge burst when it dashes). You can't control the bunnies at all during the race, so you might want to get a book or homework or something while you wait. 8-)
The following prizes can be won from the Bunny Races, in order of importance:
Bunny Shoes, Magical Drops, Ganze Sea Urchin, Seltzer, Wisdom Ring, Lunatic Ring, Fairy Ring, Cinderella Glass, Fairy Glass, Reverse Doll, Dummy Doll, 50,000 FOL, Protection Bomb, Tetra-bomb, Stone Check, Paralysis Check, Poison Check, Spring Water, Resurrection Bottle, Blackberry, Aquaberry, Blueberry.
East of the main square is the Cooking Master forum. Here is where you win the rare ingredients which make the best food (heals high amounts of HP and MP, and sell for great prices as well). You can Reproduce the ingredients as well, so you don't have to keep coming back here.
The basic idea is as follows: Your base is at the bottom right. In the center is a suppository of ingredients (there's an infinite amount). You'll always have both regular and rare ingredients in the matches. Points are awarded for successful dishes, but rare dishes are awarded far more points than regular ones. You also have a Pressure gauge which fills up when you fail your cooking, and gets lower with every successful dish. Also, whenever you pick up a rare ingredient from the center, you'll lower your Pressure gauge. The higher your Pressure gauge, the harder it is to make new items. The starting Pressure level is different for each character.
Controls are simple: Press Triangle when you're near the base to open your Cooking menu. Keep trying to make rare items (the regular ones just aren't worth it). When you run out, run back to the center and keep picking up stuff until you get some more rare ingredients (it might take a while, so don't go nuts). You have five minutes.
Here are some tips; most of these are thanks to Ian Kelley.
- Equip a Beret and an All-Purpose Knife to make the going much easier.
- The character's Courage skill is just as important as their Cooking ability. A higher Courage skill means your Pressure gauge will fill up slower.
- If your Pressure gauge is getting too high, go back to the center and pick up some more rare ingredients.
- In the Slime Battle, note that Slippery Slime is a regular ingredient while Jiggly Slime is a rare ingredient (even though they make the same items).
- Watch out for the Ganze Sea Urchin; it affects your Pressure gauge more than any other ingredient. This applies to successes as well as failures, so it's a risk to take (it's usually worth it).
When the five minutes are up, you're awarded a score as follows: Each successful dish you created has a numeric value equal to the % of HP or MP recovery that dish would do in the real game. (Note that rare food always has at least 70% recovery, as opposed to regular ones which have a max of 65%.) Your opponent will always have between 800 and 1300 points, usually hovering around 1000. Whoever has the highest amount wins. Your prizes differ depending on the Battle you entered (it's totally random); you'll get the ingredients you worked with inside the Battle. Here are the Battles and prizes:
- Meat Battle: 10 Meat, 10 Egg/Dairy Products, 3 Creamy Cheese, 3 Juicy Beef
- Seafood Battle: 20 Seafood, 1 Ganze Sea Urchin, 2 Prime Tuna
- Veggie Battle: 10 Vegetables, 10 Grain, 1 Magical Rice, 2 Purity Leaf
- Slime Battle: 10 Slippery Slime, 3 Jiggly Slime
- Dessert Battle: 10 Fruit, 4 Sweet Fruit
- Full-course Battle: 6 Meat, 6 Seafood, 6 Vegetables, 6 Fruit, 8 Egg/Dairy Products, 1 Juicy Beef, 2 Purity Leaf, 4 Sweet Fruit, 1 Ganze Sea Urchin, 3 Creamy Cheese, 3 Magical Rice, 3 Prime Tuna
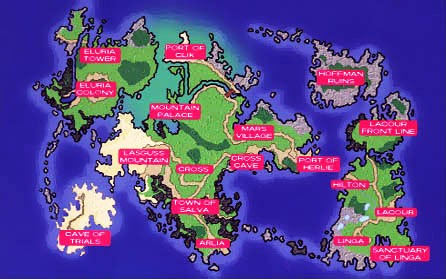
Your opponent is chosen randomly, but sometimes it'll be Puffy from the Cave of Trials (and Star Ocean 1)! You don't get anything special if you beat her, though.
However, if you have one character beat all the chefs (I believe there are four normal ones) as well as Puffy, the next person you meet will be Yarma himself! He isn't much better than a normal chef, though. The ingredients are chosen randomly like always, but if you beat him you get a Yarma Cooking Set and your Master of EATS degree! However, that means that the character who beat him can't be in the Cooking Master contest any more.
Battle Arena
Here we go, the creme de la creme of Fun City. Off to the left of the main square, you'll be up for some extreme challenges here. There are no less than four different ways to fight nasty enemies here. Let's go through it one by one.
It's you against one foe. There are five ranks, each with progressively harder enemies and better items. In Ranks B-E, your prize depends on whether you play as a fighter character (using Killer Moves) or a spellcaster (casting spells). I find Claude and Rena to be the best for the two categories. In Rank A, the prize will be a great weapon for the specific character who beats it; doing this with Noel is practically impossible, though, so be forewarned. (Well, you can do it easily if you have the Million Staff, but then you wouldn't want the prize anyway! 8-)) If you fight any category twice in a row with the same character, you'll just get 10,000 FOL as your prize. You will get 3 Blueberries, 1 Blackberry, and 1 Aquaberry to use throughout the four battles, so be careful with them. Here are the enemies and prizes in Duel Battle.
Rank E Enemies: Lizardaxe, Vopalbunny, Armedknight, Alraune. If you can't beat these, you shouldn't have gotten this far.
Rank E Prizes: Fighters: Peep Half; Spellcasters: 5 Frogs (a crappy helmet)
Rank D Enemies: Carlaeagle, Beastmaster, Gerel, Scewer. Anyone should be able to blaze through this.
Rank D Prizes: Fighters: Assault Bomb, Flare Bomb, Protect Bomb, Nuclear Bomb (the game just says "Flare Bomb" when you win, but you get the others too.)
Spellcasters: Moonite, Orichalcum, Meteorite, Mithril, Damascus, Rune Metal, Star Ruby
Rank C Enemies: Salamander, Goathead, Coldlizard, Raystinger. Tougher, but hopefully your attack power is high enough to blaze through these meatheads.
Rank C Prizes: Fighters: Shark Potstickers, Bird's Nest Soup, Peking Duck, 'Ishidaya' Tea
Spellcasters: Yukiyucho Tea, Yaegaki Tea, Root Beer, Apple Cider, Aged Berry Juice
Rank B Enemies: Darkcrusader, Ogre, Rikiha, Breakwing. Now we're getting tough. The Breakwing might give you some trouble, so you may have to use some of your healing items.
Rank B Prizes: Fighters: Moon Tiara; Spellcasters: Magical Drops
Rank A Enemies: Ericodos, Miel64, Kidnier, Meduslizzard.
OK. If you have a pair of Bunny Shoes (filch them from the bunny mannequin by the races) you should be OK; it's very tough otherwise. Also BE SURE to equip a Stone Check and Paralysis Check. Dispose of the Ericodos and Miel64 without using any healing items. Stay far away from the Kidnier; it's slow so you should have no problem. Use long-range techs if you're a fighter. The Meduslizzard is very nasty. If you have a Slayer's Ring, just use regular attacks; otherwise, slash away with your best techs. If you see it start to breathe green, go up or down ot get out of the way. It's way tougher for magic users. Lead it along, then when you see it start to breathe, go down and underneath it, then cast your best spell (you do have Motormouth at a high level, right?) It has 38,000 HP, so this will be a LONG fight. Plus it can poison you! Good luck.
Rank A Prizes: Ashton: Doubledemon Sword; Bowman: Flare Burst; Celine: Prime Prayer; Chisato: Aero Gun; Claude: Windsley Sword; Dias: Cromlea Sword; Ernest: Cat o'9 Tails; Leon: ; Noel: Death Fangs; Opera: Psycho Box; Precis: Hyper Punch; Rena: Fellper Nails
Here's how this one works. Basically, you have five one-on-one battles; win three of them and you've won the round. Of course, your best idea would be to put your three best fighters first, followed by Rena, then either Celine or Leon. The actual enemies seem to change based on your characters' current levels (either that or based on which enemies you've actually seen before; I'm not entirely sure). So you'll always be in for a big challenge, unless you've spent ungodly hours leveling up against weaklings. You will get 3 Blueberries, 1 Blackberry, and 1 Aquaberry to use throughout the five battles, so be careful with them.
Also, the difficulties of enemies in the different ranks don't seem to actually depend on the rank; I've gotten far more difficult monsters at Level D than Level B several times. There is a bigger chance of meeting nastier foes at the higher ranks, but that's about it. Since they're random, I can't very well tell you who's at what rank. But here are the prizes:
Rank F: Purple Mist
Rank E: Zephyr Earring
Rank D: Magic Cross
Rank C: Dream Crown
Rank B: Right Cross
Rank A: Star Guard
It's you vs. a bunch of bad guys! Pick one character to tee off against a lot of enemies. If you win, you get FOL and free SP! It's also a great way to level up. Mages will probably be sliced flat unless they're REALLY fast, so fighters (especially Claude, with Eternal Sphere) is the way to go here. You will get 3 Blueberries, 1 Blackberry, and 1 Aquaberry to use throughout the three battles, so be careful with them. Here's the rundown.
Rank F Enemies: FunnyThief x3, Lizardaxe x3, Slime x3. No problems here.
Rank F Prize: 1,000 FOL and 2 SP.
Rank E Enemies: Kobold x3, Robberaxe x3, Carlaeagle + 2 Magius. Watch out in the last fight; go for the Magiuses first.
Rank E Prize: 5,000 FOL and 5 SP.
Rank D Enemies: Bang x3, Hellhound x3, Periton x3. Equip a Stone Check for this set. Get the Bangs as quick as you can or they'll drain your MP.
Rank D Prize: 10,000 FOL and 15 SP.
Rank C Enemies: Darkcrusader x3, Otif x4, Insaneload x5. Now it starts getting tough. The Otifs split themselves; there's not much you can do about that besides having your Bunny Shoes and Flip at level 10. Keep your Stone Check for this set as well.
Rank C Prize: 20,000 FOL and 30 SP.
Rank B Enemies: Reflectguard x4, Wizard + 3 Breakwing, Takicodos x3. The Reflectguards aren't tough, just use Flip a lot. Get the Wizard first in the second fight, and get the Breakwings down as soon as you can (equip a Star-resistant piece of armor if you have it). Try not to get caught between the robots in the last fight. You will again need a Stone Check to survive this, unless you kill the Wizard before it can attack you.
Rank B Prize: 40,000 FOL and 50 SP.
Rank A Enemies: Takicodos + 2 Ericodus + 2 NiquialM, Riverside x4, 2 Kidnier + 2 Weirdknight + 2 Warlock.
OK. Get the little floating robots as soon as you can before they latch onto the Ericoduses and upgrade their power. The second fight is by far the toughest unless you have a huge AVD stat, because the Riversides are strong and very fast and can swallow you in one gulp! Luck will play a big factor in that fight. In the last one, go for the Warlocks first; ignore the Kidniers, since they're fairly slow. Get the Weirdknights after the Warlocks are done for, then the Kidniers. Quite difficult, so be very careful!
Rank A Prize: 80,000 FOL and 100 SP.
This is it; the true test of a warrior. Don't you dare try this one unless you're at bare minimum Level 110, and preferably level 125 or higher. That means you'll have had to do some wandering in the Cave of Trials a bit. Taking that as a given, my best strategy is as follows. Use Claude with the following equipment: Eternal Sphere, Star Guard, Battle Suit or Seraphic Garb, Bunny Shoes, Stone Check, Paralysis Check. Killer Moves: Dragon Howl and Mirror Slash. You'll pair off against 50, count 'em, 50 different enemies which get progressively harder. You should have no problems against the first half of them, but then they start getting tougher. Following is a list of battle items you'll get, but don't use them unless you really really have to, 'cause the last few fights are deadly!
Effect Items: Skanda Compress (useless; you have Bunny Shoes); Stink Gel (allows you to poison an enemy); Attack Vial (raises attack power); Pixie Cologne; Kamikaze Tonic; Smoke Mist (slows your enemy); Shock Oil (drops enemy MP to 0); Paralysis Mist (paralyzes enemy); Smoke Oil (same as Smoke Mist since there's only one target); Madness Mist (confuses enemy); Bubble Lotion, Bitter Lotion, Melting Lotion (all three allow instant-death attacks); Paralysis Oil (same as Paralysis Mist); Fairy Glass (stops MP consumption); Medical Rinse (regenerates HP slowly); Lilith Tonic; Mental Pot (useless with Claude); Natural High.
Healing Items: Aquaberry x3 (heal Poison and heal HP 10%); Blueberry x5 (heal HP 22%); Blackberry x5 (heal MP 22%); Lavender x5 (heal HP 3%); Artemis Leaf x5 (); Energy Tonic x5 (swaps values of HP and MP); Sour Syrup x5 (heal MP 30%); Sweet Syrup x5 (heal HP 30%); Maple Syrup x3 (heal MP 20%); Fruit Syrup x1 (heal HP and MP 45%).
And here's the enemy list. Good luck; you'll need it!
Fights 1-25 as follows: Lizardaxe, Armedknight, Slime, Bugbear, Carlaeagle, Gerel, Scewer, Slimepool, Shout, Sargwen, Mandrake, Salamander, Blackslime, Coldlizard, Hellhound, Periton, Reflectguard, Fenrilbeast, Darkcrusader, Otif, Reflectguard, Breakwing, Ericodus, Miel64, FunnyThief (yep).
Fight 26: Kidnier. Use Dragon Howl or other long-range techs; don't get too close.
Fight 27: Takicodos; fairly simple.
Fight 28: Riverside. Like Kidnier but way faster. Be careful and use long-range techs.
Fight 29: Wizard. Keep on him and he shouldn't be able to do much. He'll fade out, but catch him when he reappears.
Fight 30: Meduslizzard. If Flip is at a high level it's not that bad. Eternal Sphere regular attacks or Mirror Slice work well.
Fight 31: Weirdavia. VERY NASTY. Your Star Guard will help you a lot here. Don't use regular attacks; Dragon Howl works well. He has 100,000 HP.
Fight 32-33: Weirdknight and Warlock. Both pretty simple; beat them as quickly as you can.
Fight 34: Huntinggel. It can split, so get it before it can do so.
Fight 35: Giant. Use Dragon Howl if you have the MP; otherwise use Flip and try to get behind it. It's quite strong but slow.
Fight 36: Bloodgerell. Also can split; do NOT let it do so! It has 60,000 HP.
Fight 37: Punkponk. Dragon Howl works wonders.
Fight 38: Ladyqumira. Regular Eternal Sphere attacks are fine; trap her so she can't teleport.
Fight 39: Greatergoat. Blocks attacks easily, so be careful. Keep on it and use a Blueberry or two if you need to.
Fight 40: Dragonaxe. Very nasty; even when you flip around it, it'll catch you from the other side. Use Dragon Howl to soften it up, then come in with regular attacks.
Fight 41: F-thiefL99. Extremely fast and furious. Try to get him dizzy and just keep following up. You'll need to use some Aquaberries and possibly other healing items during this fight. He has 40,000 HP.
Fight 42: Lastavenger. Strong but not tough.
Fight 43: Meigus. Stay on her and she won't be able to do anything.
Fight 44: Orbiterbeast. The toughest lizard beast, with 84,000 HP and a nasty breath attack. This will probably be a long fight.
Fight 45: Starguarder. One hit with the Eternal Sphere will kill this guy outright. Or, if you're hit and you're wearing the Star Guard, one star will kill it.
Fight 46: Foriger. Fast, but not as bad as the F-thiefL99 (although quite a bit stronger). Get behind it and dizzy it if you can.
Fight 47: Cockatricking. Use regular attacks while it's on the ground to dizzy it, then finish it off.
Fight 48: Miel128. It has 59,000 HP, so it'll be a long fight, but it's not too strong.
Fight 49: Clubgunner. Multiple Terror can hurt, so as always speed is of the essence.
FIGHT 50: HELL-SERVANT. This is the pits! 450,000 HP! You will spend most of your time trying to stop this guy from attacking; keeping him dizzy and whatnot. Use Dragon Howl as much as you can, since most regular attacks will force you to jump, often straight into its Master Attack, which is deadly and can kill you outright. Use a Bubble Lotion if you still have it, and you'll then have a chance of instantly killing it (albeit a very small chance). If you manage to dizzy it so it hits the floor, keep the regular attacks coming and you can shave off a good percentage of its HP. This fight will take a very long time, so good frickin' luck! 8-)
Your prize for winning the Survival Battle: The awesome Fortune accessory, which drops some very nice items as you walk around. Congratulations! 8-)