 |
|
|
Miscellanea
As Mario levels up, his "rank" goes up. The higher his rank, the bigger the audience and stage. With a larger audience, you are able to refill your star power more quickly. And with a larger stage, there are more special effects (such as objects that may fall on Mario, his partner or the enemies, or the background collapsing on everybody after a Quake attack) that may happen. Mario's rank goes up as follows:
Mario starts out as a Rising Star. The audience capacity is only 50.
Mario becomes a B-Rank Star at level 10. The audience's capacity raises from 50 to 100. Fog, which lowers everybody in the battle's accuracy occasionally appears, and Ice, which causes damage and freezing status, occasionally targets either Mario and his partner or the enemies.
Mario becomes a A-Rank Star at level 20. The audience's capacity raises from 100 to 150. And Fireworks, which causes explosion damage, occasionally targets either Mario and his partner or the enemies.
Mario becomes a Superstar at level 30. The audience's capacity raises from 150 to 200. And Fire, which causes damage and burning status, occasionally targets either Mario and his partner or the enemies.
Also, it's worth mentioning that different audience members may do different things. Boos randomly make Mario, his partner, or an enemy invisible, Bulky Bob-ombs take up two spaces and often explode, eliminating much of the audience (and causing all Punies to run off), Crazee Dayzees sing, which puts the audience to sleep, X-Nauts refuse to give beneficial items, and Luigi and the Punies will never do Mario any harm.
If you're the perfectionist player who is constantly afraid of permanently missing things, you can rest a little easier. Even if you forget to tattle a one-time only enemy (such as a boss), you can still receive the tattle by checking the yellow garbage can at Professor Frankly's house. Any permanently missed tattles will be waiting for you.
This is just too cool not to mention, even if most non-Japanese players will miss it completely... When you boot up the Data Disk in Grodus' room, you'll notice Mario and Luigi on the screen... What you might not notice, though, is that the screen it shows is exactly the same as the Famicom Disk System's BIOS. Incidentally, the Data Disk itself looks very similar to a Famicom Disk System game...
Sure you can equip the W Emblem to wear Wario's clothes and the L Emblem to wear Luigi's clothes... but what happens when you equip both? Well, you get Waluigi's clothes, of course. Which makes sense, since Waluigi is just a cross between Luigi and Wario anyway...
Partway through the game, you'll notice a green Ratooey hanging out at the Rogueport docks. He asks for donations in 100 coin incriments, promising to pay you back later. Now, while it's understandable that you'd be skeptical of somebody asking for money in a place like Rogueport, but Lumpy's an honest guy. Later in the game, he'll give you triple your investment back (So 100 coins will net you 300, 200 coins will net you 600, and 300 coins will net you even more... a whopping 999 coins!). So, if you can afford it, be sure to invest.
Just like in Super Mario RPG and Paper Mario, there is a hidden spot where Mario can temporarily become his 8-bit alter ego. But this time, Mario's partner also becomes 8-bit! All you have to do is go into the air duct in X-Naut Fortress and drop down into the changing room. When you emerge, you'll see Mario and his partner in all their pixelated glory.
While it may not be obvious to somebody who only plays through the game once, there are actually 7 different colors Yoshi may become... which color he ends up is dependent on time... the different colors cycle as time goes on, and whichever color the cycle is on when Yoshi hatches is the color he'll be. Here's how to get the Yoshi you want, according to The Great Gonzales from the boards at GameFAQs:
Alright folks, you've heard that there's different colored Yoshis but you may be confused about how to get the color you want for your partner. Well fear not, for I provide here a complete guide for how the game determines colors and how to control the one you get. First, I will list the 7 Colors, in the order in which they Cycle: +++++++++++++++++++++++++++++++++++Green Yoshi. Red Spikey Hair, Red Shoes, Orange Pants.
Red Yoshi. Green Spikey Hair. Green Shoes. Black Pants.
Blue Yoshi. Pink Spikey Hair. Pink Shoes. Sky Blue Pants.
Orange Yoshi. Blue Spikey Hair. Blue Shoes. Green Pants.
Pink Yoshi. Green E. Gadd Hair. Pink Shoes. Red Pants.
Black Yoshi. Red Spikey Hair. Yellow Shoes. Grey Pants.
White Yoshi (actually a very very light blue). Yellow Curly Hair. Red Shoes. Pure White Pants. ++++++++++++++++++++++++++++++++++++ Now to explain How to Cycle Through the Colors At any given moment, the Yoshi in your egg is a certain color. After a certain amountof time has passed in the game, your Yoshi will change color within the egg So to put it simply, the way to get a different color is to waste enough time. ---------------------------------- Here is what you should do ---------------------------------- Get the Egg, fight your way up until you are 11th place, (next battle is the Iron Clefts), then Save at the block just outside Go fight the Iron Clefts, Run Away on turn 1 (You can Tattle first if you want) See what Color you get. Now you know what Color was in the egg when you saved. Reset. You know what Color is in your egg now. So simply wait underneath the save block, doing absolutely nothing, until enough time has passed for you to get the appropriate color you want. Count in Minutes, do this by pausing the game, and waiting for the timer to tick off as many minutes as needed. Here are the Minutes that need to pass to get each Yoshi, starting with Green Yoshi. Green Yoshi + 6 minutes = Red Yoshi Red Yoshi + 3 minutes = Blue Yoshi Blue Yoshi + 2 minutes = Orange Yoshi Orange Yoshi + 4 minutes = Pink Yoshi Pink Yoshi + 3 minutes = Black Yoshi Black Yoshi + 1 minute = White Yoshi White Yoshi + 1 minute = Green Yoshi Now it's important to not overshoot. If you have a green Yoshi, waiting 6 minutes only gets you Red Yoshi if you're at the start of his timer. If he's near the end, 6 minutes will get you Blue or maybe even Orange Yoshi. Because of this, save every few minutes and check what color you have, by fighting the iron clefts and running. The Cycle takes 20 minutes to complete. And now you know. The end. Anyone who wants to use this for a FAQ go right ahead, you don't need permission. --- Note: According to The Gaming Gamer, White Yoshi takes closer to 30 seconds to cycle to green than a minute. Since my times were all in minute intervals, it's probably true, and I wouldn't have known, so much thanks and all credit to him for that. It's an important bit of knowledge when going for the White Yoshi. As a general disclaimer, there could be fractions of minutes floating around in any of those, so save and check your color every now and again.
The Pianta Parlor is a casino on the west side of Rogueport. You can go here to win piantas, which is currency that can only be used in the Parlor. By receiving membership cards from solving troubles, you can play a variety of mini-games to win Piantas. Additionally, you can play a slot machine. All mini-games cost 10 Piantas, and the slot machine costs 1 Pianta per pull. Allegedly, though, if you are remarkably lucky and win the Jackpot in the Happy Lucky Lottery, you will gain the privilige of being able to play these games free of charge.
 Slot Machine - If you get three of a kind on the slot machine, it will spit out Piantas. If you don't get three of a kind, you win nothing. 3 Don Piantas nets you 3 Piantas, 3 Stars wins you 10 Piantas, and if you get 3 7's, you'll win 100 Piantas.
 Plane Mode Game - You can play the Plane Mode game after winning the Special Card from Koopook's trouble. In this game, you begin on a high platform, and you must use your airplane ability to float down to the right. The farther you go, the more Piantas you'll win. Additionally, there are moving platforms that may multiply the number of Piantas you win if you land on them, and there are certain spots which will make you win 0 Piantas if you land on them. You may also pick up extra Piantas in the air as you're flying.
 Paper Mode Game - You can play the Paper Mode game after winning the Silver Card from Pine T. Jr.'s trouble. This game is a race against a number of Toads, Nomadimice, Bob-ombs, and sometimes even Luigi. You must run to the finish line without falling off the platform. Making this more difficult is the fans that sometimes try to blow you away. You can easily negate the fans effects by switching to Paper Mode, but this also slows you down. The higher your finishing place, the more Piantas you'll earn (You can get a quick 20 Piantas for 1st place).
 Tube Mode Game - You can play the Tube Mode game after winning the Gold Card from Frankie's trouble. In this game, you have 3 minutes to finish an obstacle course in Tube Mode. The obstackes inclue hurdles you must jump or roll under, hills, curves, and moving platforms. You can fall off the edge, but each time you do, it will cost you precious seconds, and you will get 1 less "technical bonus" Pianta at the end for each time you fall (if you don't fall at all, you'll get 5 technical bonus Piantas). There are 4 additional Piantas you can pick up along the course... one along the jagged hill you must climb, one on the pair of narrow ledges you must cross, one on the big hill you must roll down, and one in the midst of the second set of hurdles. The faster you finish the course, the more Piantas you'll earn.
 Boat Mode Game - This can be considered the nautical version of the Tube Mode game. Obviously, instead of a tube, you're a boat in this game. You have 2 minutes to finish this course, which consists of a series of barrels, a hairpin turn, and a field of whirlpools. The barrels can get in your way, but the whirlpools slow you down much more, and each time you are sunk by a whirlpool, you lose 1 Pianta from your 5 Pianta technical bonus at the end. But there are 5 Piantas strewn throughout the course for you to collect, if you're so inclinced. The faster you reach the finish line, the more Piantas you'll win.
Just below the Pianta Parlor is a rather portly Bob-omb named Lucky who runs the local lottery. For 10 coins, you can purchase your 4 digit lottery card. The lottery numbers are picked each day at midnight...midnight real time, that is, as the game uses the Gamecube's internal clock for the lottery. And don't even think about cheating by changing the time on your Gamecube... Big Brother is watching you... the first time you try to do this, Lucky will let you go with a warning. The SECOND time, however, you will have a 500 coin fine slapped on you... Anyway, the more digits you match (you must match the digit in the correct spot... and you must match from right to left. In other words, if your first two digits match, you'll win nothing, but if your last two digits match, you will win... which makes a difficult lottery even harder...), the better prize you'll win. And even if you don't win, you'll receive a Mushroom for your effort. Here are the prizes (which haven't all been personally confirmed by myself... there's a 1 in 10,000 chance of winning the jackpot... what do you expect?):
4th Prize (1 Match) - Life Shroom
3rd Prize (2 Matches) - Ultra Shroom
2nd Prize (3 Matches) - Lucky Day Badge and Zess Special
Jackpot (4 Matches) - 3 Gold Bars and free games at Pianta Parlor
Danger Mario - This is probably the most devastatingly powerful, and risky, Badge configuration in the game. First, you'll want to get as many Power Rush Badges you can get your grubby plumber hands on. You can get extras at the Pianta Parlor. You may want to go to Rip Cheato and give yourself extra Badge Points at the expense of HP... you won't be needing that. After equipping as many Power Rush Badges as you can, decrease Mario's HP until it's under 5. You can do this safely by dropping Mario into water and letting him continually get bitten by a robotic fish. Once Mario's HP reaches 5, the Power Rush Badges will kick in, and for each one Mario has equipped, his Attack Power will go up by 2. With enough equipped, Mario will be able to take out any enemy in the game with just normal attacks. The flip side, of course, is the fact that Mario's HP has to be low, which leaves him very vulnerable, but he should be able to defeat enemies before they have a chance to attack. For additional protection, though, you may want to equip some Defend Plus, Last Stand, Lucky Day, or other similar defensive Badges.
Multi-Charge - This technique takes advantage of multiple-hit attacks and the ability to use the Charge ability multiple times for increased effectiveness, which will greatly increase damage the enemies receive. There are two techniques that work the best... Power Bounce and Multibonk. Just equip Mario with the Charge Badge and/or Charge P Badge, and the Power Bounce Badge. Now have Mario and/or Goombella use the Charge Ability for multiple rounds. Each time Charge is used, the next attack used will be 2 points more powerful. The reason Power Bouce and Multibonk are so effective is that you can hit several times with this increased power, which can cause huge damage, especially if Mario and Goombella both use this technique. If you spend a few rounds charging with Mario and Goombella, then unleash Multibonk and Power Bounce, massive damage can be inflicted upon any enemy unlucky enough to be targetted by your wrath.
It's a well-known fact that Parakarry from the original Paper Mario cameos in the intro. And observant players notice that you can find Bow from the original Paper Mario (along with her butler Bootler) in front of Poshley Sanctum after beating the game. Heck, even Jr. Troopa has a cameo in the game (look closely at the picture attached to Zip Toad's email...). But did you know that all the other playable characters from the first Paper Mario were programmed into the game, but for whatever reason, were never used. My guess is that they were originally planned to cameo in a manner similar to Bow, but for whatever reason, that plan was scrapped. In any case, for those who are curious, here's the old crew in all their spiffy new duds:
 Goombario
 Kooper
 Bombette
 Parakarry
 Bow
Bow
 Watt
Watt
 Sushi
Sushi
 Lakilester
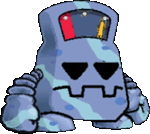
There are other interesting cuts as well. For instance, what exactly is THIS guy supposed to be? Looks like a fuel gauge to me...

Were the bartenders originally supposed to be Toads? Perhaps the success of Mario & Luigi: Superstar Saga influenced the change from a Toad to a Bean?

Remember Screamy, that crazy creature Luigi adventured with? There are a couple palette swaps of Screamy in the Paper Mario: TTYD disc. Was this species originally going to play a larger role, perhaps as an enemy in the game?


Speaking of Luigi, located right next to all of his other partners is a hamburger shaped Spinia... Was this planned to be one of his partners?

Also, with a near-identical filename to Bobbery, is this hulking Bob-omb. An early design for Bobbery, perhaps?

|
|