
 |
|
|
Bosses
Allow me to introduce the bad guys! Ranging from lowly goblins with weapons of mass destruction to classic fantasy monsters like the Creepy Chimera or Dreaded Dragons! Players who score the decisive hit gain the XP value mentioned, those who keep up a "Nice Fight!" gain half the listed value, so give that magic missiling frag stealer a bump the next time he does that :D I only cover their attacks and mannerisms, most basic strategies are covered in the walkthrough and the Tips n' Tricks section.
| Boss Name | Illustration | Info | Steal? | Experience Value |
|---|---|---|---|---|
| Warmachine | 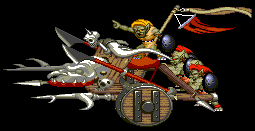 |
The first boss of the game. Mages should start burning their spell slots to torch the thing as they'll regain spells afterwards, meaning the PI/Dagger combo is a feasible option. Fighters should go for the opportunity whenever the goblins pushing the machine around die away or when they stop for a breather. Thief/Elf should support with ranged weaponry. Clerics can alternate between spellcasting and melee. Watch out for the flamethrower and the spears it shoots! | Nothing. | 10,000 XP |
| Dark Warrior | 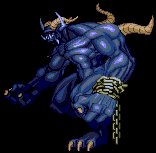 |
Riding the Juggernaut stage boss. Big and mean. Signals for its shock-attacks a bit ahead, and likes to teleport away if knocked down. Immune to Lightning elemental damage, but takes damage from a Ring of Lightningbolt. Use this to your advantage. Spell regaining means you can go nuts with your spells and the PI/Dagger combo if you have any casters in your party. | Bracelet | 15,000 XP |
| Man-Scorpion |  |
This boss inhabits the Vesuvia stage. If you play a multiplayer game, you'll face two of these nasties. Attacks by swinging the scythe. Can also detach the blade to act in a boomerang-like fashion. Surrounded by Trogdolytes and Ghouls. Other attacks include a "dynamite jump" which acts like a fireball on the area he hits, and a petrifying beam which spells instant doom if you fail your 'Save'! (Wiggle the joystick like a madman!) Spells regained after the fight, so feel free to unload everything you have. | Orb | 15,000 XP |
| Harpy | 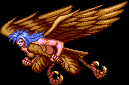 |
This winged woman likes to blow you away pretty often with a blast of wind. Charge attacks are good in these situations. If you get too excited in melee, watch out for her claws and club she wields. In the worst case of letting her ascend, watch out for her dive attacks and the feathers she shoots. She may do the wind blast from above, making it easier for her henchelves to hit you, as they are not affected by the breeze. Consider moderation with your arcane spellcasting as you'll have two more bosses before you can refresh your spell selection. | Key(!?) | 10,000 XP |
| Tel'Arin |  |
A Shadow Elf with a big sword. Before the fight, he creates a bunch of Skeletons to fight you. Dispose of them and Tel'Arin himself shows up. Likes to charge and then continue with a string of blows. Casts Fireball and Lightning Bolt. Any spells are signalled by a blue afterimage. Occasionally "powers up", casting haste on himself. Pretty easy if you can keep him down. Clerics should be aware that he can perform the Animate Dead spell again. COnsider Hold Person and Continual Light, as Cleric gains his spells back after this fight. | Bastard Sword | 15,000 XP |
| The Beholder |  |
For soloing mages, this boss causes nightmares. You can't launch any spells when the big eye of the Beholder is open. When it's shut, it uses the little eyes to attack: Inflict Wounds, Sleep and in the worst case, Flesh to Stone. The anti-magic effect produced by the central eye does not include magical weapons, so you're lucky if you've discovered any of the elemental weapons on your way. Although it might not help much, Elves and Mages regain their spells after this fight. | Necklace
Eye of Beholder |
25,000 XP |
| Ogre Master Bros | 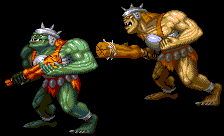 |
"Bros?" Yes. The first one keeps up by himself for a while, but after you've dealt about half a bar of damage to him, he calls his brother to aid. They can charge, smash you with their clubs and throw big rocks at you. Soloers should watch out for pincer attacks, since that can end a soloer's game very fast. Mages and elves should go berserk with spellcasting, since you'll regain your spells afterwards. | Tan: Tiara
Green: Hat/Helmet |
35,000 XP |
| Green Dragon | 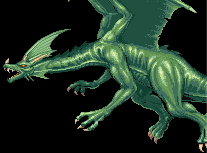 |
You get a rather challenging Boss if you decide to take Elf's path. You'll skip the Manticore and skip some of the bottom floors. But you'll fight the Green Dragon instead. It's the first one in the pair of small dragons. It's attacks include it's bite, claws (can be shield-blocked) and a stream of corrosive gas, which stuns you for a while. Seems to do this thrice in the fight; Once in the beginning, once half-way and once before it bites the dust. Slide underneath and do your aerial attacks while it performs it's breath attack. It's a flier, so hammers are helpful if you don't like engaging in melee, and have trouble aiming otherwise. Also, offensive spellcasting is highly recommended, as Mage and Elf regain spells after the dragon is down. | Nothing | 30,000 XP |
| Manticore | 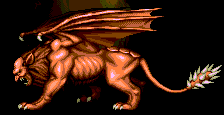 |
A beast with the body of a lion, head of an old ugly man, leathery wings and a barbed tail. You can waste him easily with the Storm Blade if you have it, since it knocks the beast down after each hit. In other cases, watch out : The Manticore has an annoying habit of blocking your attacks after you've knocked it down once, then counter-pouncing afterwards. It can also take air beneath it's wings to shoot barbs from it's tail and then come down crashing on your characters. Try to heal up, as Cleric regains his spells back after this round of combat. | Egg of Wonder
Skin of the Manticore |
25,000 XP |
| Lich Deimos |  |
The prequel of this game had the Lich Deimos as the last boss. Luckily, his revived version isn't quite as difficult. The touch of a Lich is paralyzing, even if he just brushes against you. Deimos casts several powerful spells: Animate Dead, Fireball and Lightning Bolt. He also casts Teleport and Quake frequently, following with a series of strikes from his cane. Casts Meteor Swarm when REALLY pissed. Immune to Turn Undead and spells of level 3 or lower. Mage can go nuts with his higher level spells, since he'll regain his powers after the fight. | Nothing (Since you can't effectively touch him.) | 50,000 XP |
| Displacer Beast | 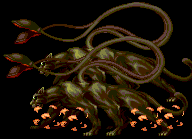 |
This beast can form a shadow twin of itself. If you hit it, it disappears. And usually after this, you get either bitten or pounced on. Ranged combat should be done from afar, since those tentacles can really wreak havoc on an unsuspecting party. Elf and Cleric can burn their spell slots with no worries, since they'll refresh her repertoire after this boss. | Potion of Haste
Skin of the Displacer Beast Displacer Beast Eye |
40,000 XP |
| Black dragon | 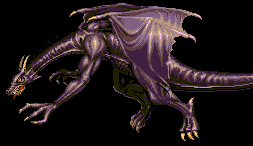 |
A Penalty Boss if you messed up in the Labyrinth Forest. Flies around constantly and claws you. Occasionally breathes an acid stream, which cannot be blocked. He can do it three times maximum, usually one in the start, one in the middle, one before it bites the dust. Slide underneath when he does this move. Not too hard if you're good at air combat, or stocked throwing hammers before. If you fight both this and the Green Dragon, you'll notice Large Burning Oils help a lot since you can damage it while taking none yourself during the acid breath. Don't forget to attack it repeatedly for it to drop the Dragon Scale - In effect the Dragon Shield! ..or Displacer Cloak if you can't wield a shield. | Dragon Scale | 50,000 XP |
| Chimera | 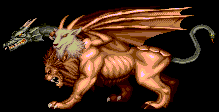 |
If you decided to help the Gnome Village (Smart choice), you'll encounter the Chimera. This boss is very similar to the Manticore: The lion head uses a bite attack, the drake head breathes fire, and the snake tail will occasionally whip you aswell. Like the manticore, it'll use the block-and-counter pounce attack. Large Burning Oils are extremely helpful, as they deal plenty of damage and knock the beast down. Mage can go on another arcane WMD-scale offense, as he'll have his spells back right after this session. | Staff of Snakes | 55,000 XP |
| Red Dragon | 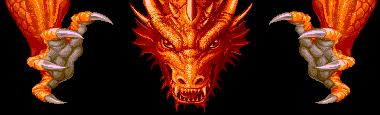 |
The Red Dragon is considered an optional boss. The rewards are worth it, thouugh. Basic attacks include clawing you, and dropping rocks on you. It can cast Walls of Fire from both claws. It's bite attack can be interrupted with a hit, preferable with a Magic Missile. If it starts to draw in breath, RUN AWAY. If it's head is seen appearing at either side of the screen, run AT it, preferably below it's face. Either that or face death, unless you have the Dragon Shield, usually leaving you to a few pixels. Better strategies dealing with Red Dragons can be found on their pages in the walkthrough. With luck, you can nab a Dragon Horn (Which is the Dragon Slayer, in effect) off him. Since everyone grabs a rest after this battle, feel free using every single piece of magical offense/defense at your disposal. | Dragon Horn | 700,000 XP(!!!) |
| Fire Salamander | 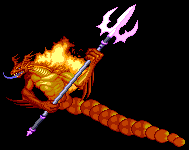 |
Touching this one isn't a smart idea. You'll get burned. Other than that, it sweeps around with it's tail, Burning you away, and occasionally, it stops to hit you with it's trident. It can also summon fireballs to burn you. It usually leaves a gap between the ones it summons from the background. If you possess the Sword of Frost, you have an ace up your sleeve, as you can keep on pelting it as you knock it down without pause, usually knocking it down again for some more! Just keep your eyes open as it is joined by Hellhounds. Clerics should patch people up, since you'll regain your divine spells after this battle. | Nothing. (What you can't touch, you can't knock.) | 70,000 XP |
| Frost Salamander | 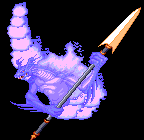 |
Touching this one isn't a smart idea. You'll get frozen solid. Other than that, it sweeps around with it's tail, freezing you solid, and occasionally, it stops to hit you with it's spear. It can also summon orbs of ice to freeze you. Special Trick: Knock it down and douse it with Large Burning oils. 4-5 and it should be KO'd! Clerics should patch people up, since you'll regain your divine spells after this battle. | Nothing. (What you can't touch, you can't knock.) | 70,000 XP |
| Tel'Arin & Tel'Eleronr | |
The Shadow Elf is joined by his green-clad brother. Both have the same annoying moves, but twice the annoyance. Hold Person and area effect spells like Reverse Gravity work miracles. If you can defeat Tel'Arin, you won't have to face him in Stage 10-2. If you finish Tel'Arin without dropping his brother, he'll lend you a hand against Nagpa later on.. | Tel'Arin: Bastard Sword
Tel'Eleron: Two-Handed Sword |
50,000 XP |
| Tel'Arin (Again) | |
He makes his second appearance on the start of level 10-2, unless you dealt with him/his brother in the Dwarf Tunnels. Pretty much the same as before, but no undead assistants. | Bastard Sword | 50,000 XP |
| Ezerhorden |  |
Boss of level 10-3. Quite possibly THE worst boss you can imagine for teamplay. If it grabs you into it's mouth, anyone hitting you will hit the grabbed player aswell, contributing to the damage. Now add the power given to you by weapons such as The Sword of Legend or the Battle Axe which translate to crippling damage. It is joined by undead assistants, mostly of minor concern. Not too difficult, but the bonds of friendship are at stake here. Takes lots of damage from Lightning elemental attacks. Consider spamming all spells you have away, since both Divine and Arcane spells are restored after this fight. Being a ghostly creature, Thieves cannot grab anything off him. | Nothing (Ghosts don't have pockets to pick?) | 80,000 XP |
| Dark Warrior 2 | 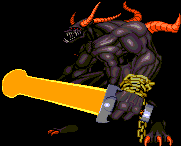 |
Pretty much the same as the Dark Warrior, except two big differences- The big sword and his elemental has been changed from lightning to "dark fire", which usually knocks your character down burning. The Large Burning Oil tactic works pretty well against this version of the boss. Heal up your characters, since Cleric is lucky enough to get his spells refreshed. | Morning Star (I WANTED THE SWORD!) | 90,000 XP |
| Nagpa |  |
Fights alongside a Manticore and a Black Dragon. A sneaky little git. Try to concentrate on the little guy only, since his allies will fall with him. This can be hard, as he keeps teleporting all the time, occasionally stopping to either whack you with his staff or to cast a lightning bolt. Hold Person for holding Nagpa still, Continual Light can stun the big guys for a moment. You will skip this battle if you kept Tel'Eleron alive in the Dwarf Tunnels. Cast everything you have once again, since you'll regain your repertoire just in time for.. | Staff of Elemental Power | 10,000 XP(!?!) |
| Synn | 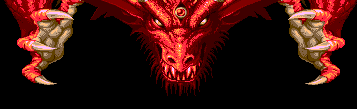 |
Your final boss. A Red Dragon instead of a hot blonde in revealing clothing. Oh well, can't have everything. You can apply the same strategy as you did with Deathwing back in Cave of Raphael, except that her Firestreams are Fireballs instead. A notable exception, if you did defeat Deathwing: The Dragon Slayer deals awesome damage. It's recommended you check out the walkthrough for image assistance as well. Since it's the final battle, give it everything you've got in the forms of attack items, attack magic, healing magic, stage magic and whatever mantras you have for final bosses. ENDING GET. | Mercy. Not. | 500,000 XP |
|
|