
 |
|
|
FAQ
This section basically answers questions about WA3 that come up quite often on various message boards and emails to me. Please examine the list below and then click on the respective link; it may very well contain the answer you seek! If it is not there and you simply cannot find the answer anywhere in the shrine, please email me and I will help you out to the best of my abilities.
I want to thank the guys at the Wild ARMs 3 board for helping me come up with these questions. 8)
What's MTC? How do I increase it? |
| MTC is your "Material Count", or the amount of times a character can use the Summon command. Each time that character summons, it will expend 1 MTC, and obviously, you cannot summon if you have 0 MTC! To replenish MTC, stay at an Inn. As for increasing your MTC amount, every one of your team members has a maximum amount of MTC that starts at 1, but this number can be increased through repeated "practice". Practice involves killing enemies with summons. Dealing a finishing blow to an enemy with a summon adds 1 point to an invisible tally, and once this tally reaches a certain number, that character's MTC maximum will increase by one! The number of enemies you must defeat with summons begins quite low (no one is certain yet, but it is believed to be around 4 or 5 enemies), but each time you increase your MTC max by 1, the amount of enemies you need to kill for the next level gets larger! Rumour is that the number doubles each time; so, if you needed to kill 4 enemies for the first extra MTC point, it will take 8 for the next! The numbers eventually get to the point where it's not worth the time you would have to invest to boost your MTC, but you don't really need a high MTC count anyhow; 5 is fairly good for each character. The best way to boost your MTC levels is to summon on large groups of enemies that are weak in constitution and have an elemental weakness to the summon you choose. For example, the Jelly Blobs in Serpent's Coils. They're weak to everything, and appear in groups of 4 at times, so use your MTC then. Don't go overboard, and don't spend time "leveling" your MTC; rather, make it a point to use it all up before you stop at an Inn for the first half of the game, then once you get further into it, don't worry about it so much. You can build it further by battling the Dust Man groups in the Fila Del Fia area if you desire. Save Growth Eggs for when your MTC level gets really high for best results. |
What's a good ARM setup? |
| I have some good ARM setups on the ARMs section of the shrine that work quite well. However, please note that different parts of the game call for different ARM configurations. For example, in the beginning, you should mainly opt for weight reductions (and in a few instances, bullet count) because weight is the cheapest stat upgrade, yet it allows you to hit the enemy with Gatling for more shots with less FP. Later on, you can always Initialize upgrades, comforted by the fact that you didn't "waste" a whole lot of Gella. |
How does the Migrant Seal system work? |
|
It's actually fairly simple. In the top left corner of the screen is your ECN and your Migrant Level. ECN is the amount of "points" you have to skip battles with (you start with a maximum of 10, but you can increase this number up to 50 by finding the 4 Booster Kits throughout the game), whereas your Migrant Level is a level that dictates how many points it will take to skip an encounter. As you progress through the game, you will most likely come across Migrant Seal items. Each Seal boosts your Migrant Level by 1 (to a maximum of 20), which basically allows you to skip battles for less and less ECN, and in some cases, you'll be able to skip battles for free. To skip a battle, press the Circle button when the white "!" appears over your character's head. This will skip the encounter and consume some ECN; the amount consumed depends on the combination of enemies you would have had to fight. Check the ECN gauge in the top-left when the "!" appears to see just how much ECN you will need to consume. Obviously, if you do not have enough ECN to skip a battle, you will be forced to fight anyway. You can replenish your ECN by picking up the white gems in battle and by resting at an Inn. Also note that if you see a green "!", it means you have a high enough Migrant Level to skip the battle for free. However, as the game progresses, the battles will start to cost more and more ECN as the monsters get stronger and stronger. This is why finding Migrant Seals is of utmost importance! Imagine attempting the 100 floor deep Abyss dungeon with a Migrant Level of 1; you would have to fight every battle! Or perhaps you were at a late point in the game, and the enemies weren't exactly worth the effort you needed to beat them. With a high Migrant Level, you could skip most of the battles and cruise your way through the dungeon to tackle the boss. There's a chronological list of all the Migrant Seals in the game on the Migrant Seal section of the shrine. It also includes Booster Kits. |
I need Medium setups! |
| The best way to set up your Mediums is to have them complement your character's strengths, or to have them make up for their weaknesses. That being said, allow me to share my Medium setup with you. I'm certain there are better setups out there, and I encourage you to email them to me!
However, I think Andvareel said it best when he said that the best Medium setup is one that is constantly changing. You may want to stick with a certain setup for a certain part of the game, then switch them around as you progress further and more options are available to you. Don't equip "rare" or extremely valuable Gear until you have a completed setup that you know you will stick with. Even more important is to learn to switch Mediums in battle! Take for example the Telepath Tower fights. Now, you can either spend HOURS hunting down status-prevention Gear, or you can begin the battle, equip Love Charm and Hope Shard on Gallows, and then Extend a Status Lock and a Permanence to your entire team.
Virginia: Gale Claw, Moon Spark, Love Charm
Clive: Terra Roar, Lucky Hand, Brave Seal
Jet: Fiery Rage, Cosmic Cog, Hope Shard
Gallows: Aqua Wisp, Flash Hit, Lust Jaw |
How can I conserve Heal Berries? |
|
Simply make the most of them! When travelling through the dungeons in the game, you're bound to lose HP from battles, but remember; after each battle, the VIT meter will replenish some of your lost HP! You don't even need to really worry about manually healing unless the VIT meter runs out, or if you're in a tense situation in a heated battle. Here are some berry-saving tips.
|
How should I upgrade my Sandcraft? |
|
Sandcraft upgrading may seem a bit intimidating at first, but unfortunately, the ideal strategy for Sandcraft battles is to simply get the first hit in and hit for enough damage to kill the enemy in one strike. That being said, purchase the Ark Smasher gun, put your character with the highest RFX into the Gunner position, your character with the 2nd highest RFX in the Deckmate position, and just Fire all Ammo at any enemy you see. Enemies will rarely (if ever) have a chance to do anything at all. |
I can't find "insert name here"! |
|
One of the least favourite aspects of Wild ARMs 3 is the World Map Search system, mainly because people claim that it is not only awkward to use, but it forces the gamer down a much more linear path. Though I do not agree with the second point, I can see how people would be confused with the first.
Usually, if you cannot find a place with the location or co-ordinates given, it means you simply do not have enough information to actually uncover the location. Usually when a location is ready to be "discovered", there will be red text in the dialogue boss and a chime will sound.
Here is a list of all of the locations in the game, and the requirements you must meet for the locations to appear.
|
I need Elemental Rings and Status Prevention Gear! |
| Well, first thing's first; don't bother looking high and low for status prevention gear. The Status Lock + Permanence combination is all you really need. If you are worried about Fallen status, head to the first few floors of the Abyss and battle the Cannon Buffalo enemies; they drop Holy Grails. Now, as for elemental rings... Earth Ring: Pickpocket from Chimera Geo in Dissection Facility. You can also get them from Sekmet in the Cradle of the Metal God if you haven't completed that already. Water Ring: Pickpocket from Chimera Muse in Dissection Facility. Also a common drop from Land Lamprey in Mimir's Well. Wind Ring: Pickpocket from Chimera Wing in Dissection Facility. Alternately, it's the common drop for Gargoyles in Sacrificial Altar and Demondor Pillar, and you can get them from Griffins in Fortune Gear. Fire Ring: Pickpocket from Chimera Fray in Dissection Facility. Or if you haven't beaten Cradle of the Metal God, get them from the Haboryn enemies there. Thunder Ring: A rare drop from Barbarossa in Fila Del Fia. Barbarossas attack in big groups though, so your odds of getting them are fairly good. Ice Ring: A rare drop from Sun Flayer in Nightmare Castle. The only alternative is to get them in the Cradle of the Metal God off of Fleurety, but you can't do that after you've completed the dungeon. Dark Ring: A rare drop from Evil Dead in Dim Root Path. I actually got these rather quickly. Light Ring: A rare drop from Fairylight in Glimmering Emblem. No big deal.. you can probably kill these with Lucky Shot, after all. Of course, there are other ways to obtain these rings, but I merely listed what I felt were the easiest ways to obtain them. If you don't mind spending some money, you can sell an elemental ring to the Black Market, and from that point forward, you will be able to purchase rings of that type from the Black Market (for a steep price.) |
What does "Luck" do? |
| Since I'm lazy, I'm simply going to paste a quote from the game that will answer your question. 8P
Some may boast about physical strength, and some may boast about magic. But how many of you boast about luck? How many of you out there on the battlefield take luck seriously? Well, let me tell you this. That powerful one-timer, the Critical Hit, and the ever so handy Defender; these skills are activated by chance and governed by luck. And what about those death blows and the various status ailments the enemies throw at you? These can actually be prevented by skills and luck. And the booby-trapped treasure chests you get after winning a battle--the chances of you successfully defusing it also depends on luck. It can be said that almost every action you take in battle is affected by luck. Having read this, I hope you take luck more seriously from now. If you do, there's no doubt you'll emerge victorious in the wasteland. So there. Luck has an effect on nearly every battle command in the game that can be attributed to "chance". |
How do I start the Telepath Tower quest? |
| You must do the following before completing the Deus Ex Machina dungeon, or you will not be able to start the quest!
|
Why do some animals get picked up on the Radar? |
| Said animals are actually items, believe it or not! Later on in the game, when you acquire the Changecrest, you can use it to change the animals into items. A list of these animals can be found HERE. |
What is Finest Arts, and how do I use it? |
| Finest Arts is a very useful Personal Skill that, when equipped, gives you access to an extremely powerful attack. To use Finest Arts in battle, equip the skill (obviously), and then use the Gatling command when the character with Finest Arts has 100 FP and no ammo in his or her ARM. The first four hits should do fairly good damage, whereas the fifth hit will be absolutely massive. |
Where is the hidden exit in Gemstone Cave? |
| Here's a tiny snippet of my walkthrough that should answer your question. Now, travel through the first few rooms of the dungeon, crossing over the rock bridge and past the huge boulder Maya dropped on you a while back. When you reach a room with 4 Orange Gems places all in a row, rotate the camera a bit and look along the western wall (past the pond, behind the massive rock pillars). Bomb the weak point in the wall if you didn't already, then head in and grab the treasure if you didn't already. Head to the northern part of this room and bomb the wall up the incline, and you'll find a hidden exit to the World Map. |
I can't find Arioch! |
| The Arioch side-quest is indeed very frustrating. What most people don't know about finding the little buggers is that they never appear in the same dungeon consecutively! Each time you encounter an Arioch battle, you will have to travel to any other dungeon to find the next one. Use this method to find the tiny red bastards faster and easier.
Using this method, I was able to battle all 100 groups of Arioch rather quickly. |
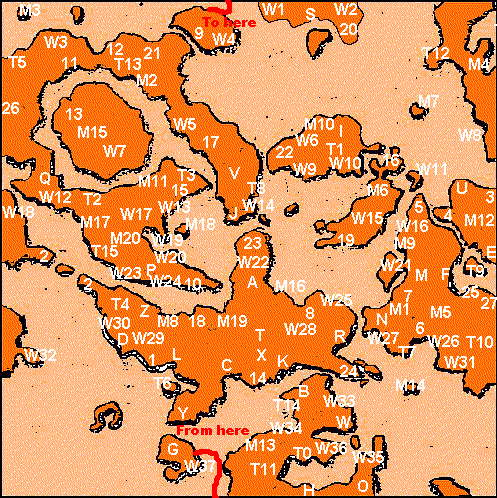
How do I find Deus Ex Machina? |
| After Cradle of the Metal God, head to Ballack Rise and examine the telescope at the very top of the town. Fly around for a while, and look for a very distinct wavy pattern in the sky. Fire 5 missiles into it to destroy the cloaking device and reveal the dungeon. The dungeon appears in random locations, but I've seen it appear near Gunner's Heaven, Caging Tower, and Laxisland. |
Why are Lucky Hand and Moon Spark so weak? |
| Lucky Hand's summon attack is SUPPOSED to do very little damage, and in some cases, no damage at all. However, any enemy that is killed by Lucky Shot has a near-100% chance of dropping its item after the battle. On the other hand, the Merciless Queen summon reduces all enemies' HP by the number of FP used to summon as a percentage. For example, 25 FP = 25% HP reduction. That is, if it hits; some enemies are immune to this, and it doesn't always hit anyways.
|
I need more Dragon Fossils! |
| Believe it or not, many of the enemies in the game drop Dragon Fossils regularily (as in, the fossils aren't in a treasure chest at the end of battle), and even simple enemies such as Gobs cough them up after battle! All you have to do is beat up some Gobs in Gob's Hideout or around the Midland Station area for a while! |
What do you mean by EXP chain? |
| Whenever a Personal Skill is activated in battle, look to the top-left corner of the screen, and look for a notice stating which personal skills were activated. This notice is not there just for show; every time a Personal Skill set and equipped on a character is activated in battle, that character gets an experience point bonus equal to 0.1, or 10% of the battle's original EXP value. Now, imagine if you were to activate 10 Personal Skills for one character in battle... they would obtain 10 0.1 experience bonuses, or an EXP bonus of 100%, which is double the amount of normal EXP! Increasing your EXP bonus is a very good idea in boss battles that are worth a large amount of EXP. Simply find a skill that you know will be activated over and over (such as an elemental ward that co-responds to an elemental attack the boss uses), then allow it to activate over and over again. |
How can I SURVIVE Glimmering Emblem? |
| Glimmering Emblem is a major trouble spot for many people, mainly due to the battles within. The answer is simple: skip as many battles in Glimmering Emblem as possible! To ensure you can skip as many battles as possible, make sure you have the following:
Since the goal is to get in and out of the dungeon as soon as possible, run through as fast as you can. Skip as many battles as possible, utilize the white and orange gems strewn about, and try and let the VIT meter do the healing for you. When you HAVE to battle, try to summon on the enemies to wipe out the large groups as quickly as possible. |
What is "inertia cancel"? |
| Inertia Cancel is a little-known command that allows you to cancel a character's action and select a new one as it is being executed, at the cost of 25 FP. You can reduce this cost to 0 by equipping the Baselard and setting up the Power Cancel personal skill. To use Inertia Cancel, press Circle while the command name is displayed at the top of the screen, but before the character actually performs the action. This is best done by repeatedly tapping the Circle button through the previous character's turn. |
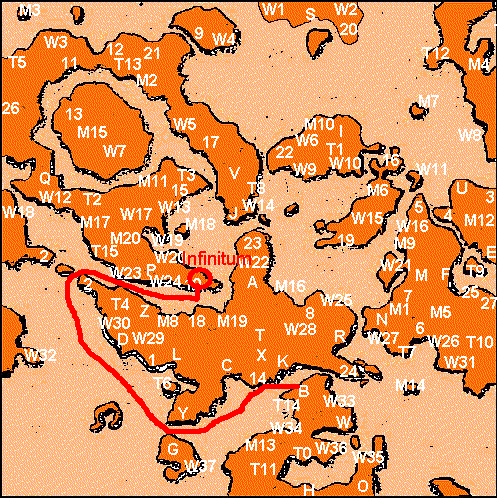
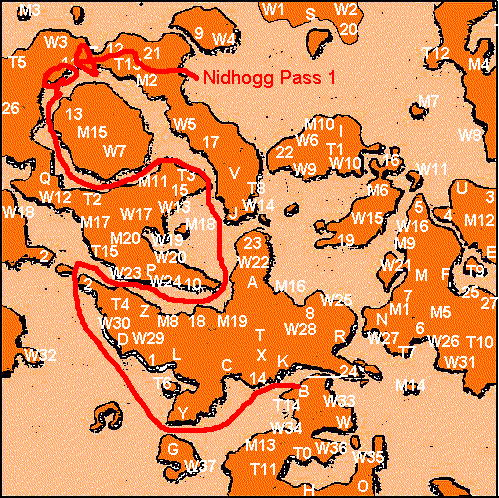
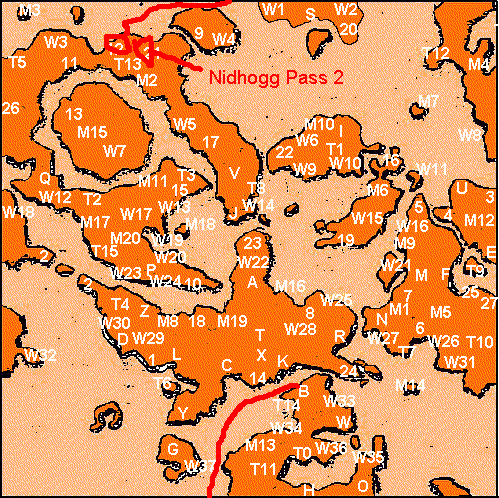
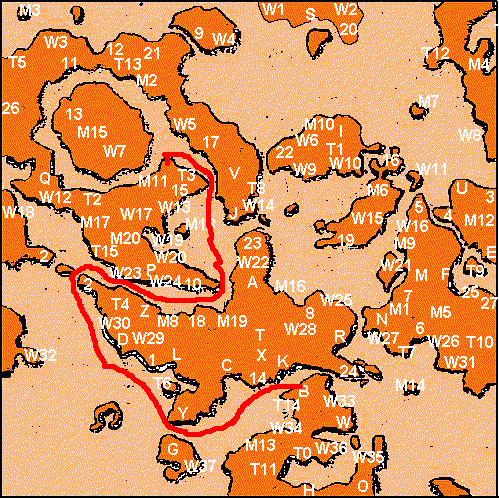
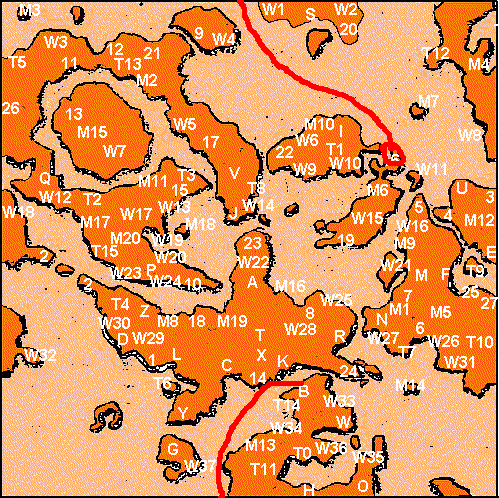
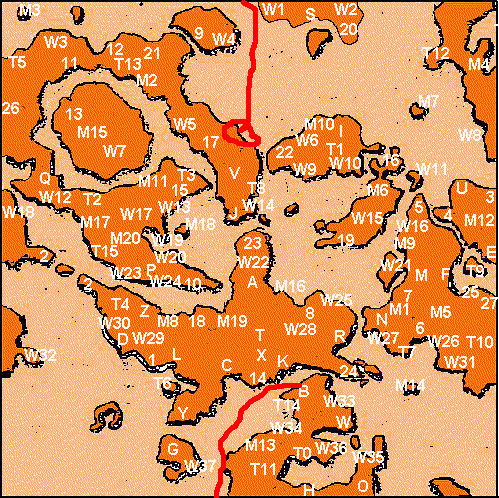
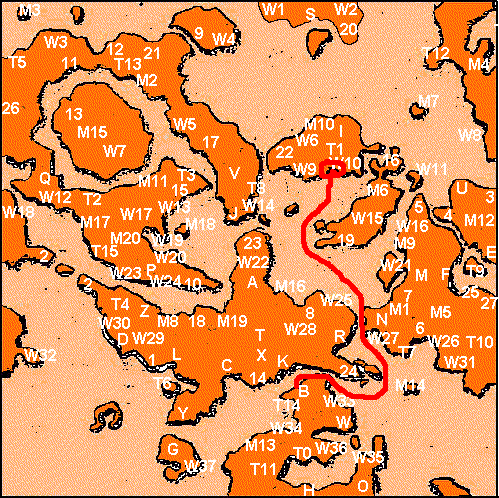
How do I find Nidhogg Pass? |
| After Infinitum, speak with Cordell in Baskar Colony, then head to Little Twister and speak with Claudia. Now, head to Jolly Roger.
This map shows the path to Nidhogg Pass 1. |
My horse won't jump! |
| I'll admit, the controls for jumping your horse over a chasm are aggrivating. However, most people tend to think it's the angle you jump at. While a factor, most people just simply aren't going fast enough. Move as far back as possible, and try to hit the gap within 20 degrees of straight. |
How do I get to "Sunset Peak"? |
| First of all, you'll need the Teleport Orb from Millenium Puzzle #14. Now, head to Southfarm Station and purchase a ticket for East Highlands, and you will be teleported to the Sunset Peak station. Dash into the clock there for an EX File Key! 8P |
I've got money problems! |
| Here are a few tips then.
He normally gets his attack after Jet and before Gallows, so keep this in mind. If you kill him before he gets away, you get your money back, but with the Gella Boost skill, you have a 25% chance of getting DOUBLE that! With 4 Gella Boosts, that means you'll always get double your money back! This is by far the quickest and easiest way to obtain Gella quickly if you already have quite a bit, and are looking for a quick way to get lots more. |
What are the best ways to build EXP? |
|
|
Can I "miss" anything in dungeons? |
| Luckily, Wild ARMs 3 is designed so that there are no treasure chests or "rare" items located in dungeons that are only there temporarily. You can miss cheap items like Gimel Coins and Heal Berries in said dungeons, but those aren't really too valuable. However, there is a switch in Serpent's Coils that drops a ladder down a little earlier in the dungeon. MAKE SURE YOU HIT THIS SWITCH DURING YOUR FIRST VISIT TO SERPENT'S COILS! This will ensure that you will be able to visit the depths of the dungeon later on in the game if you miss the chests there. |
I just got a new Tool. Which chests can I open? |
| Take a look. Steady Doll:
Mighty Gloves:
Galecrest:
Radical Sneakers:
Grappling Hook:
Changecrest:
|
I can't find the "Southern Sanctuary"! |
| The problem here is a simple misunderstanding. The Southern Sanctuary and the Fallen Sanctuary are actually the same thing. Head to the Fallen Sanctuary south of Baskar. |
What's with the game timer? |
| If the game timer seems entirely inaccurate, then you're absolutely right. The game's timer only counts time spent on the infield screens; meaning, the screens like the world map or towns or dungeons, and it doesn't count time spent in battles or in cutscenes. |
I can't get past the door in Dim Root Pass! |
| Though I haven't pinpointed the exact cause of this, I have noticed that in most cases, people who encounter this problem used a GameShark to acquire the Mediums early. I'm assuming the game counts the Mediums you have when you attempt to open the door, and the number must be equal to 12. Since a code was put in to acquire the Mediums early, and the game still adds Mediums to your quantity when you find them during the in-game events, which completely messes up everything. The simple solution here would be to not use a GameShark. |
|
|