
 |
|
|
Menu System
Main Menu
Ability Menu
Item Menu
Formation Menu
Custom Menu
Equip Menu
Skill Menu
Status Menu
Main Menu

Move the cursor to whichever submenu you want and press A to enter it. You can only Save on the main map or on a save point. The Special, Equip, Skills, and Status submenus are for specific characters; you have to choose a character to enter the menu. In basically every menu, pressing B one or more times will exit the menu and come back to this screen. Pressing B here will go back to the field/map screen.
The information on this screen is as follows:
For each square of the screen:
CHARACTER NAME
LV (Character's current level)
HP (current HP/max HP)
MP (current MP/max MP)
NEXT (amount of EXP needed to level up)
At the bottom of the screen:
Time (total playing time so far) Fol (amount of Fol acquired)
Encounters (total amount of battles fought)
Ability Menu
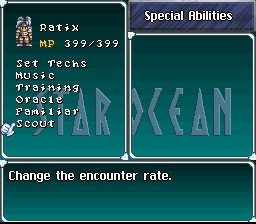
If you've learned any of the Abilities shown in the above picture (Music, Training, Oracle, Familiar, or Scout), you'll go to this screen when you choose your character. If you haven't, you'll go immediately to the Set Techs or Set Spells menus (see below). The Abilities available all have very simple menus not worth explaining here, so we'll skip to the tech and spell menus.
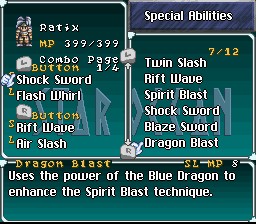
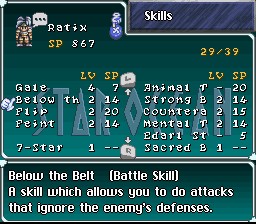
Fighters can equip up to four techniques: two short-range and two long-range. Move the cursor to the skill you want to replace, press A to bring up the skill list, then press A on the skill you want in that spot. On the bottom of the screen you'll see how much MP the technique uses, and its range (short, long, or both). Put the arrow on the character (doing this will return to the original Ability menu if you've learned any of the Abilities mentioned above) and press the Left or Right directional buttons to switch between active characters.
If you've learned the Link Combo Skill to at least level 2, you will be able to choose multiple pages of techniques. Just press the right direction button when selecting any technique to go to the next page. In any page but the first page, any technique can be applied to any spot; on the first page, short-range techs must be in short-range spots and similarly for long-range techs. See Skills for more info on Link Combo.
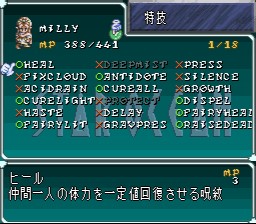
For the magic users, pressing Y on a spell toggles its use on/off; "Off" spells will turn gray. When a spell is "Off", it will not be used automatically in battle by that character, but you can always choose it manually if you wish. You can use some spells outside of battle; they're marked with a green O. Press A on the spell to use it. On the bottom of the screen you'll see the MP that spell costs.
Item Menu
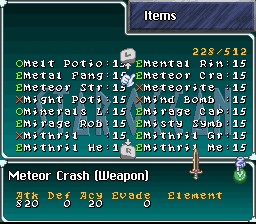
The following are the controls for this screen:
A: Uses items with a green O in front of them. If the item has a green E in front of them, it opens an equip screen like the shopping screen. (Like shopping, green up arrows mean it's a stronger item than the one that character has equipped, red down arrows mean a weaker item, blue sideways arrows mean it's equal to the one that character has, and an E means it's already equipped.) Pressing A on an item with a red X in front of it does nothing.
B: Exits the item screen.
X: Opens up the "ordering"/Item Creation/Key Item menu bar.
Y: For armor and weapons, toggles the item description with the item's stats. For healing items, toggles the description with the amount of HP/MP it heals.
L: Moves the list one screen up.
R: Moves the list one screen down.

On the "ordering" menubar: Pressing B returns to the main menu; pressing A chooses that ordering method. Pressing down lets you choose the Item Creation menu (to create items) or the Key Items menu (to check your key items). Item Creation menus are fairly simple; select the item to work on using A and switch between characters by putting the cursor onto the character at the top and pressing left or right. You can only select characters who've learned that Ability.
From left to right, here are the ordering methods:
NEW: Puts the newest items (the ones in green) at the top of the list.
BTL: Puts items which can be used in battle at the top of the list.
(Japanese characters): Arranges all items alphabetically.
Sword: Puts weapons at the top of the list.
Shield: Puts armor at the top of the list.
Ring: Puts accessories at the top of the list.
Beaker: Puts usable (green O) items at the top of the list.
One last note about elementals: Weapons and armor will sometimes have little colored symbols in their stat ratings. A symbol on a weapon indicates that the weapon will have an elemental attack; there can be multiple symbols on a piece of armor and it indicates that the armor will absorb that elemental. The elementals are as follows:

From left to right: Fire, Water, Holy, Death, Dark, Earth, Thunder, Assist, Void, Wind.
Tactics Menu
This actually consists of three menus: Strategy, Order, and Formation.
Strategy lets you change the tactics of individual characters; select the one you want with A and move down to see the characters below your active party. Ally allows you to switch character positions and swap them in and out of the active party (you can't change Ratix out of the active party, but you can switch his position to one of the first four). Form allows you to choose one of 8 predefined formations for your party. First let's talk about the tactics.
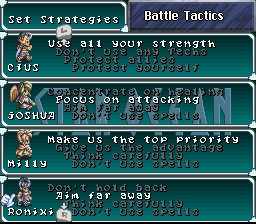
Fighter Tactics:
Use all your strength: Attack with all MP.
Don't use any Techs: Don't use techniques unless really necessary. They seem to hang back more when this is chosen.
Protect allies: Stay near a weaker character and fight any enemies that come near.
Protect yourself: Do nothing.
Dorn's Tactics:
Take initiative: Attack the enemy up front.
Wait for your chance: Attack, then retreat momentarily, then attack again.
Protect Allies/Protect yourself: Same as regular fighter.
Magician Tactics:
Make us the top priority (Milly): Use only healing spells.
Give us the advantage (Milly): Use primarily augmentative spells (that raise battle parameters or lower enemy's stats); heal when necessary.
Think carefully (Milly/Ronixis): Don't use too much MP; try to best decide which spell to use when.
Don't hold back (Ronixis): Cast your strongest attack spells.
Aim far away (Joshua/Ronixis): Attack the farthest enemy with spells or (for Ronixis) with bows.
Concentrate on healing (Joshua): Use primarily healing spells; use attack spells if allies are all near full health.
Focus on attacking (Joshua): Use primarily attacking spells, healing when necessary.
Don't use spells (Milly/Joshua/Ronixis): Do nothing.
Now for the formations.
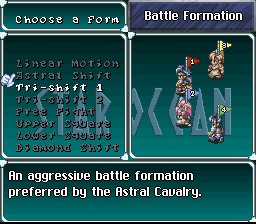
Linear Motion: All allies are lined up from top to bottom. Good for the start of the game or when you have four fighters.
Astral Shift: Two characters in front and two near the back corners. Good for two fighters and two spellcasters.
Tri-Shift 1: Three in front, one in back. Use if you have one very weak character.
Tri-Shift 2: One in front, three in back. Use if you have one very strong character.
Free Fight: Two way in front, two way near the back corners. Can be dangerous, but useful if you have a powerful party.
Upper Square: Two directly in front of the other two, near the top of the screen. More offensive than Astral Shift.
Lower Square: Same as Upper Square but near the bottom of the screen.
Diamond Shift: One in front, then two behind him and above/below, then one in back. Use if you have one relatively strong character and one relatively weak one.
Custom Menu
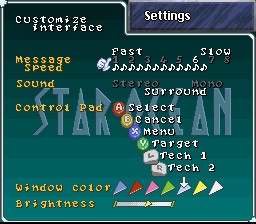
Here's what each line means:
Message Speed: Change the speed at which words appear on the screen when talking to people. 1 is the fastest, 8 the slowest.
Sound: Choose stereo, mono, or surround sound.
Control Pad: Change the default button configuration, which is shown on the picture. For more info on what each button does, see above. To change the buttons, put the cursor on the line you want to change, then press the desired button. It will swap places with where it was previously assigned. (Note that pressing B when you're here won't return you to the main menu, because the game will think you're reassigning the B button! Pressing it when you've gotten the B button selected will work, though.)
Window Color: Choose from one of six default colors.
Brightness: Adjust the brightness of the chosen color.
Equip Menu
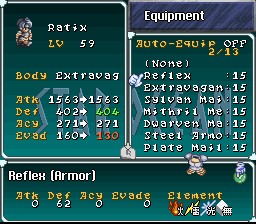
To switch between active characters, put the cursor on the character name and press right or left. As usual, A is "accept" and B is "cancel/exit". Press Y to toggle the weapon/armor description with its stat ratings (see the Item menu for info on the symbols in the stat ratings). Select an item to bring up the list of items that can be equipped on that slot. When you do this, the left window (as seen above) will show you the stat changes for your main stats for that piece of equipment. Green values mean that they go up, red ones go down, and white ones stay the same. You can de-equip a piece of equipment by selecting the (--) at the top (Marvel cannot de-equip her orb, though).
Press X to bring up a tiny mini-menu. "Equip Best" will automatically give you the best equipment, but only as regards the specific attribute of the equipment (Attack for weapons, Defense for armor). Sometimes it's more beneficial to equip other items, even though they may be a bit weaker, because they have elemental boosts or other stat boosts. You can also turn Auto-Equip on or off. When it's on, it'll automatically use "Equip Best" whenever you get a new piece of equipment. I don't recommend having it on.
Skills Menu
Here you can teach yourself Skills. When you level up you gain SP, and you can use that SP to level up individual Skills. Skills can go from level 0 to level 10. After the skill name, LV is the current level, and SP is the amount required for the next level. Press the A button to level up a skill. You can select the character at the top (the cursor MUST be at the very top left to select the character) and press left or right to change characters.
Some skills give stat bonuses on level up; many, when combined, allow you to use Abilities. Press the X button to go to your Ability list.
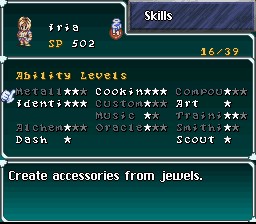
Here you can see which Abilities you've learned. Each Ability requires 1-3 Skills to learn. Each required Skill will light up one star for that Ability. When they're all lit, the Ability will be in white and you'll learn it. (Note that some Ability names are too long, so the stars actually show up in the middle of the names!) Select a Ability with the A button to see which Skills are required for that Ability, and your levels in each of them, as well as (at the bottom) your overall Ability level. Press B to exit out of this screen, and B again will return to the regular Skill menu.
Status Menu
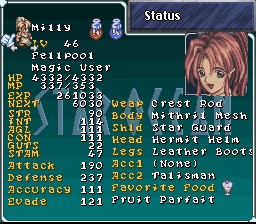
Press left or right to switch between characters. Here's an explanation of what the stats mean:
Milly: Character name.
LV: Current level.
Fellpool: Character race.
Healer: Character class/job.
HP: Current/max HP.
MP: Current/max MP.
EXP: Total amount of EXP acquired.
NEXT: Amount of EXP needed to raise a level.
STR: Innate strength, which affects the Attack rating below.
INT: Innate magical ability, which affects how effective spells will be.
AGL: Innate agility, which affects the Accuracy and Evade rating below.
CON: Innate constitution, which affects the Defense rating below.
GUTS: A special stat. GUTS causes certain effects in battle: hits that do double damage and/or dizzy the enemy, avoiding status ailments, or being revived with 1 HP after being killed. A high GUTS stat raises the chances of these things happening.
STAM: Another special stat. You start with this value of Stamina at the start of the battle. As you do actions (attacking, running, casting spells) your Stamina decreases. If you stop and do nothing, it'll increase again. At the end of the battle, you'll recover HP and MP based on how much Stamina you have left. High Stamina can be extremely useful later in the game.
Attack: Reflects how much damage the character can cause in battle.
Defense: Reflects how much damage the character can take in battle.
Accuracy: Reflects the character's accuracy rate in battle.
Evade: Reflects the character's ability to dodge attacks in battle.
The stuff to the right is the equipment that character has equipped. The Favorite Food indicates that character's favorite food; eating it will instantly restore HP and MP by 100%. Except for Ratix/Dorn/Milly, though, you won't know what it is (and it won't be indicated here) until the character actually eats it.
Press the X button to see a list of the character's Talents, which are used in Abilities.
Press the A button to go to the naming screen. It's a bit more complicated than usual. Use the up and down keys to go between "End" and the name (maximum 7 characters). Press A on the letter you want to change and the cursor will go down to the character set. Choose a character by pressing A. To return and end the naming session, you must press B to make the cursor go back up to the top of the screen.