|
|
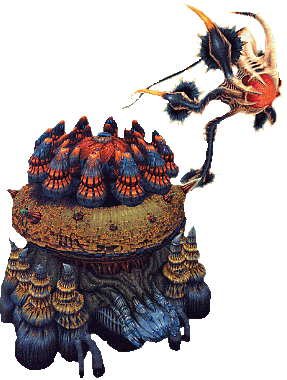
Meteor Parasite
Note: All artifacts in the 'Artifact Drop' list with a asterix next to it can only be received in that level by beating the boss.
It cannot be found naturally within that level.
Also note that just because you receive (for example) 140+ points, doesn't mean you'll get the Artifact set that requires 139+ points. You may get the 102+ points artifact set or less. You just simply meet the requirements for that particular set to appear.
Meteor Parasite | Mount Vellenge |
Fire - 2
Blizzard - 2
Thunder - 2
Slow - 3
Stop - 3
Gravity - 3
Holy - 3 |
Cohorts
Tentacle(x2) Variety |
Strategy
The battle of the Parasite is a long and arduous one and comes in three phases. The first form starts at the top of the Parasite and the other two forms work your way down to the bottom of the Parasite. Each successive phase will bring new hardships into the battle. In every phase, however, there are two tentacles on either side of the main target. These tentacles can either give you a good whallop with their gigantic heads, or cast spells to damage or poison you. So be ready with the Clear spell to counter the effect. Here are its myriad of attacks:
| Phase 1: Cutter Head | The Parasite core will extend out from its shell and try to sweep across the arena to hit you with its multi-bladed head. Simply stand back to the edge of the arena to avoid this easily predictable attack. |
| Phase 2:Explosion | The Parasite will start casting spells during the second phase. Once you see a pink circle forming under your feet, move quickly. Roughly one second and the entire pink circle will explode violently taking away one full heart! |
| Phase 2: Strike Beam | This attack should not worry you unless you are on the edge of the battlefield. When the core retracts, it will shoot a multitude of laser beams out to the far edge of the arena striking anything there. To avoid it, simply move in close to its main body. |
| Phase 3: Gattling Gun | Its final and most deadly attack covers the entire middle portion of the arena, leaving only the edges of it safe. It will fire blue pinpoints of light in the direction it will be firing; and only a second later, all those pinpoints will erupt in deadly explosions. One or two hits may not matter much, but if you get caught in the full blast, you'll most likely lose all your health. When you see those blue pinpoints, dash to the side immediately! |
|
Back to menu
|
|
(c)2006 RPGClassics.com. All materials are copyrighted by their respective authors. All games mentioned in this site are copyrighted by their respective producers and publishers. No infringement on any existing copyright is intended. All rights reserved.
|
|

