
 |
|
|
Battle Manual
Even if you've been playing ToP for a while, I guaranteee that you'll see some stuff in every section you never knew! Click on the section you wish to see.
How To Attack
Helper Characters and Spells
Techniques
Battle Menu
Status Problems
Escaping
Advanced Information
The battle system in ToP is quite unlike any other out there (besides for Tales of Destiny, of course. 8-)) It's what's known as a "linear battle system". You (Cless) and your three (or two, one, or zero) helpers are on the same linear playing field as the enemies. This isn't entirely one-dimensional, though: You can walk past some enemies, and there's the element of height as well. You directly control one character; the others are controlled by the computer based on settings you make in the main menu (although you can direct them in battle). When all of you die or are turned to stone or paralyzed, the game ends.
Every character has two types of battle points: HP (Health Points) and TP (Technique Points). Depending on the character's level, he/she can only have a certain maximum amount of HP and TP. Being hit by enemy attacks will lower HP; using techniques or spells will lower TP. Using items in and out of battle can regain lost HP and TP. Some enemies can also drain TP from you. Whenever you win a battle, every character will gain back TP in the amount of one-half their current level. Also after a battle, you will gain a certain amount of EXP (experience; when you get enough, you raise your level), and some gold (money). Some enemies will also drop items.
When a character raises a level, he/she will get a raise in all his/her stats. Cless and Mint may also learn new techniques or spells when they raise levels.
The party is always centered around Cless. Cless has what I call a base of movement. What that means is that Cless is always thought to be in a certain position even though at the moment he might not be in that position. When Cless goes out to attack, he always returns to his base position. He can change his base position by either a) walking; b) being hit by an enemy; or c) stopping himself by pressing the opposite direction he's travelling in. (E.g. Cless runs to the right to attack an enemy, and runs back left. Before he reaches his base position, you press Right to stop him. His current position becomes his new base position.)
When Cless changes his base position, the other characters will walk toward the new base position and take up their formation again. For more info on formation, see the Order Menu in the Menu Explanations.
The battles are in real time. If Cless is close enough to an enemy, he can just keep slashing away at it. However, since there may be many enemies at once, this tactic doesn't always work. Especially since if Cless misses, he is caught off balance for a second, which allows the enemy to get a strong hit in. Always be on guard!
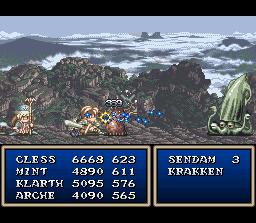
The names on the left are your characters, followed by their current HP and TP. The names on the right are the enemies you're fighting and the amount of each enemy type. When a character dies, his/her name will be displayed in orange. If their HP or TP is down to less than 25% its maximum value, that value will be displayed in orange.
Cless has two types of attack: A slash and a thrust. The slash is a downward attack, which hits enemies quickly. A thrust takes more time to set up, but pushes enemies back slightly. To execute a slash, press A; for a thrust, hold Up and press A. Depending on the weapon Cless has equipped, his Slash power and Thrust power may be different.
Cless will not just stand where he is and slash; he will usually run up to his designated target, hit him, then run back to his base position. Depending on where Cless is relative to his target, he will execute one of four attacks:
If Cless is extremely close to the enemy, he'll just attack from right where he is. For small enemies (who may actually be beyond the reach of his weapon), this means he may miss if he doesn't walk a bit closer.
If Cless is relatively close to the enemy, he'll run up to it, do his normal attack, then run back.
If Cless is a good distance away, you can make him run up and execute an upward attack, which does about 1.5 times the damage of a regular attack. Do this by pressing the A button again while he's dashing (if you don't, he'll just do his regular slash). This is excellent for high-flying enemies, but for ground-bound enemies it's very risky. Firstly, you'll be vulnerable for a second even if you hit him. Secondly, some enemies are so short this attack will miss completely all the time. This attack also knocks enemies backwards. Note that this also works with thrusts; pressing Up+A and then A again will do a jumping thrust, which uses the Thrust base stat instead of Slash.
If Cless is very far away from the enemy, the upward slash (by pressing the A button a second time) will turn into a jump and downward attack, doing from 1.5 to 2 times the damage of a regular attack. This is the best type of attack except for very high-flying enemies. This attack can knock some enemies quite a bit backwards.
I find that slashes are far more useful than thrusts; they're faster and have a much wider swath. Thrusts can hit "through" enemies - it can hit an enemy standing behind another one if you're very close. But I don't find that all that useful. Of course, it's up to you. 8-)
One last thing: Cless can run past any enemy to reach his target. (That is, if his base of movement is to the left of the screen, he can target an enemy on the right of the screen regardless of how many enemies are between him and the target.) However, he can't walk past any enemy on the ground (that is, change his base of movement past them) before killing them.
Cless can be helped in battle by up to three characters, although four are available by the end of the game (still, only three can be in battle at once). Each character is a bit different. To see the different tactics for each character, check the Tactics Menu from the Menu Explanations.
Mint is a healer, and absolutely integral to survival. She also has several "effect" spells like slowing down the enemy or raising attack power, all of which are more or less useless. She tends to have low defense power, so put her in the center of the formation so the rest can protect her. She learns new spells as she raises in level.
Klarth is a summoner. His spells are all similar, only differing in the elemental. Towards the end of the game, he becomes quite a bit less useful than Arche. He has the best physical attack of the magic users, though.
Arche is a witch. She has the special ability to fly. This is useful firstly because the Tractor Beam spell won't affect her; and also she has a better vantage point to hit taller enemies, or flying ones. She has many more spells than Klarth, and she finds progressively better spells as the game wears on.
Chester has no techniques, only a long-range attack. However, he raises levels quickly, and his attack seldom misses. Many of his weapons fire two arrows at once, meaning double the damage. He's very useful later in the game.
Try your best to keep your helper characters alive. You can't control any of them directly, but you can change their tactics in battle, and also manually tell them which spell to use. If the character has already chosen a spell and started casting it, you can't change the choice until either the spell is cast or the character is hit (canceling the spell).
Be warned that spells take time to cast; if a character is hit while casting a spell, the spell use will be canceled. This also applies to enemy mages, though: hit them before they can nail you with magic! Keep in mind that while a character is casting a spell, he/she can't move or do anything else. Ditto for enemy mages; take advantage of it!
One last thing about spells: Any character or monster casting a spell not only can't move, but acts as a barrier to stop everyone else from moving! If you're trying to get away from a monster and Klarth or Mint decides to cast a spell, you can't walk past him/her!
Helper characters arrange themselves around you as you set in the Order Menu. However, if Cless dies, he can't move around and thus can't make his helpers move around, right? Wrong. When Cless dies, he'll become a ghost. Move the ghost around so the helpers follow it. However, be careful: If Cless is revived, he'll come back to life from where his body is; you'll probably be caught off guard for a second as the screen pans back to him and everyone tries to get back to where he is.
Cless can set up to four sword techniques (which use TP, just like spells) to use in battle: two "short-range" and two "long-range". If Cless's target has a red "S" on it, that means the tech he'll execute will be the short-range one; if the target has a blue "L", it'll be the long-range one. Note that this means that even though you can equip four techniques, you can only have access to two of them at any time. This can get a bit weird when you realize that some techs exist in both the long and short lists. For example, there's a tech called Concentration which raises attack power. If you equipped it as a Long Range tech, you can only use it if your target is far away from you!
Cless can use two attacks at any time: the "regular" attack is done by pressing B, and the "alternate" attack is done by pressing Up + B.
Techniques are usually learned by raising levels (although some are gained in special places). However, there's another category of techniques: Combos. These are special long-range techs which combine two existing techniques (usually one long-range and one short-range). To use a combo, you have to have "mastered" both techs, as well as having bought or found the actual combo tech somewhere. To "master" a tech, you have to use it 100 times in battle. Once both techs are mastered, the combo tech will turn green and you will be able to equip it in battle. When Cless executes a combo in battle, he'll be accompanied by a blue shadow.
Most techs will put Cless right in the thick of things, meaning that if he misses he'll be caught off balance and vulnerable for a second. Some techs let him stay away from the enemy, though. Like spells, if an enemy hits you before the tech actually starts, the tech won't be executed, but you'll still lose the TP required.
Like spells, techs take a certain amount of time to set up; the time is different for each tech. For faster enemies, you might want to equip a faster but slightly weaker tech than for slower enemies. If you stayed with the slower tech, you'd probably never get it to actually work before you're hit!
There's a special accessory called Combo Command which lets you equip all your techs at once! To execute any tech you've learned, there's a special Street Fighter-style button combo to press. Check the Techniques section for more details.
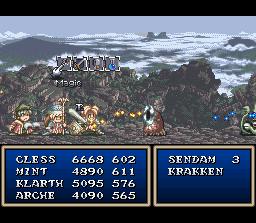
Enter the battle menu (and pause the game) by pressing X. From left to right, the choices are: Magic, Tactics, Order, Item. Press A on the menu you want.
Magic Menu: The arrow will go down to the names below.
Names in orange can't be chosen (here, because Cless can't use spells. If a magic user is dead, Stoned, Paralyzed, or is out of TP, they can't use spells either.)
The game will de-pause while choosing the character, so choose quickly!
When you do, the game will pause again. Choose a spell, then choose a target (the game will still be paused). Press B at any time to go back one choice.
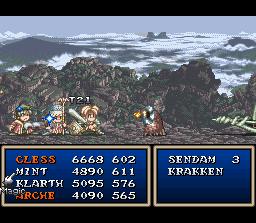
Tactics Menu: Like the Spell Menu, you'll have to choose a character (this time the game will stay paused, though). The choices are identical to the Tactics Menu from the Main Menu. Again, Cless has no tactics.
Order Menu:
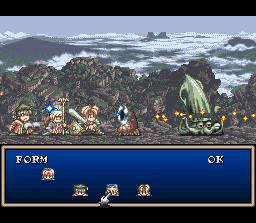
The basic idea is identical to the Order Menu from the Main Menu, but it looks slightly different. Plus, you can't change characters (if you have all five) in battle!
Item Menu: Choose an item (only the ones with a green O can be chosen), then choose a target. Every item takes some time before its effects are felt; some (like Life Bottle) can take a very long time to work.
If a menu has a red X over it, it means that a spell or tech effect is going on; you can't cast a spell or use an item at that time, but you can change Order and Tactics. Also, you can't use one item after another; the game makes you wait a bit. If you have to use an item badly, keep pressing X then B to see when the Item command becomes available.
There are four main status problems in ToP. No problem disappears after battle; you must cure it!
Poison: The least deadly status problem. It looks like little green bubbles are coming out of the character's head. The character will lose HP every few seconds. In the field, the character will lose HP every three steps. You can cure this with Mint's Antidote spell.
Paralyze: Looks like two yellow lightning bolts are coming out of the character's head; the character can't move or act.
Stone: Character turns gray, and can't move or act. If all characters are Stoned, the game ends.
Dead: Character is lying down; this is caused when his/her HP goes to 0. If all characters die, the game ends. Cure this with the Life Bottle item (in or out of battle), the S-Flag item in battle, or Mint's Raise Dead spell. Be warned that the Life Bottle item takes a huge amount of time to work in battle.
Dead and Stoned characters do not gain EXP or regain TP after battle.
The first three status problems can all be cured by using the Remedy Bottle item (in or out of battle), or using Mint's Recover spell. Using a Medecine Bottle in battle will drop one ally's attack power by 20%, but also protect him/her from all three status problems throughout the whole battle.
There are two other semi-problems:
Dizzy (Unconscious): Some attacks will cause the target to become dizzy. A dizzy target can't move or act, but the dizziness fades after a short while. You can cause the enemy to become dizzy as well! To reduce your dizziness time, wear an Armlet accessory.
Critical: When a character's HP drops below 25% of its maximum, the HP will be displayed in orange and the character will be crouching in his status screen.
There's only one way to escape from battle: Reach either side of the linear playing field, and hold either L or R (depending on if you're on the left or right side of the field). A 10-second timer will start up. Keep holding the L or R button and the timer will tick down; when it reaches 0, you'll run away. You get no penalty for running away from battles (in fact, sometimes you must run) but you won't get any experience either. Don't run away from any battles if you can help it.
It seems that the timer goes much slower when there are more enemies around. Try killing one or two and then try again. 8-) Also, you can equip a White Mist or Mist Rune accessory to make the escape speed faster.
Finally, if Cless is hit while trying to escape, the timer will usually restart (although sometimes the game will ignore it).
Did you know...
- Cless's weapons differ by more than stats. Axes, spears, and swords each act differently in battle. Spears have much longer range with the thrust attack, axes have a much wider swath with the slash attack. Swords seem to be faster than either of them. Usually the actaul thrust/slash stats of the specific weapon reflect these strengths.
- If Cless is close enough, he can hit an enemy behind him with a normal slash!
- Elementals play an important part in battles. Check the monster stats for any new dungeon to see if they absorb or are immune to any elementals, and make sure to equip a weapon which doesn't use that elemental! Also de-equip any attack spells which use that elemental. For example, when entering Glaciated Cave (which has a lot of water-absorbing enemies) you wouldn't equip the water-elemental Ice Scimitar sword, and you'd turn off Arche's Ice Tornado spell. Non-elemental weapons are usually a bit weaker than elemental ones, but you can equip them anywhere.
- Also, later in the game you'll be able to choose between armor which absorbs different elementals. Depending on where you're fighting, choose armor which can heal you from enemy spells instead of hurting you!
- It's not always best to keep hammering away with your best spells. Try to conserve TP whenever you can, but don't hold back if you're in a tough fight. Remember that you regain TP after every fight!
- Sometimes if an enemy is too close, Cless can't use even his short-range techs!
- Some spells like Fireball follow a line. If you target a far enemy, it'll end up hitting a closer one first.
- If a non-magic-using enemy is in the back row (i.e. there are more enemies between you and him), he'll stay inactive until you kill the front enemies. This includes some enemies who actually can use spells, even some bosses like Demitel and Dhaos!