
 |
|
|
Walkthrough Part 5
Thought you were done, did you? Ha! You've still got a good 5 - 10% of the game left, and that includes going up against Ragu Ragla and the rest of the golems!
You did save your game after picking up the 3 effects in Malduke, didn't you? From there, just set both levers to the left and use the transporter to go back to the entrance. Ride the Dimensional Elevator down to Ka Dingel, then cast Escape and go back to Adlehyde. Spend your money to upgrade the Arch Smash. You'll need it.
RINGS OF TIMESPACE
First, repair Adlehyde fully. You'll
know when you've done this when you can't donate any more money
to the restoration committee (the last increment is 100,000
gella -- if you need cash, see the Hayokontons quest).
Talk to the new guy in the Aldehyde pub and he will give
you the DISPELLADO (if he doesn't, try talking to the Baskar
chief's dog). Then go to the Rings of Timespace (the rock
circle northwest of Baskar Village). Use the Dispellado on
each rock in the following order: NW, SW, SE, NE, W, S, E,
and N. Then enter the Illusion Temple in the center. You
will meet Dan Dairam, the Guardian of Timespace. He will
revive Elmina, then you will get the CHRONO RUNE. In my
opinion, this is the best rune available for Cecilia, but
many people prefer the Love Rune. They're both good, and
remember, you can switch between them during combat to fit
the situation. Also, now that Elmina is revived, you can
talk to her at the pub in Milama. Jack will return
Elmina's ribbon (that she gave him in the intro), but it
doesn't affect the game in any way.
HAYOKONTONS
On the small island east of the Isle of Conflict
(where the arena is), you will occasionally encounter
Hayokontons. They give you lots of experience and gella
when defeated (use a Lucky Card), and they will also
occasionally drop Duplicators. You can also steal Duplicators
from them. If you kill them with the Lucky Shot spell, they
will always drop a Duplicator, but this is easier said than
done. It helps to cast Lock State when fighting them, as
they use both Direct Voice and Human Experimentation.
OCEAN OF SAND
The long desert strip enclosed by mountains
in the NW/SE corners of the map is home to three important
enemies. To fight these enemies more easily, use the
Curse spell.
First of all, in the south part of the strip, you can fight Acid Bunnies. They give you great experience, but they tend to run away. Give Jack a Rune that boosts his Response (like the Courage Rune) and use Cosmic Nova on them.
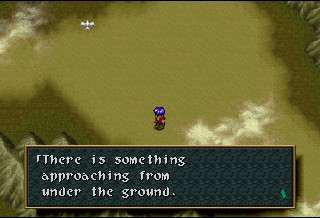
In the region up by the sign about disposing of golems, Shelzauruses will appear. They give you an easy 5000 gella and can be killed quickly. In the same region, Barbados the golem will appear. The best way to find Barbados is in Earth Golem (use the Ocarina to summon it), because you will not encounter any enemies besides Barbados. Barbados always appears in the same place, which is near the lower-left section of the circular area:
      _________
-----/       ! |
               |  ! = Signpost
----\          |  - = Mountains
    |   *      |  * = Barbados appears
    \________  |      around here
Or click here for a screenshot of where the battle takes place.
Barbados is fast and strong. Rudy should use the Arch Smash. When he gets Condition Green, use Fury Shot with the Phaser. Jack should cast Trump Card if he's healthy and Phazer Zapp if he's not. When he has the Force, use Sonic Vision. You will also need to have Jack heal with Heal Blade. Cecilia should cast Slow Down, then Hi-Shield, then cast Armor Down on Barbados. Use Remedy and Heal to heal. Barbados's attacks are very strong, so don't be surprised if you can't beat it the first time. You may want to go fight Lucifer and Sado first to get better armor. When you do beat Barbados, it will drop the Dist Dims, Cecilia's best staff. It also casts Soul Guard when Mysticed.
LUCIFER AND SADO
Go back to Ka Dingel and then to Malduke
(it shouldn't take you too long if you cast Invisible and
run through). Go to the place where you can teleport to
the three different Areas. Save your game. Go to the Mine
Area.
Go to the middle room with the eye on the wall. Take the stairs to the south. Put out the fire using the Vase, then stand in the center of the circle and use the Guitar. Sado will appear.
Rudy should use the Arch Smash and, when he gets the Force, Fury Shot the Phaser. Jack should cast Trump Card and Phazer Zapp, and use Sonic Vision. Cecilia should cast Slow Down, then Armor Down on Sado. After that, attack with Randomizer if you have the chance, and mostly use Remedy to heal. When you get the Force, use High Guardian (both the Love and Chrono Runes work great). You get the BRAVER VEST (the best armor for Rudy) when you win.
Go back to the save point, save your game, and then go to the Statue Area. Pay a visit to your friend Mr. Crystal Switch to turn it red, then go back to the upper level of the main room. Take the door in the upper-right, then take the top door. There is a stone tablet warning you about Lucifer. Walk into the wall south of that tablet, then go right. When you come out of the wall, head up to another flame. Put it out, then stand where it was and use the Guitar to summon Lucifer.
Lucifer is a little bit tougher than Sado (and equally big). Fight him just the way you fought Sado. You might want to equip Goat Dolls, because his Beam Fencer attack does about 3600 damage to the party, and Sephiroto does about 2500. Lucifer yields the JADE WILDER, Jack's best armor, when defeated.
LEVIATHAN
Repair Adlehyde up to 30,000 gella mark (if
you've got the Chrono Rune, then you've already finished
repairing the town). Go to the house in the upper right
and talk to Drake. He will repair the Sweet Candy for
you. You can pick up any bottles you missed and also go
snipe hunting for Leviathan.
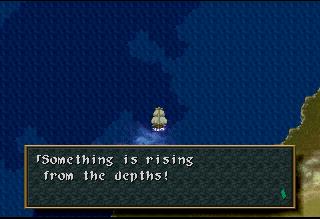
Leviathan, like Barbados, appears in a set location, not randomly. Head southwest from Ship Graveyard (in the ship) to a patch of dark blue water. In the lower-right corner of that patch, you'll fight Leviathan. Click here for a screenshot of where the battle takes place. Finding Leviathan is the hard part; beating her is easy. Just use the same routine you used on Sado, Barbados, and Lucifer. You won't need to cast Slow Down, though, and Leviathan can't hit nearly as hard. Leviathan drops the PRET-A-PORTE armor for Cecilia.
ZED
Fly to Saint Centour and enter. Remember that blind
girl? Go talk to her, then leave the town. On the way out,
Zed will appear. Choose to fight him and he will turn into
Monster Z.
Zed is surprisingly tough (this is Zed we're talking about, after all). Equip Goat Dolls, cast Lock State and Awaken, and then do the usual routine. Be sure to cast Slow Down on Zed; he's fast. By the way, Heal Blade cures your status should you need it. It's pretty hard to lose with a healthy supply of Goat Dolls. When you beat Zed, you get his DOOM BRINGER sword. Be sure to spare him.
The Doom Bringer's a good sword for Jack, but it lowers his luck. You can get a better weapon for him by defeating Angol Moa in the next quest.
THE ARENA
There are several quests involving the arena.
First of all, you can enter the arena itself. There are
four rounds of enemies, and you get different prizes
depending on how many fights you win before you choose
to quit:
Round 1: 10 Heal Berries, Goat Doll, Lucky Card
Round 2: 1 of each Apple, 5 Potion Berries
Round 3: 3 Secret Signs, 10 Magic Carrots, Ambrosia
Round 4: Duplicator, 3 Nectar, Full Libra
The first enemy is Medea. Use the Arch Smash, Trump Card, and Saint and you can kill him in one round. The second enemy is Badnews, who is tougher. Use the standard boss routine on him (see above), but use the Phaser instead of the Arch Smash to converse the Smash's ammo. Also, have Jack attack with Divide Shot, as it will always do 9999 damage (until the enemy gets low on HP; then switch to Trump Card). You may also want to use Hi-Shield because his Brutal Attacks are, well, brutal. In the third round you fight Javawalk. Use The Routine (with Divide Shot) and Banish.
The final opponent is Riversider. It's weak against water, so Rudy should use the Bazooka (using Fury Shot with it when he has the Force) instead of his other ARMs. Yes, the Bazooka finally comes in useful! If you haven't upgraded it, though, you may be better off with the Arch Smash and Phaser. Also, Hi-Flame works well for Cecilia, but she will probably be healing most of the time. Other than these points, use the standard boss routine, plus Divide Shot.
After you beat the arena once, get healed, load your ARMs, save, and enter again. If you have the Saber Fang from Ka Dingel, you will fight Flash Boomerang, a combination of Boomerang and Luceid. Just use the standard routine, but be sure to cast Slow Down! You will probably want to use Goat Dolls (especially for Cecilia), because Boomerang's Shadow Boomerang Maximum attack does 2000-4000 damage to the whole party! Don't forget to equip new Dolls when the old ones are used. As long as you don't get Shadow Boomeranged too often, you will be able to defeat him. Your reward is the DIVINE BLADE for Rudy.
There is still one more quest at the Arena: Angol Moa. To get to him, you need five Duplicators from the Hayokontons or the arena. I prefer the arena, but you can get them however you like. Then go to the arena and punch through the blue wall above "Duke" Pegucci. Use your five Duplicator keys and go down to the bottom floor. Walk up to the top and you will fight Angol Moa.
Do the standard routine on Angol Moa. Goat Dolls are useful, but not a necessity. Angol Moa is fairly strong, but not very difficult (I thought Flash Boomerang was harder). Moa drops the JUGGERNAUT when you win, the best weapon in the game. It's for Jack.
THE ABYSS
Ready for the ultimate dungeon? First, you
should have completed all the other extra quests. Buy a
lot of Goat Dolls. Then buy even more Goat Dolls. You
will also need two Duplicators.
Fly to the Elw Pyramid northeast of Baskar Village. Punch the green teleporter, then get in it. You may be taken to The Abyss (the screen will turn red). If not, try again. I think it helps to have *low* Luck.
Once in the Abyss, head south. The enemies in here are the strongest non-boss enemies in the game, so use strong attacks on them. You can steal Fish Badges from the Largons, and Frog Badges from the Wojanoids. When you come to a series of levers, flip the far left two, and the one second from the right (you can find out this combination by using the Radar). Keep going south to a passage with three statues. Push both the side statues down, then the middle one to the side. Keep going until you reach a Duplicator door. Open it, then follow the passage behind it to three chests. Open them for the best helmets in the game (DEAD HEAT, TEXAS NUMBER, and RUBY TIARA). Go back to the Duplicator door and head straight south to the next room.
Hug the outside wall and loop around the entire edge of the room. Go down the ladder in the upper-left corner. Get the AMULET in the chest and head north. Do not light the lantern in the next room; if you do on accident, use the Vase to put the fire out. Then go north again to reach the hookshot maze.
Swing left once and then up/left. Use Hanpan to open the chest for the ORB OF LIFE. Swing up and left again and have Hanpan pick up the MYSTIC SLATE. Neither of these accessories are that great, but they're nice to have. Swing northeast, then straight east twice. Walk up the long, narrow, ledge to the wall. Open the chest for the POWER BOOST, then swing to the post barely visible on the right. Use a Duplicator on the door and go through. Go north to a room with a circle on the floor. Get all healed up, then stand in the middle of the circle and play the Maya Guitar. Ragu Ragla will appear.
Ragu Ragla is the strongest boss in the game, as well as the strangest-looking. Equip those Goat Dolls, because you'll never beat him without them! Ragu's Volcanic Bomb spell does 7000 damage to the whole party... ouch. Rudy should use the Arch Smash, Jack should cast Phazer Zapp (Trump Card's usless because you always have very little HP), and Cecilia should use Hi-Blast (all elemental magic will heal Ragu). Be absolutely sure to equip new Goat Dolls when you use them up. Don't even bother healing, because you're just going to get killed each turn... you won't be able to do Force attacks either, because you lose your Force each time you die. The only thing that really matters here is how big your supply of Goat Dolls is... if it's big enough, you'll win eventually.
Once Ragu Ragla kicks the bucket, you'll get the SHERRIFF STAR, which raises all your stats by 100, in addition to having numerous other effects. Of course, if you can beat Ragu Ragla, what would you need the Sheriff Star for?
Unfortunately, you don't get any special ending for completing the extra quests (which is a shame, as the ending isn't that great). But, hey, a lousy ending is just a minor flaw in an otherwise near-perfect game. The end.