
 |
|
|
 |
 |
Fountain Head Cavern Walkthrough
Corak's Notes on Fountain Head Cavern:
The builders of Fountain Head stored their riches inside barrels in this cavern, and constructed pendulums to guard them. Enchanted altars monitor the passageways and sell skills that are most helpful to those who would dare leave the town walls.
Monsters in this area: Vampire Bats, Goblins, Moose Rats. Boss: Rat Overlord.
Map of Fountain Head Cavern:
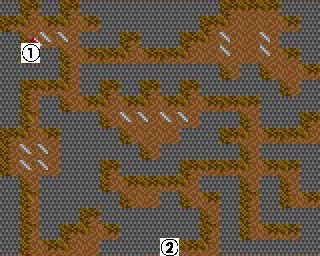
![]() Entrance. This is where
you end up when you climb down the hole in Fountain Head. You can get back there by
climbing back up (duh).
Entrance. This is where
you end up when you climb down the hole in Fountain Head. You can get back there by
climbing back up (duh).
![]() Here's another exit.
Climb up here, and you'll end up in the secret north-west part of Fountain Head, where you
will battle the Rat Overlord.
Here's another exit.
Climb up here, and you'll end up in the secret north-west part of Fountain Head, where you
will battle the Rat Overlord.
When you first enter the area, you'll be standing in a small "room" full of Vampire Bats. When the bats are dead, you'll be left with a bunch of barrels. Save before opening one; three contain treasure while one poisons the character who opens it. Also, a character can get hurt while searching a barrel. In any case, the "good" barrels contain about 1000 gold and a Sacred Silver Skull.
When you continue down the hall you'll notice a swinging pendulum. Passing through it will cause 5 damage to all party members. You can avoid them if you have the jump spell already, but it's possible to make it past the area without it. Now you have a choice: Proceed straight, past the pendulum, or turn left. Turn left first, bash down the gate, kill the bat and pass the pendulum. Before going past the second gate and pendulum, look to your left and you'll see another barrel. The character who opens this one gets a permanent +5 bonus to his/her Might, so choose the character who will open it wisely. It also contains another Sacred Silver Skull.
Now bash down the second gate. After passing the pendulum, you'll be in a large room with lots of bats. Kill all of them.
| Now approach the altar. (Look at the screenshot to the right: that's what an altar looks like.) This is the altar of Ezer, which can teach any character the skill Spot Secret Doors in exchange for 250 gold. You only need one character with this skill for it to work, but it will not work if the character is disabled, so you might want additional characters to have it. And if you're a perfectionist like me, you want every character to have every skill anyway. | 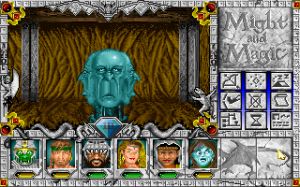 |
There are six barrels in this room, two of which will just poison the character who opens it, so be sure to save again before opening one. Two others contain a random item. The final two are the important ones, however. One gives the character who opens it a permanent +5 increase to his/her personality("you've become a more charming individual"), and the other does the same for intelligence("you've gained understanding and wisdom"). Be sure to give these bonuses to characters who actually benefit from this increase: Personality bonuses should only be given to users of Clerical Magic or Natural Magic, while Intelligence bonuses are only useful to users of Arcane Magic or Natural Magic. In addition, the barrels containing the stat bonuses also contain a Sacred Silver Skull each.
Now leave the room, go back past the two pendulums and turn left. You'll be facing the first pendulum you saw. Don't use the Jump spell(if you had it at all), but walk into it and sidestep to the right. Using the sidestep is important: Don't turn right or the pendulum will hit you a second time. There's a message on one of the walls here that mentions the Slithercult Stronghold, one of the optional dungeons. It doesn't mention anything important, though. Now, proceed through the open door. A troop of 12 Goblins will assault you as you get near the door, but shouldn't pose a significant threat if you built up your levels enough. If you find you're having trouble beating them, this would be a good time to take a few trips to the arena before continuing on.
After beating the Goblins, get the two barrels in the room; they contain 500 gold totalled. Now visit the two altars here. The left one, the altar of Shuji, will teach a character Direction Sense for 100 gold. The one on the right, the altar of Yu'ude, will teach a character Danger Sense for 500 gold. Both of these skills are very useful, so make sure at least one character in your party has them.
Next, unlock the door ahead with your Thief. There's a barrel behind it. The character who opens it will get a permanent +5 increase to his/her Luck, plus a Sacred Silver Skull. Before turning back, however, you should notice the gargoyle on the right indicating a secret door. So, bash down the wall in front of you. You'll have to beat a pair of Moose Rats now. After they are defeated, proceed past the wall you bashed down and you'll enter a small room with five barrels and a couple of bats. The barrels are arranged in a "+" form. The two barrels which you can reach directly will poison the character who opens them, so ignore them. Also ignore the barrel in the center of the "+"... if someone opens it that person will die. The two barrels furthest removed from you each contain a random item.
Now that you have five Sacred Silver Skulls, go back to Kranion the Skull Miser and get the password you need to reach the Rat Overlord from him, as well as 5000 gold and 5000 experience for each party member.
I'm going to be careful about this... although I can tell you the password right now, I can imagine some people would rather find the answers to the puzzles themselves. In this case, it's not such a big deal: It's easy to get the password. But other puzzles are much harder, I've even lost sleep over some of them. Therefore I've made a special Puzzle Spoilers section. If you're like me, and you like solving difficult puzzles all by yourself, I advise you to stay away from that section. Otherwise, feel free to help yourself... I wouldn't want anyone to get stuck.
After getting the password, Jump or walk all the way past the first pendulum you saw. A message on the wall will tell you to stay south to find the Rat Overlord. Turn left, into another room with some Goblins and Vampire Bats. There's more barrels here, too. The center one gives the character who opens it a permanent +5 bonus to his/her Accuracy. It also contains yet another Sacred Silver Skull. It's still useful, though: You may have completed Kranion's quest, but you can still get a reward from Kranion for bringing him additional skulls. The other barrels contain gold: 950 gold in total to be exact.
Next, bash through the gate up ahead. This can be a pretty deadly section: Multiple pendulums ahead. Pass the first two, then bash through the gate to the east. (I figured I could start using the east, west, north, south terms now, since with Direction Sense you can now see in which direction you're facing on the large gem in the bottom-center of the display window) Past the gate, if you go straight you'll see a message on the wall that Kranion knows the password and that five Skulls will make it known. Duh! ;) The important thing here is the altar of Sufe. It will teach a character how to swin for 200 gold. Every character should have this skill; only then will you be able to pass through water squares(providing they are near land).
Go back again to where you bashed in the gate and go south, past yet another pendulum, to find your way blocked by an altar. It will ask you "What be the word for me, if ever the other side you see?" The answer is the password that Kranion told you. If you haven't gotten it yet, you can cheat by looking in the Puzzle Spoilers section, or you can try a wild guess... let's just say it's a very appropriate word.
Anyway, after telling the altar the password (you may not need to yet if you used the Jump spell), first turn left(you'll be facing East). Walking into a wall, you'll see another message: "The Yellow Key grants access to the Fortress of Fear". Further down the hall is a barrel. It contains yet another Sacred Silver Skull, and the character who opens it will get a permanent +5 bonus to his/her Speed.
Turn back, give the altar the password again, and go south this time. You'll bump into a thin wall, so bash it down. It's s'more Moose Rats! Beat them and get the barrel at the end for yet another skull. This time, the character who opens it gets a permanent +5 bonus to his/her Endurance. Note that this will immediately increase the character's max HP, much like a Personality or Intelligence increase causes a spellcaster who makes use of that attribute to gain SP.
After getting the barrel, turn back, give that annoying altar the password a third time, and head west. Once again, a thin wall with two Moose Rats behind it. Beat them and follow the path until you have a choice to go forward or turn right. Turn right (you'll be facing west) and there'll be more Moose Rast and a couple of barrels. The barrels have the same effect as the last barrel you opened: They both give Endurance bonuses and hold a Sacred Silver Skull. Distribute the Endurance bonuses well, you'll need it.
Go back to the intersection and head south. A warning on the wall alerts you that "The Rat Overlord is near". Walk on and you'll see a little less friendly warning: "Turn back or perish!" Keep going anyway until you bump into a wall. Bash it down and you'll see three Moose Rats: All that's standing between you and the Rat Overlord. Make quick work of them and go on. You'll see the ladder that leads upward to the secret room in Fountain Head where the Rat Overlord can be found. Rest before going up there, so you'll be at full strength. After that, go on up and there he is...
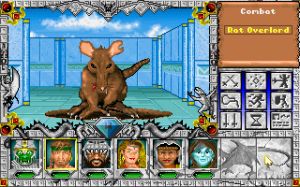 |
...a Moose Rat?!? Don't be fooled, he may look exactly like one, but he's much, much stronger. 250 HP and 6 attacks per round makes him a little harder than the average Moose Rat... hope you're strong enough to beat him at this time. Otherwise you'll just have to come back later, when your characters have gotten some better equipment. There isn't much of a strategy involved, just whack him with Might and Magic 'till he's dead. |
After beating him, bash down the gate and have your Thief open the treasure chest. Surprise! Turns out Morpheus' magical prison was the chest. :) Upon freeing Morpheus, the curse of ooze is lifted from Fountain Head and he advises you to visit the fountain that stands alone. The chest also holds 2500 gold, a Rope and Hooks (otherwise you can't get back unless you have the Create Rope spell!) and six random items. Not bad!
When you return to Fountain Head now, all the fountains who were previously infested with the green ooze are now flowing with crystal clear water. If you toss a coin in one, it will give you a hint about other things to do on your quest. Every fountain has something else to say. The fountain that stands alone is special though: It's located in the south-east corner of Fountain Head. You can drop any amount of gold in this fountain. The character who does this will gain an amount of experience equal to the amount of gold he or she dropped in the fountain. So if you have too much money... (Ha! There's no such thing as too much money!) Huh? Who said that? Oh well, anyway... as you can see you can "buy" experience this way if you want.
And that's it! You have fulfilled all quests in Fountain Head, so it's time to head out and explore the rest of Terra!
The only way out of here is back to Fountain head.
|
|