
 |
|
|
 |
 |
General Information
You've just started a new game of Might and Magic III and you have no clue what to do? Then this section's for you. But don't get me wrong, this section's not just intended for novices. There's lots of basic information here which you may not be aware of. Therefore, I advise you to read through this section carefully before attempting to follow any of the walkthroughs. It's quite some text, but then Might and Magic's a complex game. You might even consider this section a manual of sorts. In fact, some of the info here may be in the manual... if it exists. You see, with my copy of the game I just got a little storybook and a reference card. So I'll just have to be extra elaborate here, I don't want people who don't have a manual to be confused. After all, when I say stuff like "bash in the door" you should know how to do that, right?
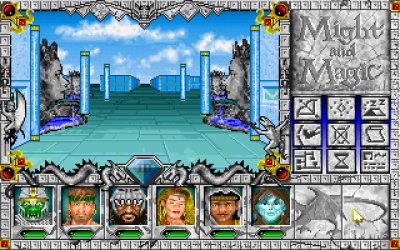
Okay, now let's get started! When you've started a new game (and named your game) you'll see this screen:
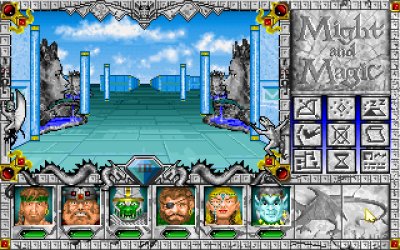
You can walk around by using the appropriate arrow keys on the keyboard. Also, if you move the mouse pointer to the edge of the window displaying your surroundings you'll notice the arrow will change to indicate a direction. If you click while the arrow is pointing to a direction, you will move in that direction. Note that you can either turn left and right and then move forward, which is probably more convenient most of the time, or you can sidestep left and right, which may prove more useful in certain situations. I myself prefer to use the arrow keys to move, though. If you do, remember that the left and right arrow keys will make you turn in that direction; if you wish to sidestep you'll have to use the mouse.
Now, don't start walking around blindly, they're ARE monsters in this town. First of all, let's prepare for the journey ahead. At the bottom of the screen you'll notice the portraits of your six pre-generated characters. You can take a more detailed look at the characters by clicking on their portraits. If you click on the left-most character, Sir Canegm the Paladin, you'll see this screen:
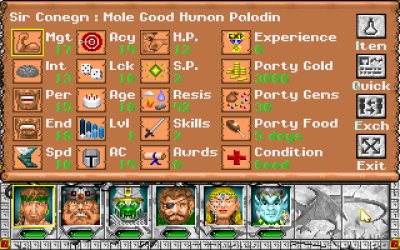
The first seven symbols will look familiar to you if you've already read the section on character creation. These represent your basic statistics. If you don't know what these seven are, I advise you to read the character creation section later on. I suggest you read it at least once anyway, but for now let's concentrate on the status screen. As you can see, all numbers are green at the moment, which indicates they are at their natural maximum (this only applies to the first 12 numbers, since things like Gold obviously have no "natural maximum"). Other number colors you will see during the course of the game are: Yellow (to indicate the amount is in between 25 and 100 percent of your natural maximum), red (to indicate the amount is in between 0 and 25 percent of your natural maximum), blue (if the amount is 0 or below), and grey (if your natural maximum has somehow been magically exceeded). The gems below the character portaits also follow this color code: Green means you're at maximum HP, yellow that you have in between 25 and 100 percent of your HP left, red that you have less than 25 percent of your HP left, blue that you have 0 or less HP left, and grey that you've somehow managed to get over 100% of your maximum HP.
Now, let's go over all of the the values that come after your stats, in the order in which the appear on the status screen.
Age: All characters start out at the age of 18. Obviously, whenever a year of game time passes, the characters will grow a year older. It's also possible for characters to be unnaturally aged during their journey (by being touched by a Phantom, for example). This is very hard to reverse in the early stages of the game, so try not to let this happen to you. If you're wondering what Age affects: As you get older, your statistics will start declining. When a character's age is around 80, his/her stats will be so low, the character will have become pretty much useless. Plus, a character may simply die of old age after his/her 80th birthday. You can click on the Age button, or the button of any other statistic, to see your natural amount in that statistic. If you click on the button of one of the seven basic stats, you'll also see a rating of that statistic.
Lvl: You guessed it, this is the character's level of experience. If you click on the button, you can also see how many attacks per round you can currently perform.
AC: Shows your character's Armor Class. The higher this number, the harder it is for monsters to hit the character.
HP: The character's Hit Points. If this drops to 0 or less, the character will fall unconscious. If the character's HP drops too far below 0, or if the other characters run from a battle, he/she will die.
SP: The character's Spell Points. If the character can't use magic, this will be 0. Magic users need Spell Points to cast spells.
Resis: Shows the total number of the character's resistances combined. For a more detailed breakdown, click on the icon and you'll see the amount of resistance the character has against Fire, Cold, Electricity, Acid/Poison, Energy and Magic attacks. The higher the number, the better the protection: There's a smaller chance that enemy spells of the element will harm the character, and if they do their damage will be reduced.
Skills: The amount of secondary skills the character has. Click on the button to see a list of the different skills the character possesses.
Awrds: The amount of awards the character has. You'll get awards by joining a Guild, completing quests, and the like. Click on the button to see a list of all the awards the character has received.
Experience: The amount of Experience the character has gained during the journey. You get experience mainly by beating monsters but also by completing certain important tasks and doing things like picking locks. Click on the button to see how much experience you need until your next level. When this value says "eligible", visit a Training Center to raise your level.
Party Gold: Shows the amount of gold the party currently has. If you click on the button you can also see how much money you have in the bank.
Party Gems: Same story as gold, but you can't pay with these. Magic users need them to cast certain spells.
Party Food: Shows how much food the party has. If you run out of food, you won't recover any health by resting.
Condition: This normally just shows Good. If any benificient spells like Blessed or Holy Bonus have been cast upon you, +'s behind the word 'Good' will indicate an improved status. If the character is suffering from one or more status ailments, this will display the most serious condition. To get a better overview of your condition, click on the button.
You'll have noticed that there are some buttons on the side: Item opens the character's Inventory, Quick will display the Quick Reference screen (more on that later), Exch will prompt you to click on another character; the selected character will trade places with that character, and Exit obviously returns you to the game. If you open Sir Canegm's Inventory Screen, you will see this:
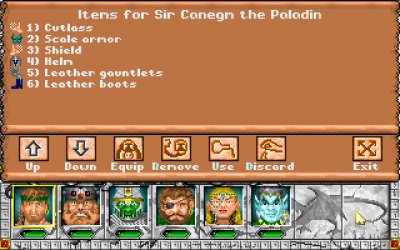
If you have more than 9 items, you can go to the next page by clicking on the Up/Down buttons. Each character can't have more than 18 items, however. As for the other buttons, they should be pretty obvious. You'll need to Equip the character with the stuff you want him/her to wear/use, but before that you may need to Remove another item: As much as you may want to, you just can't wear two armors. You can equip only one of any of these items: Melee Weapon, Off-hand object(this can be a shield, a gem, a potion, or whatever, and you can't equip anything in this slot if you're equipped with a two-handed Melee Weapon), Ranged Weapon, Armor, Headgear, Boots, Gauntlets, Cloak, Belt and Necklace. You can equip up to 4 Medals and up to 10 Rings though. If you've got something you don't need and you don't want/aren't able to sell the item, you can also opt to Discard it. Finally, you can Use any item which has a special use or has the ability to cast a spell.
Okay, I'll take a little break from explaining the game mechanics now and move on. Exit any screens that are blocking your view of the main screen. Now it's decision time: Will you be using all, some, or none of the pre-created characters? My advise is, quite simply, use none. They're all pretty average, you can do better. Of course, finishing the game with them is possible, but it'll be much more fun to customise your party to your own style. To do this, simply press the down arrow on your keyboard and you'll walk backwards, right into the Inn.
The Inn is where you create your characters and add them to your party. First you'll be asked to sign the register. Click on the "Thumbs Up" to do so (thereby saving the game) and enter the Inn. This is what you'll see:
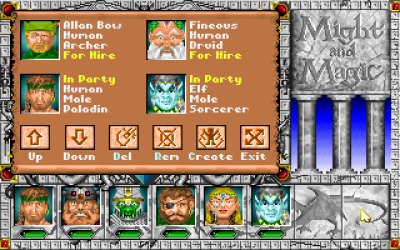
As you can see, the first two characters here are "For Hire". By clicking on them, they will state their price (in general, the higher the character's level, and the more valuable his/her equipment, the higher his/her price) and you can accept or decline to pay that price. I wouldn't bother too much with hirelings for now... they put a tremendous strain on your cash flow, especially in the early stages of the game, since you'll need to pay them their wages every day. And the wages increase as their levels do... so for now, leave these two alone. (they suck anyway ;)
The only other people here are your own characters, which you can now Remove from your party, or you can even Delete them permanently. To start creating your own party, hit the Create button and follow the instructions in the Character Creation section. After creating your characters, you can add them to your party by clicking on their portraits. Now don't forget to take the equipment of the preconstructed characters! They have some pretty handy things for the beginning adventurer, so transfer their stuff to your own characters. To do this, go to the Inventory screen, click on an item, then click on the portrait of the character you want to give it to. Now, assemble your new party and equip them in any way you see fit. (use the Item List to see what all that stuff does)
Now, depending on how many times you entered and exited the Inn, you'll either be facing the Inn's door or the same direction you were facing when you started the game. If you're facing the door, turn around. After creating the characters I'll be using for the walkthrough, my screen now looks like this:
Note that the two characters in front are NOT the two characters that were in the standard party: I deleted them so I could use their portraits. In case you're curious, from left to right I have a Knight(for the necessary pure muscle), a Paladin(a little less pure muscle, but still very strong and versatile), a Ninja(great fighter and moderate thief; like I said in the Character Creation section, a thief is a must), a Ranger(the most versatile character of all, always one of my favorites), a Cleric(healing is something you'll be doing a lot, so taking the most powerful healer may be a good idea) and a Sorcerer(the most powerful user of Arcane spells, in case swords just don't cut it. Pun intended). Your selection may be entirely different, of course, and rest assured that any party can finish the game, although it's about 10 times as hard without someone with Thievery. That's why during the walkthrough I'll be assuming you have a thief(Robber or Ninja) in your party. So do yourself a favor and make sure that's the case.
Now, on with the game. You may be wondering what all those icons at the right of the screen mean. Here's an explanation.
![]() Shoot: Whenever you click on this
button, all characters equipped with a Ranged Weapon will fire the weapon in the direction
your party is facing.
Shoot: Whenever you click on this
button, all characters equipped with a Ranged Weapon will fire the weapon in the direction
your party is facing.
![]() Cast: Click on this button and
select a character to view which spell the character has currently selected. You can then
opt to select a different spell and/or cast the currently selected spell.
Cast: Click on this button and
select a character to view which spell the character has currently selected. You can then
opt to select a different spell and/or cast the currently selected spell.
![]() Rest: Clicking on this button will
make your party rest at their current position. When you do this, each character will
consume one unit of food and eight hours will pass, providing your sleep isn't
interrupted; if sleeping in an unsafe place, monsters may ambush you. If you complete your
rest uninterrupted and you have enough food, all party members will regain all their HP
and SP. Most time-limited spells will be dispelled when you rest.
Rest: Clicking on this button will
make your party rest at their current position. When you do this, each character will
consume one unit of food and eight hours will pass, providing your sleep isn't
interrupted; if sleeping in an unsafe place, monsters may ambush you. If you complete your
rest uninterrupted and you have enough food, all party members will regain all their HP
and SP. Most time-limited spells will be dispelled when you rest.
![]() Bash: This button will cause your
party to rush forward, bashing anything that may be in their path with all their might.
Use this to attempt to break down doors, gates or thin walls. Your success is determined
by comparing the strength of the door/wall with the combined Might rating of the first two
(conscious) characters in the party, who will take 2 damage as a result of this action.
Bash: This button will cause your
party to rush forward, bashing anything that may be in their path with all their might.
Use this to attempt to break down doors, gates or thin walls. Your success is determined
by comparing the strength of the door/wall with the combined Might rating of the first two
(conscious) characters in the party, who will take 2 damage as a result of this action.
![]() Dismiss: With this button, you
can dismiss a member of your party and send him/her back to the Inn in which you enlisted
him/her. It's generally not a good idea to dismiss any of your main party members, but
it's great for getting rid of hirelings you can't afford to pay anymore. At least one
character must remain in the party at all times.
Dismiss: With this button, you
can dismiss a member of your party and send him/her back to the Inn in which you enlisted
him/her. It's generally not a good idea to dismiss any of your main party members, but
it's great for getting rid of hirelings you can't afford to pay anymore. At least one
character must remain in the party at all times.
![]() Notes: Clicking on this button
will display the notes of the famous adventurer Corak the Mysterious concerning the area
you're in. After viewing them, click again and you'll see a list of all the quests you're
currently involved in.
Notes: Clicking on this button
will display the notes of the famous adventurer Corak the Mysterious concerning the area
you're in. After viewing them, click again and you'll see a list of all the quests you're
currently involved in.
![]() Map: If any character in your party
has the Cartography skill, clicking on this button will display the automap, showing all
places you've previously visited in the current area.
Map: If any character in your party
has the Cartography skill, clicking on this button will display the automap, showing all
places you've previously visited in the current area.
![]() Info: Click on this button to get
some general info concerning your game, like time, date, year, and day of the week. It
also shows any spells currently affecting your whole party, like Light, Protection from
Fire or Wizard Eye, for example.
Info: Click on this button to get
some general info concerning your game, like time, date, year, and day of the week. It
also shows any spells currently affecting your whole party, like Light, Protection from
Fire or Wizard Eye, for example.
![]() Quick Reference: This displays a
quick summary of your party's status. In the case of my party, this is what it looks like:
Quick Reference: This displays a
quick summary of your party's status. In the case of my party, this is what it looks like:
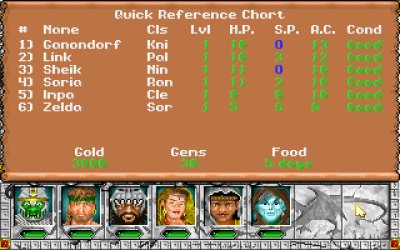
(If you're a Zelda fan, you've probably noticed the characters' names come from said series. Not that it matters...)
You may have noticed that none of these options allow you to save the game. If you want to do that, click on the large gem near the center of the screen displaying a "III", or, if you have someone with Direction Sense, indicating the direction you're facing(S, N, W, or E). You'll get a little menu with some options which should be obvious to you: You can save your game, load your game, quit the game and turn music and sound effects on or off. Don't worry about the Delay option: PC's these days are so fast that changing it won't have a noticeable effect. There's also a Mr. Wizard Help button. You can click on this to ask the almighty Mr. Wizard to get you out of a jam. He'll teleport your party to the Inn in Fountain Head when you use this option, but at a cost: The levels of all characters will permanently decrease. He may take pity on you and take nothing away if your characters are still at a low level. Think carefully before asking Mr. Wizard for help... preferably, don't do it at all. Also note that you only have one slot to save your game, so be careful.
Alright, time for some action! Let's go find a monster. Walk two steps forward, turn right, and walk forward until you're one step in front of the gate(don't approach it; if you're asked if you want to leave the town you've went one step too far. In that case, select the "thumbs down" and take a step backwards). Next, turn left and you'll see a long hall. Walk forward for a bit and you'll see something green in the distance. It'll waste no time and fire something purple at you; that's what a magical ranged attack looks like. It'll hit a character for Magic damage(resistance to Magic applies). Now you decide your next move: You can run up to it and engage in hand-to-hand combat, you can hit the Shoot button and fire any Ranged weapons you may have at it, or you can hit the Cast button and fling a spell at it. No matter what you choose, eventually the green thing will be right in front of you, prompting combat. You should see something like this on your screen:
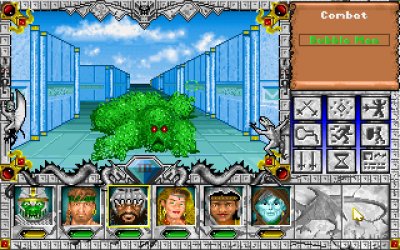
The scroll in the upper-right corner lets you know you've entered combat mode. In this scroll, you can see the names of the enemies you're facing, in the familiar color code: If the name is displayed in green, the enemy is at full strength. When it's yellow, the enemy still has between 25 and 100% of his HP left. And when it's red, the enemy has less than 25% of its HP remaining. You can only focus your attention on one enemy at a time. If there are more enemies, you can switch focus to a different enemy by clicking on its name, or by using the 1, 2 and 3 number keys on your keyboard. The most powerful enemy you're facing is usually standing in the center, the second most powerful on the left, and the least powerful on the right. But in this case, there is only one enemy, so you won't have to worry about who to hit. Now, the character with the highest Speed value will be selected; the character who has the next move will have a box around his/her portrait. When the enemy has a turn, you'll know soon enough: It'll attack immediately.
You may have noticed that some of the options at the right of the screen have changed. The Cast, Info, and Quick Reference buttons are still there, and they do the same thing, except now you can only cast spells with the character whose turn it is. Here's what the rest of the buttons do.
![]() Quick Fight: This will order the
character to fight using his/her current Quick Fight option settings. If you want a battle
to go really fast, hold down the left mouse button on this icon: You'll cycle through the
party's attacks at warp speed.
Quick Fight: This will order the
character to fight using his/her current Quick Fight option settings. If you want a battle
to go really fast, hold down the left mouse button on this icon: You'll cycle through the
party's attacks at warp speed.
![]() Attack:
This will make the character attack the currently selected opponent with whatever melee
weapon he/she is currently equipped with.
Attack:
This will make the character attack the currently selected opponent with whatever melee
weapon he/she is currently equipped with.
![]() Use: This
brings up the character's inventory screen, where you can select an item to equip, remove,
or use.
Use: This
brings up the character's inventory screen, where you can select an item to equip, remove,
or use.
![]() Run: Well,
you know what they say: Discretion is the blah blah blah... you know where I'm going with
this: Don't be afraid to run away if you're in a hopeless battle. Success is, realisticly
enough, determined by the character's Speed and Luck. If successful, the character will
flee to a nearby safe location. If the other party members beat the enemy, the party
members who fled will rejoin the group after the battle. If all characters flee, or those
that stayed to fight are defeated, your party will end up in the safe location they fled
to. In this case, any characters who were knocked unconscious will die.
Run: Well,
you know what they say: Discretion is the blah blah blah... you know where I'm going with
this: Don't be afraid to run away if you're in a hopeless battle. Success is, realisticly
enough, determined by the character's Speed and Luck. If successful, the character will
flee to a nearby safe location. If the other party members beat the enemy, the party
members who fled will rejoin the group after the battle. If all characters flee, or those
that stayed to fight are defeated, your party will end up in the safe location they fled
to. In this case, any characters who were knocked unconscious will die.
![]() Block:
Order the character to attempt to block the next attack directed against him/her. Only
physical attacks can be blocked. Success is largely a question of Luck, and the chance of
success is raised considerably if the character has a shield equipped.
Block:
Order the character to attempt to block the next attack directed against him/her. Only
physical attacks can be blocked. Success is largely a question of Luck, and the chance of
success is raised considerably if the character has a shield equipped.
![]() Quick Fight Option: With this
button you can set the party's Quick Fight options. You can direct a party member to
Attack, Cast the spell that he/she has readied, Block or Run when the Quick Fight option
is selected. By default, every party member will Attack when Quick Fight is selected.
Quick Fight Option: With this
button you can set the party's Quick Fight options. You can direct a party member to
Attack, Cast the spell that he/she has readied, Block or Run when the Quick Fight option
is selected. By default, every party member will Attack when Quick Fight is selected.
After beating the Bubble Man here, the current exposed areas of Fountain Head, the town you start in, will be safe: The other monsters here are behind closed gates and thin walls. Now you can safely explore the most important areas of the town. The last thing I'll discuss in this section are the different buildings you can find in every town.
The Blacksmith's Shop: Here is where you buy new equipment and sell equipment you don't need anymore. You can also have any broken equipment fixed here, and the blacksmith will identify your items, for a price. If you use the Item List, however, that won't be necessary. While buying, if you select a character, you'll notice that the little icons in front of the items will disappear if the character can't equip that item. The Blacksmith's is only open during the day.
The Training Center: Unlike most RPGs, you'll have to go to a specific location and shell out some cash to gain levels in this game. When you've gathered enough experience, visit a Training Center and pay the amount of Gold required to reach the next level. This amount will increase as your level does. It's only accessible during the daytime.
The Guild: This is where you buy your spells. You can only buy spells at a Guild if you're a member of that Guild, so you'll need to find someone in town willing to grant you membership first. In a Guild, you can also get info on your spells, in case you need to be reminded. They're only open at night.
The Temple: Here you can be healed of any damage and/or status ailments. You can also get yourself and/or your equipment uncursed here. You can also donate at the temple. If a character donates enough money, he or she will get the spells Blessed, Holy Bonus, Heroism, and Power Shield cast upon him/her for the rest of the day. The amount of times you have to donate in order to receive the bonuses depends on the day of the week: If it's Onesday, you'll only need to donate once, at Twosday twice, etc. The more times you need to donate, the greater the blessing will be. The temple always has time for the needy, day or night.
The Inn: This is where you create, add and remove party members, as well as enlist the services of hirelings. The Inn is always open.
The Tavern: When you're up late at night, some would say the Tavern's the best place to spend your time. And they could be right. Not only is this the only place you can buy a food supply for your journey, it's also a great source of info. For starters, you can always listen for rumours. The rumours change every day, and you can pick up some interesting stuff this way. Also, you can buy an ale for one gold by selecting the "Drink" option. After that, you can tip the barkeep with another gold piece, and he'll tell you something useful. Whenever you drink, there's a chance you'll be affected by the "Drunk" status ailment, so be careful. The higher your Endurance, the better you can hold your drinks.
The Bank: The only bank in Terra is in Fountain Head. You can safely store your Gold and Gems here, at an interest rate of 1% per day. It's open from 9 to 5 during the day.
The Magic Mirror: This is not technically a building, but there is one in every town. When you approach it, it will ask for your destination. If you know the password for a destination, you can use the Magic Mirror to travel quickly from place to place.
Well, this section turned out to be quite a detailed manual... I hope it's been useful to you. I suggest you peruse the section on Fountain Head next to get started on your quest.
Oh! I almost forgot... you don't even know what your quest is, do you? Well, Sheltem, your arch-nemesis, has gained control of the Pyramids of the Ancients, which, according to legend, hold the secret of interdimensional travel. You obviously can't let him have this power, so you once again set off to find him and finish him off once and for all, something you failed to do in the first two Might and Magic games. Good luck!
|
|