
 |
|
|
Bosses
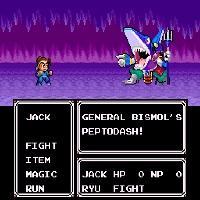
Boss Fights in Super Ninja Boy are quite different from the ordinary enemy battles. Instead of the "River City Ransom" type battles that you fight when encountering enemies, the boss fights are more like "traditional" RPGs. The enemy is on the right, and you are on the left. You select a command, as does he. Then the game carries out the attacks, tells the amount of damage received/healed, and kills off any characters which have lost all their HP. Here is a sample picture of a boss battle:
Your Commands Are:
Fight: Use various physical attacks. The game chooses a random one, and attacks the boss with it. You will either punch, Miracle Kick, Moonsault Kick, or attack the enemy with your sword.
Magic: Use Magic against the boss or on yourself. Also, if you have enough M Points, you can use Mighty Ball on the boss, which will do a massive amount of damage to the boss, or be blocked out.
Item: Use Items against the boss or on yourself. This includes attacking with swords, Boo Bombs, or healing with Sweet Buns, Meat Buns, or Cupsules.
Run: Run away from the boss! Don't choose this! Stand and fight, valiant warrior!
Here is a list of the 6 boss battles in the game, where they are hiding, their various attacks, a picture of each boss, and my tactics for beating them. NOTE: If you are playing 1 Player mode, Ryu will be in the Boss Fights with you, and will use random Fight Commands. Also, when the boss attacks, it will target BOTH your characters.

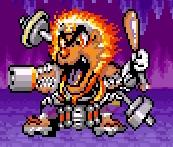
Location: Mt. Wasabi Cave
Description: Bongoman's "furious electric sound" is the cause of all the fatigue and idleness in Edo City. Defeating him will restore Edo City to normal, and will get you the Red Auraball.
Tactics: Use any M points you have to Mighty Ball him, then select your sword from the Item command to do the rest. With this strategy, he won't take long. When your HP drops to around 10 or so, use a Sweet Bun! Make sure you have 8 of them with you in EVERY boss fight!
Suggested Level: Level 12
HP: About 80
Exp: 400
Sen: 200
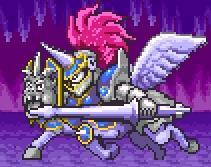
Location: Ghost Tower (Tower West of Satoon)
Description: Disguising himself as the good King Romel, General Konk is one of the Dark Bombers of the Galands. His plan is to take over Project-3F and use it to send gas bombs around the world, poisoning the good people of Fairyland! But you won't let him, right? Beat him to get the Green Auraball.
Tactics: Pretty much the same thing as before, except his attacks are stronger, and he can turn invisible. When he turns invisible, you must select "Hyper Vision" from your Magic command to make him appear again! Save the Meat Bun for emergencies in this fight!
Suggested Level: Level 18
HP: About 160
Exp: 2000
Sen: 1600

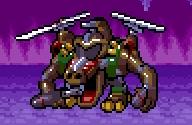
Location: Sunken Ship (go through the Undersea Passage of Moo)
Description: This evil sea-beast has been terrorizing the town of Moo. Some people say it is actually his fault that the town of Moo has sunk underwater, yet this is not really proven. Defeating Nargi will allow you to progress deeper into the Sunken Ship and search for Bismol.. You will obtain the Turtle Watch after defeating him.
Tactics: Once again, the same old tactics you used on the other guys. Mighty Ball him, then slash away with the sword. Use Hyper Vision when he turns invisible, heal when needed, etc etc...
Suggested Level: Level 27
HP: About 190
Exp: 2000
Sen: 2000

Location: Sunken Ship (after Nargi)
Description: The evil shark fiend who summoned Nargi to do his dirty work. Bismol wants all your Auraballs, and he will not hesitate to kill you to get them! Defeat him for the Silver Auraball.
Tactics: Yet again, the same things as before. The only difference is that this boss can recover HP, but that won't be much of an issue. If you lose, level up and try again.
Suggested Level: Level 27
HP: About 200
Exp: 3500
Sen: 3000
Location: Sewer Canal in Athletown
Description: The one responsible for creating the Jack and Ryu clones which terrorized Athletown, Bad News Boss is furious that you were able to get this far. He's supposed to be some kind of "team spirit" type boss, I think... He also has the Gold Auraball, so kick the crap out of him!
Tactics: Must I explain again? Do the exact same thing as before: Mighty Ball, Sword attacks, heal when needed. I figured this would be etched into your brain by now!
Suggested Level: Level 29
HP: About 235
Exp: 3500
Sen: 4500

Location: Final Dungeon
Description: or those of you thinking Rub-A-Doc was a good guy, well... I hate to burst your bubble... he's EVIL! He steals all your Auraballs, and then tries to take over the world! This is the last battle! Show him what you're made of!
Tactics: Yet again, the same things as before. Just keep using Mighty Ball until it runs out, then attack with your Sword.
Suggested Level: Level 33
HP: About 270
Exp: 4000
Sen: 8000
|
|