
 |
|
|
Manual
Bahamut Lagoon is a cross between a traditional RPG and a strategy RPG. There are generally three major modes you'll find yourself in during the game. They're explained in detail below.
Walking Around: Extremely simple. Hit A to talk to people or examine things, hold Y to run. There isn't even a menu. O_o
Pre-Battle Menu: Here's where you prepare for battle. Hit A to accept a choice and B to cancel. Pressing right on the directional pad in a list will take you one screen down, and left will take you one screen up.
Battle: The main thrust of the game is here. As usual, A accepts or examines units, and B cancels. Hold Y while moving the cursor to make it go faster. Start brings up a mini-menu. Hitting X on a unit brings up more detailed information about it.
While in this mode, search for items by hitting A on every conceivable surface. 8-) You can also go into shops by speaking to the shopkeeper, or feed your dragons by talking to them. The shopkeeper lets you buy and sell items, as well as equip your party or look at your inventory (two submenus from the Pre-Battle Menu). Talking to a dragon lets you feed it. Like in the menu, hitting right while choosing an item to feed goes one screen down, and left goes one screen up. You can feed a bunch of one type of item at once by choosing it and then pressing right or left (increase/decrease by one) or up/down (increase/decrease by 10).

On the main menu screen, hit left or right to switch between the parties. The dragon belonging to the current party is displayed at the top left, and the party members (four per party) are displayed on the right. (The images at the top are the possible parties). Hit A on an option to enter it.
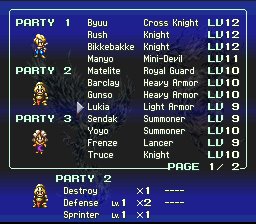
Formation: You can do two things here: switch members between parties, and look at stats. You have a maximum of six active parties; any other members do not participate in battle. (See Tips and Strategies for what constitutes a good party formation.) Each party is associated with a dragon (see the Dragons menu below). On the bottom you can see special effects and long-range moves associated with the specific four-person party you're viewing. Hit A on the same character twice to bring up a status menu.

Move the cursor down to bring up a list of techniques. Hit A to see details on each technique. The reason some techniques are listed twice is because the first listing is the melee effect, and the second indicates the long-range effect. The stats are pretty simple. There are only four battle stats, each of which is self-explanatory. The number in () brackets is the innate value of that stat (i.e. without anything equipped). Techniques are directly dependent on the stat levels of the party's dragon; see Techniques and Spells for more info.

Dragons: Similar to Formation, here you can switch which party is associated with which dragon. If you have any dragons with weird forms (like Unknown or Uni Uni) you may want to do this. (See Dragons for more info.) You can see which party is associated with the dragon, and their special effects/long range attacks, in the box. You can also see quick stats along the bottom. From left to right, the stats are: Strength, Vitality, Dexterity, Mind, Fire, Water, Thunder, Earth, Life, and Poison. Remember that elementals gain a level every 10 points, and other stats gain levels once every 25 points. See Stats for more info.
Hitting A twice on a dragon brings up a status screen. This shows each stat specifically (not the weird ones like Intelligence and Loyalty, though) as well as their four battle stats (identical to the character ones). Hitting A again brings up a second status screen; here you can view the dragon's techniques for closeup and long-range, similar to the character status screen.
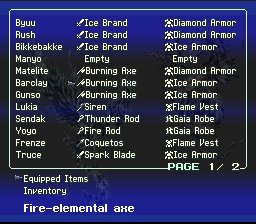
Equipment: There are two screens here. Equipped Items is the screen above; it shows quickly which characters are equipped with which items. Hit A to view the items individually and any special properties. Hit right twice to advance the screen to the next one, or go down all the way to do the same thing. You can't actually equip them here. The Inventory screen is identical to Equipment except that the character names aren't included. ^^; If you're in an Ex-Play game, Inventory will be changed to Inventory / Item Details. This means that when you view items, you CAN hit A on them and you'll see what changes each item does when it's fed to a dragon.
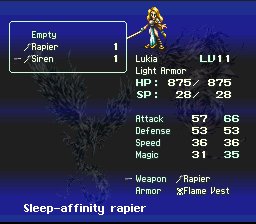
Equip: First you get to choose a character, then you're brought to the above screen. You can easily see changes in stats when you equip an item. Raised stats are in blue, lowered ones are in black.
Map: This lets you view your battlefield. It's exactly like you're in a Player Phase except that you can't actually make any moves. Hit Start to return to the menu.
Begin Assault: Start the battle!
Side Quest: You can choose from two or three side quests; these are just single battles, after which you return to the Farnheit where you can buy stuff or feed your dragons.
Auto-Formation: The game will set your formation so that the maximum number of people of the same class are together. I recommend against using this, ever.
That's it for the pre-battle menu! Now let's go into a real battle!
Okay. First off, battle has two phases: player and enemy. During the player phase, you move your units and attack or use spells. As soon as a player's unit finishes its turn, that player's dragon will immediately move as well (you can't directly control what a dragon does). When all players have used their turns, the player phase ends and the enemy phase begins, during which time each enemy unit has one turn, after which it's player phase again.
There are up to four characters/enemies in a unit. Each player unit is associated with one dragon, which determines the possible techniques used by that unit, as well as their level. When all characters/enemies in a unit run out of HP, the unit is removed from battle for good (character units will still come back for the next battle, worry not). Ditto if a dragon runs out of HP. (If that happens, the dragon's unit will have nearly all their techniques disabled.) If a character unit dies, its associated dragon will die as well. You win the battle (depending on the chapter) when you either defeat the boss, or destroy all enemy units. You lose the battle if Byuu's unit is destroyed.
During the player phase, move the cursor with the directional button. Hitting A on a square will tell you what surface it is if there's nothing else on it. If it's an enemy unit, you can see the enemies in the unit and their level/HP/MP, and you can see how far the unit can move. If it's a player unit, the following menu will come up.
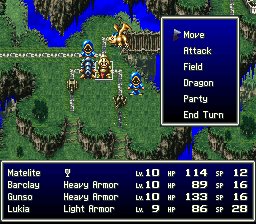
Below, you can see each character's name, class/job (if s/he has a status problem like Strengthened, Poison, Rabbit, Sleep, Stone, or Death, that icon will be there instead of the class name), level, HP, and MP (or SP, which is more or less the same as MP).
Move: Allows you to move the unit. Each unit has a specific range; it can't move further than that. Certain types of surfaces only let you move one square at a time, or don't let you step on them at all. See Terrain for more info.
Attack: This only comes up if you're directly next to an enemy. Choosing this enters into an RPG-style battle.
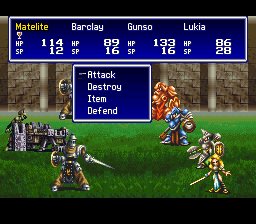
Exactly one round will ensue. Each character can choose one of the four options. Attack uses a physical attack. The second option is different for each character class, but lets you use a technique or spell. Item lets you use an item, and Defend lets you defend against attacks; you can defend another character instead of yourself if you like. If a Defending character is hit, s/he will gain EXP from the attack. After all four characters have chosen, each unit (player/enemy) will do exactly one action. There's also a chance that your dragon will swoop in before the battle starts and damage the enemy. (It might also just watch or encourage you.) Once all units have taken an action, the attack turn ends and your characters gain EXP based on their actions, and money/items and extra EXP if they defeated enemies. Note that Mini-Devils are controlled randomly in battle.
Back to the main battle menu. Field lets you choose a spell or technique that can be used without entering a battle. Field techniques have both range and effect; the first indicates how far you can throw it, and the second indicates how many squares around the target are affected. For instance, if a technique has range of 1 and effect of 2, you can put the target within one square of yourself and it'll have an effect range of five squares (itself and the four immediately around it).
Field techniques CANNOT hurt the wrong side; you can't cast a Flame spell on your own party or heal the enemy. The only two exceptions are some of the random Mini-Devil dances, and using healing techniques on undead enemies (which hurts them). (You may also heal enemies if you use (e.g.) Fire spells on a Fire-elemental enemy.) Depending on the elemental of the field technique, you may also affect the terrain it hits. For example, if you hit a structure (even if another unit is on top of it) with a thunder technique, the structure will be destroyed. Note that defeating an enemy using field attacks instead of going in-battle will only gain you half the amount of money and items. See Tips and Strategies for a discussion of whether closeup or field attacks are better.
Dragon: This lets you set the artificial intelligence of your dragon. You have three possibilities. Come tells the dragon to stick close to you and attack enemies near you. Go tells it to go as far ahead as it can and attack enemies further out. Wait tells it to stay near you and do nothing or heal.
Party: This opens a mini-menu similar to the Pre-Battle Menu. You can use healing magic or items (only Summoners or White Mages may use healing magic), change equipment, or see your inventory.
End Turn: Ends the turn without taking an action.
A turn ends when one of the following choices is picked: Field, Attack, or End Turn. Once they're picked, you can no longer move, change your dragon's AI or use healing items on your party till the next phase. So be sure to do so before you choose your move! A unit that has ended its turn will be in gray and is deemed inactive till the next phase.
Pressing Start brings up another mini-menu. Sound Menu lets you choose between Stero, Mono, and Surround. End Phase is basically the same as if you'd gone to every player unit and picked "End Turn"; the dragons will still move. Save Game saves your game into a temporary slot; at the title screen, pick "Temporary Play" to return to the exact state you saved.
About experience: You get experience from taking any action at all besides "End Turn"; it doesn't have to be successful to get EXP from it. The experience is directly based on the level of the person taking the action. For field techniques, the entire party will gain the same amount of EXP. For in-battle (Attack), each character's action determines his/her EXP. Also, killing an enemy will give the entire party bonus EXP.
Even if you lose a battle completely, don't restart; you keep the EXP you got during the fight!
|
|