
 |
|
|
 |
Levels 2 & 3
At the red alter at Level 1, it will be removed and a teleport circle will appear. Take it to Level 2.
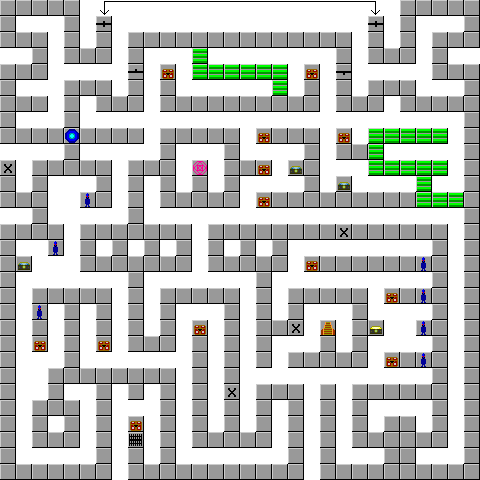
The music to the level changes, and for the better, because this is the best music in the game (besides the final battle). There is another Mithril Ore at the treasure just to the east of the portal. You will find some Brikeyes here, which are pretty tough to kill, but may sometimes leave some Mithril Ore. You will also run into Sentinals here. They hit hard, but can be killed with a few spells quickly. They will also send you back to town a few times. When it seems to come to a dead end, there is a door that when taken, takes you to the other side of the level.
Some good items are located here. A Magic Hood, a Great Axe, and a Sun Armor. You have to fight a Sentinal to get the Sun Armor. After you have that, you should be near the stairs, and a Gold Fountain, but beware of the Head Hunters that pop down. Remember this and head up the stairs. Then use Egress to exit the Labyrinth.
Go back to the Castle and meet Xern, the person who was a mentor to Melvyl, who they say is really Dark Sol. Xern will give you the Medallion, which can be used at the Gold Fountains to return there on command. Head to the Tavern in town and Melvyl will meet you there. Pay attention to the scene here, before he disappears.
Go back to the Gold Fountain and use the Medallion. You will save half of it to return there. Now, it is time to update equipment again. If you still have the Dark Block, go to the Trader and have him make a Weapon for Pyra. Yes, the weapon will be cursed, and will tangle her up about 30% of the time, but the power of it is worth it. He will make Pyra a Hex Whip. The only weapon for Pyra that is stronger is the Mithril Rod, but it is not a Whip. Plus, the Hex Whip is much cheeper than the Mithril Rod. Also, have him make a Shield for Milo with the other Mithril Ore. Also, if the Alkemist has the other Mithril Ore for sale, buy it and have an Armor made for Hiro. But when you pick it up, give it to Milo. You should now have this equipment:
Hiro: ![]()
![]()
![]()
![]()
Milo: ![]()
![]()
![]()
![]()
Pyra: ![]()
![]()
![]()
![]()
Go up the stairs at Level 2, to enter Level 3.
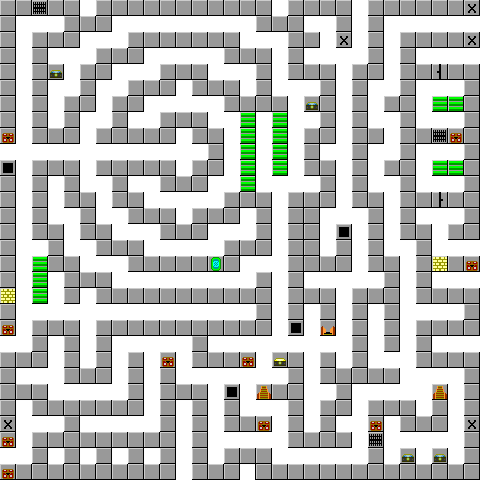
Level 3 is a bit tougher, but with the Hex Whip, it should be made easier. Most of the level is just a winding pathway that can drive anyone crazy. When you reach an egg, like the Tortolyde's, but this time it is the Shell Beast. Use your best attacks on it to kill it, then continue. When you reach Coordinates (1, 28) you will find a Mystic Rope. This will let you climb landings (marked in X's) to go to the upper level. Climb the pit from where you got the Rope to Level 4, and go a ways to get the Enduro Staff. Sell it when you get back.
Buy the Dwarf's Key back and go to the Cave of Strength. Fall down the hole at (8, 17) and use the Mystic Rope to go back up. Go to the other side of the pit and take the Mithril Ore. Have the Trader make a Weapon for Milo and recieve the Mithril Axe. Sell the Dwarf's Key again.
Go back to Level 2 (do not use the Medallion). Go to (15, 25) and use the Mystic Rope to Level 3. Go a ways and grab the Great Flail (which is to be sold). Go back to Level 2 and go to (1, 11). Use the Rope here and go until you see a wall. Use the Orb of Truth and easily kill the Grim Wall. The wall will be gone and you can grab the 3rd best sword in the game, the Storm Sword. Give it to Hiro.
Continue on at Floor 3. Climb the Rope at (30, 27) to Level 4. There is Holy Water on that Level, and stairs leading down back to Level 3. Take it and get another Mithril Ore. Take this back to the Trader and have him make an Armor for Pyra, which will result in the Light Robe.
At (29, 9) there is a Light Helmet for Hiro, which is the first of the Arms of Light. You have to use the door to the north of it to get it though. Around this point, you should watch out for Scizzars, which are powered up versions of the Kaiser Krab. Climb the Rope at (30, 3) to Level 4. Go around and take the pit back down. Follow to the stairway. Just before you get to the stairway, you will run into Blackbone. He is TOUGH. Use your best attacks against him, including Boost. You should be around Level 33 by now (or at least I way). Exit out and rest up. Take the Medallion from the Gold Fountain in Level 2, and go back to the Level 3 Gold Fountain and drop it in there. Update your equipment again to this:
Hiro: ![]()
![]()
![]()
![]()
Milo: ![]()
![]()
![]()
![]()
Pyra: ![]()
![]()
![]()
![]()
Go back to the Castle and see a battle scene between Xern and Dark Sol. Dark Sol will use Demon Breath on Xern, and then say that if Xern is the best they have, to give up now. Will the Arms of Light save them now?
|
|