
 |
|
|
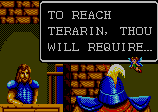
The Legend of IasonLong ago in a land of swords and sorcery, a stumbling shepherd lad named Iason unknowingly opened the Pandora Passage. Through this gateway all manner of evil creatures were let loose upon the Five Lands under the claws of the Dark Lord Terarin.
As Iason grew into a man, he watched Terarin's nightmare army devastate the Five Lands. Since it was Iason who had unleashed this evil, he took a vow to defeat Terarin and restore peace to his world.
Iason trained with the White Monks, learning the ways of the King's sword... and the magical dangers of Terarin's evil hoard. To help him in his quest, the monks gave him magical arms and armor.
After a long and valiant battle, Iason defeated Terarin and drove her into another dimension. Then, with his armor glowing gold, Iason resealed the Pandora Passage.
The people of the Five Lands made him a legend. Before he went back to the life of a shepherd, Iason made a prophecy that one day Terarin would return, and that four brave warriors would awaken to meet her evil challenge!
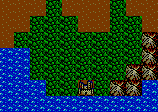
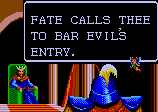 In Arasia,
the
King of Arukas charges you to
bar evil's entry into this
world through the Pandora Passage.
But you should
visit
the town of Garia,
just south of his castle
first.
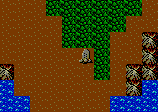
You aren't nearly strong enough to venture far just yet, so build
experience by
battling the local beasts that inhabit the Galian Peninsula.
Thieves,
Evil
Merchants and Weasly
Wimps
will
make your best prey for now.
Steer clear of the forests and mountain enemies as they are much
too strong. In this stage of the quest, guilders will be
hard
to come by, unless you run into a slew of Evil Merchants.
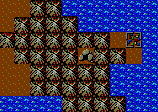
It may be tempting, but do not kill any Merchants,
Travelers or White Monks or you will lose your character
points. You can sell any fangs you gain in battle in Garia
for 50
guilders each which should help with healing/weapon repair costs. As
soon as you have the funds, you should purchase a knife, armor and
shield. Make sure you also stock up
on healing potions. You will need them at this early
stage of the adventure.
In Arasia,
the
King of Arukas charges you to
bar evil's entry into this
world through the Pandora Passage.
But you should
visit
the town of Garia,
just south of his castle
first.
You aren't nearly strong enough to venture far just yet, so build
experience by
battling the local beasts that inhabit the Galian Peninsula.
Thieves,
Evil
Merchants and Weasly
Wimps
will
make your best prey for now.
Steer clear of the forests and mountain enemies as they are much
too strong. In this stage of the quest, guilders will be
hard
to come by, unless you run into a slew of Evil Merchants.
It may be tempting, but do not kill any Merchants,
Travelers or White Monks or you will lose your character
points. You can sell any fangs you gain in battle in Garia
for 50
guilders each which should help with healing/weapon repair costs. As
soon as you have the funds, you should purchase a knife, armor and
shield. Make sure you also stock up
on healing potions. You will need them at this early
stage of the adventure.
 In
Garia,
you will be told about the Sage Kosama
and his location in the
northern
mountains. At this point, it is advisable to
increase
your experience by three or four levels. Once you
have some experience under your belt, head for
the Austel
Province in the
northwest
tip of Arukas.
Head over the bridge to the North of Garia and you will find Kosama's
Village in the Northwest.
In
Garia,
you will be told about the Sage Kosama
and his location in the
northern
mountains. At this point, it is advisable to
increase
your experience by three or four levels. Once you
have some experience under your belt, head for
the Austel
Province in the
northwest
tip of Arukas.
Head over the bridge to the North of Garia and you will find Kosama's
Village in the Northwest.
 Kosama
talks about the Legendary Armor, and informs you
that your
quest
cannot be completed until you find three companions who are to
accompany
you to the Gelkis Shrine.
However, the three
warriors
are lost and under powerful spells which prevent them from finding
you.
Thus you are given the spell "AWAKE, GIANT!", and told
to
search
for Guy,
in a town that
worships
the sea.
Use
this spell when you encounter these warriors and they will become
your companions.
Kosama
talks about the Legendary Armor, and informs you
that your
quest
cannot be completed until you find three companions who are to
accompany
you to the Gelkis Shrine.
However, the three
warriors
are lost and under powerful spells which prevent them from finding
you.
Thus you are given the spell "AWAKE, GIANT!", and told
to
search
for Guy,
in a town that
worships
the sea.
Use
this spell when you encounter these warriors and they will become
your companions.
 Head
South from the Sage's Village, across the bridge,
and you will
reach
Oruk in
the
Marula Province.
Here you will find a "Mask
of Beasts"
for sale in the item shop - this item is good for maze trolling. There
is also a weaponsmith
for hire. Once you are able to hire him all of your equipment will be
fixed at no cost. Head further
South
to the Ortygian Forest and battle some of the
indigenous
creatures
in and around there. Collect some guilders from battling the Great
Lions of the plains and, more importantly,
accumulate as many fangs (at
least 300) as possible.
Level grinding may be boring, but the more you do now the less you
will have to do later because Guy will start out one level
below you (don't go too crazy since there is a maximum starting level).
Head
South from the Sage's Village, across the bridge,
and you will
reach
Oruk in
the
Marula Province.
Here you will find a "Mask
of Beasts"
for sale in the item shop - this item is good for maze trolling. There
is also a weaponsmith
for hire. Once you are able to hire him all of your equipment will be
fixed at no cost. Head further
South
to the Ortygian Forest and battle some of the
indigenous
creatures
in and around there. Collect some guilders from battling the Great
Lions of the plains and, more importantly,
accumulate as many fangs (at
least 300) as possible.
Level grinding may be boring, but the more you do now the less you
will have to do later because Guy will start out one level
below you (don't go too crazy since there is a maximum starting level).
 Battling forest
Liphants
will sometimes yield the "Sacred
Nuts". Liphants will drop
them in clumps
of 3 and you can utilize them as powerful
weapons in
battle.
You can carry a maximum of 11 nuts,
provided that you
use
one of the nuts in battle prior to receiving the last batch. Liphants
don't always drop these little magic treasures but this is the best
spot
to hunt for them in the game, even better than the Arukas
province.
Battling forest
Liphants
will sometimes yield the "Sacred
Nuts". Liphants will drop
them in clumps
of 3 and you can utilize them as powerful
weapons in
battle.
You can carry a maximum of 11 nuts,
provided that you
use
one of the nuts in battle prior to receiving the last batch. Liphants
don't always drop these little magic treasures but this is the best
spot
to hunt for them in the game, even better than the Arukas
province.
 The castle
of
Marula is located in the Ortygian Forest.
If you've obtained at least 300
fangs,
then the King of Marula will
award you with the Iris
Axe, one of the legendary weapons referred to as
the sword
of
a warrior. If you have 60,000 guilders to spare, there is a
smithy
hamlet in
the
Hierax
Province in the south just before the desert, that will build your
weapon to perfection.
This is fine weapon to wield but, more
importantly,
you need it to dispel Guy
from
his trance.
The castle
of
Marula is located in the Ortygian Forest.
If you've obtained at least 300
fangs,
then the King of Marula will
award you with the Iris
Axe, one of the legendary weapons referred to as
the sword
of
a warrior. If you have 60,000 guilders to spare, there is a
smithy
hamlet in
the
Hierax
Province in the south just before the desert, that will build your
weapon to perfection.
This is fine weapon to wield but, more
importantly,
you need it to dispel Guy
from
his trance.
 If you are in need of a few
fangs, you will find 100
of them in a chest in the shrine at Julus
(click on the name for the map),
just a bit further east of the castle. Although this is an
optional mini quest, the
helm
that
is found in this cave will prove useful later on when needed to acquire
the crystal,
which allows you to
see better in the mazes. You can also build up your levels in the
process.
If you are in need of a few
fangs, you will find 100
of them in a chest in the shrine at Julus
(click on the name for the map),
just a bit further east of the castle. Although this is an
optional mini quest, the
helm
that
is found in this cave will prove useful later on when needed to acquire
the crystal,
which allows you to
see better in the mazes. You can also build up your levels in the
process.
 Before you awaken Guy from his trance, you can test your strength by
taking on the Senpi
in the mountains with the Armor
of Kronos
,
the Armor of Legend needed to enlist Medi. You
don't have to be this powerful, but traveling through the game is much
easier at this level. Guy will also be much more powerful
when he
joins you. To reach the cavern with the Senpi, head West and North,
between the towns
of Minos
and Menos
on the western Kallipolis
shore. Go ahead and use all 11 of your Sacred
Nuts
on the Senpi first, then
just keep attacking
it until it dies. You will have to gain a few levels before you can
defeat him alone. If you don't feel like doing that, then continue on
to the next step and come back with Guy.
Before you awaken Guy from his trance, you can test your strength by
taking on the Senpi
in the mountains with the Armor
of Kronos
,
the Armor of Legend needed to enlist Medi. You
don't have to be this powerful, but traveling through the game is much
easier at this level. Guy will also be much more powerful
when he
joins you. To reach the cavern with the Senpi, head West and North,
between the towns
of Minos
and Menos
on the western Kallipolis
shore. Go ahead and use all 11 of your Sacred
Nuts
on the Senpi first, then
just keep attacking
it until it dies. You will have to gain a few levels before you can
defeat him alone. If you don't feel like doing that, then continue on
to the next step and come back with Guy.
 Once
you've acquired the Iris Axe
and the Armor
of Kronos, head
North
beyond Oruk,
then West to the foot of
the
Penteus
Mountains, then South to the basin of the Kokalos
Forest,
and finally
West
to find the seaside town of Kadia.
You
will find Guy
disguised as the town healer. Choose the "Spell" option and
cast "AWAKE, GIANT!" to have
Guy
join your
quest. In addition to telling you about your next companion, he will
give
you a
portion of Iason's
Scroll, which
is
needed to uncover the location of the Gelkis Shrine.
Once
you've acquired the Iris Axe
and the Armor
of Kronos, head
North
beyond Oruk,
then West to the foot of
the
Penteus
Mountains, then South to the basin of the Kokalos
Forest,
and finally
West
to find the seaside town of Kadia.
You
will find Guy
disguised as the town healer. Choose the "Spell" option and
cast "AWAKE, GIANT!" to have
Guy
join your
quest. In addition to telling you about your next companion, he will
give
you a
portion of Iason's
Scroll, which
is
needed to uncover the location of the Gelkis Shrine.
 Now
detour Northwest to a castle in the Dirke Mountains
in Apheidas,
where the Apheidian King will
present Guy
with the powerful Turos
Sword, which just happens to be
effective against
skeletons.
Stock up on 60,000 guilders
again and head back to the smithy hamlet in
the
Hierax
province in the south just before the desert. They will upgrade the
Sword of Turos for you.
From
Kadia,
head East and South to the Kokalos Forest.
There you
will have
to best the skeleton
in order to gain
entry to the southern passage. Your only hope is attacking the skeleton
with Guy wielding the Sword of Turos. Once in Kadmos,
you
will
find a locked cave in the eastern mountain range and a small village
in
the center of the peninsula. If you have 30,000
guilders you can purchase the Argo,
ship
which
will allow you to cross all waterways. At
this
point however,
your lackluster skills as a pilot will not allow you to traverse the
stormy
seas of Areos (the water that appears in a darker shade of blue).
Now
detour Northwest to a castle in the Dirke Mountains
in Apheidas,
where the Apheidian King will
present Guy
with the powerful Turos
Sword, which just happens to be
effective against
skeletons.
Stock up on 60,000 guilders
again and head back to the smithy hamlet in
the
Hierax
province in the south just before the desert. They will upgrade the
Sword of Turos for you.
From
Kadia,
head East and South to the Kokalos Forest.
There you
will have
to best the skeleton
in order to gain
entry to the southern passage. Your only hope is attacking the skeleton
with Guy wielding the Sword of Turos. Once in Kadmos,
you
will
find a locked cave in the eastern mountain range and a small village
in
the center of the peninsula. If you have 30,000
guilders you can purchase the Argo,
ship
which
will allow you to cross all waterways. At
this
point however,
your lackluster skills as a pilot will not allow you to traverse the
stormy
seas of Areos (the water that appears in a darker shade of blue).
 Board
the ship and head
south over the sea to the continent of Eratos.
There you will find the town of Torif.
Heal up and save
because the enemies are going to be much more difficult on this
continent. Many of them use spells that hit everyone in your party.
Stay in the plains until
you and Guy are strong enough to venture to other areas. From Torif,
head South across the river until you find the Village
of Karme. There you'll have the option to purchase up to 4 Staff
of Earthquakes for 10,000 guilders each. From
there make your way to the eastern coast, beyond the desert to the
coastal
town of Doris.
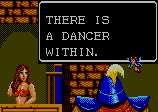
Here you will find an exotic dancer at a pub. Just as you did with Guy,
you will need to cast the spell "AWAKE, GIANT!" to bring Medi out
of her trance.
Before you awaken
her however, you may want to make sure both you and Guy gain as many
levels as
possible so that she will
start off strong. Remember, she will be one level lower than your
weakest party member (in most cases). If the spell doesn't work on her,
you will have to travel back over the sea and obtain the
Armor of Kronos. Once Medi
joins your party, she will give you
another piece of
Iason's
Scroll. Only buy Medi a shield for now because you
are
about to obtain her main
sword and armor soon. Medi tells you about Treo,
the third companion, his whereabouts and his situation.
With Medi in your party, you are now able to open up all of the locked
caverns that you could not access before. Before you attempt this
however, make sure you save your game because there are Senpi and
Hanj in these caverns.
Board
the ship and head
south over the sea to the continent of Eratos.
There you will find the town of Torif.
Heal up and save
because the enemies are going to be much more difficult on this
continent. Many of them use spells that hit everyone in your party.
Stay in the plains until
you and Guy are strong enough to venture to other areas. From Torif,
head South across the river until you find the Village
of Karme. There you'll have the option to purchase up to 4 Staff
of Earthquakes for 10,000 guilders each. From
there make your way to the eastern coast, beyond the desert to the
coastal
town of Doris.
Here you will find an exotic dancer at a pub. Just as you did with Guy,
you will need to cast the spell "AWAKE, GIANT!" to bring Medi out
of her trance.
Before you awaken
her however, you may want to make sure both you and Guy gain as many
levels as
possible so that she will
start off strong. Remember, she will be one level lower than your
weakest party member (in most cases). If the spell doesn't work on her,
you will have to travel back over the sea and obtain the
Armor of Kronos. Once Medi
joins your party, she will give you
another piece of
Iason's
Scroll. Only buy Medi a shield for now because you
are
about to obtain her main
sword and armor soon. Medi tells you about Treo,
the third companion, his whereabouts and his situation.
With Medi in your party, you are now able to open up all of the locked
caverns that you could not access before. Before you attempt this
however, make sure you save your game because there are Senpi and
Hanj in these caverns.
 Before
you venture out to find Treo
(your final companion), you may want to do a little side questing at
this point. Start out going West, past Torif,
to the Southern tip of the forest in Molos.
There you'll find a
castle where the King of Elatos
will give Medi
the sword of Eros.
Now head North to the village where you bought the Argo
and get the Titan Armor for
Guy from a Senpi in the
mountain cave. Next, head back South to Eratos,
towards the Northern edge of the desert where you'll find the Silvius
monument. Inside you'll pick up the aura
mantle. This isn't an absolutely necessary item,
but it helps keep the little pests away.
Before
you venture out to find Treo
(your final companion), you may want to do a little side questing at
this point. Start out going West, past Torif,
to the Southern tip of the forest in Molos.
There you'll find a
castle where the King of Elatos
will give Medi
the sword of Eros.
Now head North to the village where you bought the Argo
and get the Titan Armor for
Guy from a Senpi in the
mountain cave. Next, head back South to Eratos,
towards the Northern edge of the desert where you'll find the Silvius
monument. Inside you'll pick up the aura
mantle. This isn't an absolutely necessary item,
but it helps keep the little pests away.
 From
Silvius,
go Northeast to the mountain cavern in the Phrixos
Province, where the Armor
of Athena
is hidden. Another Senpi will be guarding this armor, but by now you
shouldn't need any
magical item to help in defeating these creatures.
Next you'll head Southeast to the island of Ikaros,
where you'll find Ulysses'
Shield, the final piece of Iason's Armor
of Legend. The Hanj is guarding this legendary shield.
You will need to find the village that sells stones of protection, fill
up
on Sacred Nuts and buy 4 staffs of protection. This is not an easy
battle. Use the same tactics with the Hanj (stone (to stop his spell),
then staves, then sacred nuts, and finally attack until it is dead).
Head
back to town if you need healing. Head North until
you find the Village of Iphis where you can pick
up 6 Stone
of Protection for 50 fangs apiece. Now move
Northwest
until you find the island cave in the middle of the mountian
lake.
You will find a zombie within the cavern. The "AWAKE, GIANT!" spell
removes this zombie curse and Treo will appear.
Do not buy Treo any equipment because all of his main equipment is in
one cave
just South of Garia.
From
Silvius,
go Northeast to the mountain cavern in the Phrixos
Province, where the Armor
of Athena
is hidden. Another Senpi will be guarding this armor, but by now you
shouldn't need any
magical item to help in defeating these creatures.
Next you'll head Southeast to the island of Ikaros,
where you'll find Ulysses'
Shield, the final piece of Iason's Armor
of Legend. The Hanj is guarding this legendary shield.
You will need to find the village that sells stones of protection, fill
up
on Sacred Nuts and buy 4 staffs of protection. This is not an easy
battle. Use the same tactics with the Hanj (stone (to stop his spell),
then staves, then sacred nuts, and finally attack until it is dead).
Head
back to town if you need healing. Head North until
you find the Village of Iphis where you can pick
up 6 Stone
of Protection for 50 fangs apiece. Now move
Northwest
until you find the island cave in the middle of the mountian
lake.
You will find a zombie within the cavern. The "AWAKE, GIANT!" spell
removes this zombie curse and Treo will appear.
Do not buy Treo any equipment because all of his main equipment is in
one cave
just South of Garia.
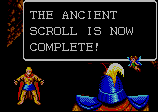
 Now
that your party is complete, you'll notice a new scroll
command in the menu. The completed scroll gives
cryptic directions
to the whereabouts of the keys
of earth, hell, and heaven. Finding these keys is a
neccessity to unlocking the gates to
the Gelkis
Shrine and defeating Terarin.
You will want
to
restock your supplies and find all remaining arms of legend.
To begin, go North from the island cave toward Arukas.
Continue
North until you reach the Iphis Shrine
to Iason on the northern tip of the mountains of Eratos,
just South of Garia.
To
gain
entry, utter the "TREO HAS COME" spell.
Now
that your party is complete, you'll notice a new scroll
command in the menu. The completed scroll gives
cryptic directions
to the whereabouts of the keys
of earth, hell, and heaven. Finding these keys is a
neccessity to unlocking the gates to
the Gelkis
Shrine and defeating Terarin.
You will want
to
restock your supplies and find all remaining arms of legend.
To begin, go North from the island cave toward Arukas.
Continue
North until you reach the Iphis Shrine
to Iason on the northern tip of the mountains of Eratos,
just South of Garia.
To
gain
entry, utter the "TREO HAS COME" spell.
 You will
be able to fully equip Treo
with
the treasures you find in the Iphis
Shrine.
After you have completed the Iphis Shrine, go West to the mountain cave
of Koryki
to get the Celene
Shield
for Medi.
There is
another Hanj in this cave so make sure you are fully stocked with
magical items and save before going in. Keep on
Westward until you reach the Gorophonus desert.
Upgrade your
weapons in the
smithy
hamlet at Hierax, then continue north to a cavern
where you'll obtain
the Hector Shield
for Guy.
Once again, this cave contains another Hanj so you need to
restock on items first.
From there, head West to the island village where Treo
will be presented with a new ship that enables the party to sail the
stormy
seas
and reach the continent of Areos.
You will
be able to fully equip Treo
with
the treasures you find in the Iphis
Shrine.
After you have completed the Iphis Shrine, go West to the mountain cave
of Koryki
to get the Celene
Shield
for Medi.
There is
another Hanj in this cave so make sure you are fully stocked with
magical items and save before going in. Keep on
Westward until you reach the Gorophonus desert.
Upgrade your
weapons in the
smithy
hamlet at Hierax, then continue north to a cavern
where you'll obtain
the Hector Shield
for Guy.
Once again, this cave contains another Hanj so you need to
restock on items first.
From there, head West to the island village where Treo
will be presented with a new ship that enables the party to sail the
stormy
seas
and reach the continent of Areos.
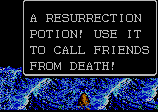 The party
should now be fully equipped. Cross the stormy waters of Anteia
surrounding the continent of Areos. You may
encounter sea
dragons, which periodically drop resurrection
potions when defeated. You can carry a total of 3
resurrection potions.
Although these misnamed potions do not actually resurrect
a
fallen warrior from death, they will fully restore
the
HP of an injured warrior. Once you reach land,
search in the
center of the plains for the town of Tegea.
In the northern desert of Kithairon, there
is
a small village that will trade a powerful white
orb, for 1000 fangs. You may also want to fully
stock
your magic arsenal of sacred
nuts,
stone
of protection and staff
of earthquakes
as the search for the keys is nearing conclusion.
The party
should now be fully equipped. Cross the stormy waters of Anteia
surrounding the continent of Areos. You may
encounter sea
dragons, which periodically drop resurrection
potions when defeated. You can carry a total of 3
resurrection potions.
Although these misnamed potions do not actually resurrect
a
fallen warrior from death, they will fully restore
the
HP of an injured warrior. Once you reach land,
search in the
center of the plains for the town of Tegea.
In the northern desert of Kithairon, there
is
a small village that will trade a powerful white
orb, for 1000 fangs. You may also want to fully
stock
your magic arsenal of sacred
nuts,
stone
of protection and staff
of earthquakes
as the search for the keys is nearing conclusion.
 We can now consider the
advice given by travelers, merchants and white monks in accordance with
Iason's completed scroll:
We can now consider the
advice given by travelers, merchants and white monks in accordance with
Iason's completed scroll:
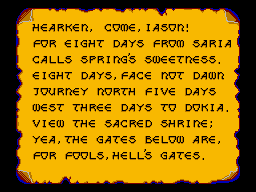
"The South Wind carries the sweet & luscious fragrances of Spring ..."
"'Face not dawn.' means you should go West..."
Head 8 days South (days = squares) from
Tegea
and you will find a laughing monument. Now go 8
days
West and
you will find another laughing monument. Go North five
days
from here to arrive at yet another laughing
monument.
Go West for three Additional days and you will find a monument
containing . . .
a fight with a Basailz!
 This
is where most adventurers get stuck in the game. What we must remember
are the descriptions of Iason
that
are an important clue regarding the actual distances covered in his
scroll:
This
is where most adventurers get stuck in the game. What we must remember
are the descriptions of Iason
that
are an important clue regarding the actual distances covered in his
scroll:
"Thou art only about half as big as Iason!"
Given this information, we can deduce that Iason moves at twice our speed so we must double the distances indicated (8 days = 16 squares) for his directions to apply. Considering all of the above information, you will start from Tegea, heading 16 days south to rest on a patch of desert surrounded by mountains.

Search this square/area to reveal a monument to Iason. Now cast the spell "COME, IASON" and you will enter Rokhod's Catacombs where you will find the Key of Heaven after battling Rokhod. Rokhod isn't as strong as you might think. Use a couple of your Staves of Earthquakes to lower its life, then attack. Heal your party, move out of the cavern and use a feather to go back to Tegea to heal up. You may want to go back and buy more Staves.

Now move your party back to where you found Rokhod's Shrine. Search on the square 16 days West of here and you'll find Sehod's Catacombs. The Key of Earth is your prize for defeating Sehod. Use the same techniques with Sehod as you did with Rokhod. Once you get the Key of Earth, exit the cave and use a feather to go back to Tegea and heal up. You may want to go back and buy more Staves once again.

Go back to the spot where you found Sehod's Shrine. You will have to retrace the same steps from before. From Sehod's Shrine, venture North 10 days and you will arrive at Ohod's Catacombs. The Key of Hell is your prize for defeating Ohod. Use the same techniques as you did with Sehod and Rokhod. Once you get the Key of Hell, head back to Tegea and heal up.
SAVE YOUR GAME! Before going to the Gelkis Shrine, make sure you have the following items: 11 Sacred Nuts, 6 Stones of Protection, 4 Staffs of Earthquakes, 1 Sphere and 3 Potions of Resurrection. Your maximum life bars should end at least under where Treo is standing in the character screen if you want a chance to beat the Dark Lord. Travel back to where you found Ohod's Shrine. Go West 6 days to find the Gelkis Shrine. While traversing the maze watch out for the fake starwells and traps. Consult the maps section if you are having a tough time. You will reach Terarin's Lair after climbing the stairwell in Sub-level 3. You should be able to defeat her with full health and a complete arsenal of magical items. After you use up all of your magical attack items and stop her spells with the Stones of Protection, attack with your strongest fighter. Each time your strongest fighter gets within a small fraction of their life, use a potion of resurrection to heal them . If all of your fighters are the same or similar levels, Medi is the best choice for a main attacker because she will sometimes use her CRUSHING ATTACK. Once all of your potions are exhausted, attack with each party member until their life is within a sliver of death. Terarin should fall well before you are in danger however. If not, you have some leveling up to do!

(c)2006 RPGClassics.com. All materials are copyrighted by their respective authors. All games mentioned in this site are copyrighted by their respective producers and publishers. No infringement on any existing copyright is intended. All rights reserved.