
 |
|
|
The Demons
Golvellius has sent seven of his fiercest demons to stop you. Before you are able to do battle with Golvellius you must defeat each demon and obtain all 7 Crystals from the Wise Woman. After the death of each demon, search the area for the Wise Woman who is selling the Crystal. You will find the demons in caves hidden throughout the valley floor. Some caves will appear when certain objects are struck with your sword and others can only be opened by defeating the wild beasts of the valley..
Golvellius has sent seven of his fiercest demons to stop you. Before you are able to do battle with Golvellius you must defeat each demon and obtain all 7 Crystals from the Wise Woman. After the death of each demon, search the area for the Wise Woman who is selling the Crystal. You will find the demons in caves hidden throughout the valley floor. Some caves will appear when certain objects are struck with your sword and others can only be opened by defeating the wild beasts of the valley..
| Name (Manual/Game) | Image | Strategy |
| Despa | 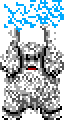 |
Despa will throw giant snowflakes at
Kelesis while moving horizontally, left and right, at
the top of the room. Dodge between the snowflakes and
run up to strike the demon 2-3 times with your sword,
then back away and dodge between the snowflakes again.
Repeat until Despa is defeated. |
| Rolick |  |
Rolick will curl up and spin very quickly following Kelesis around the room. Dodge the demon while it is spinning. When Rolick slows down/stops, get as many stabs in as possible before it begins spinning again. |
| Bachular |  |
Bachular will spit 3 fireballs that
stick in one position for a long time, hampering your
movement. The demon also disappears and reappears at
will. Once it reappears, run up and hit it as many
times as possible before it disappears again. As you
chase Bachular, try to avoid the fires it places about
the room. |
| Fosbus |  |
Fosbus throws skulls toward Kelesis and when they hit the bottom of the room, they split into 4 skulls and spread out. Try to avoid the skulls while slashing the demon with your sword. Each hit you receive takes a full Life Container away, so be careful. |
| Warlic |  |
Warlic immediately splits into two
demons and both begin taking turns charging at
Kelesis. This is a difficult battle because one hit
takes an entire Life Container away and you must be
aware of both Warlics at all times. Stay near the edge
as much as possible (the bottom-left mostly) to avoid
multiple hits. Always attack the second Warlic that
charges, otherwise you will be hit by the second one
while attacking the first. Attack Warlic when it stops
its charge, before it pulls away. The battle eases a
bit once one of them is defeated. |
| Crawky |  |
Crawky moves around the room in a figure 8 pattern and shoots out numerous rings that bounce off the walls. The best way to defeat the demon is to wait near the bottom left corner of the room and strike when Crawky reaches the end of its lunge toward the bottom. Keep dodging the rings as best you can. |
| Haidee |  |
Haidee isn't too difficult for being
the second to last boss. As soon as the battle begins,
just start rapidly stabbing the demon as many times as
possible. The blue "dandruff" that gets thrown at
Kelesis from Haidee's hair doesn't hurt too much when
they hit. Once the demon starts running after Kelesis,
run away until it slows and starts shaking its hair
again. Stab quickly until Haidee is defeated. |
Final
Battle: Golvellius!
 |
Golvellius is pretty tough (as all evil final bosses
are expected to be!). Some of his hits can take up to
two Life Containers! Be sure you have Purple and Green
Mea and all 19 Life Containers before you take him on.
Keep a distance while he speeds up and slows down.
Attack him with your sword when he slows down and stay
out from under him because he breaths a line of fire
occasionally. After he starts to move again, run away
until he slows. Repeat until he is defeated. |