
 |
|
|
 |
 |
Blistering Heights Walkthrough
Corak's Notes on Blistering Heights:
Blistering Heights was built by magical beings and placed on the Isle of Fire for privacy. Because of the extremely harsh nature of the fiery isle, ingenious forms of magical protection were divised to protect the town and those powerful enough to reach it. There are statues in the four courtyards that will temporarily lend protective magic to any who approach them.
Monsters in this area: Fire Lizards, Mini Dragons. Boss: Major Demon.
Map of Blistering Heights:
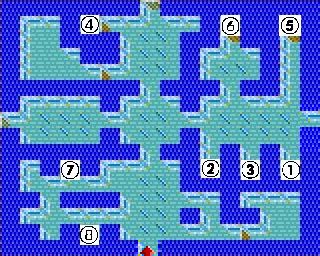
The arrow indicates your starting position and facing, assuming you enter through the town gates. Note that this town has three other exits besides the one you enter through.
![]() The Inn.
The Inn.
![]() The Blacksmith's Shop. This shop sells
powerful equipment, forged of Steel. In the Weapons and Armor categories, the ninth item
is a random one. In the Miscellaneous category, both the eighth and ninth item are random.
The Blacksmith's Shop. This shop sells
powerful equipment, forged of Steel. In the Weapons and Armor categories, the ninth item
is a random one. In the Miscellaneous category, both the eighth and ninth item are random.
![]() The Training Center. When your characters have
reached level 25, this is the only place they can continue their training..
The Training Center. When your characters have
reached level 25, this is the only place they can continue their training..
![]() The Tavern. When you refill your rations here,
you'll have enough food to last 40 days.
The Tavern. When you refill your rations here,
you'll have enough food to last 40 days.
![]() Eagle's Guild. I'm sure I don't have to tell
you that you'll have to get membership before you can learn spells here.
Eagle's Guild. I'm sure I don't have to tell
you that you'll have to get membership before you can learn spells here.
![]() The Temple.
The Temple.
![]() The Magic Mirror.
The Magic Mirror.
![]() Entrance to the Blistering Heights Cavern.
Entrance to the Blistering Heights Cavern.
First off: The most common way to reach this town is by using the appropriate Magic Mirror password you can learn in the Swamp Town Cavern. You'll start in front of the Inn if you got here that way. But since that's very close to where you enter the town if you enter through the town gates, the way you entered doesn't matter for the walkthrough.
Okay, first, as usual when you reach a new town, you'll want check out the Blacksmith and upgrade your equipment as needed. The Steel equipment available here is the best non-random equipment you can buy at any Blacksmith. But before you take another step, cast Protection from Elements(Fire). This will make the enemies here a lot easier. After that, go ahead and beat the two Fire Lizards in the area. Shouldn't be a problem at all with your Protection spell.
Since this is most likely the last of the towns you visit, you can now also get the Award "Blessed by the Forces" by have every character donate at all five temples, if you haven't already. After doing so, you can head to the Insect Shrine in area B2 and pray there to receive 5 random items. But for now, back to Blistering Heights.
In the Inn, you'll find the two most powerful hirelings in the game: Lord Bruno the Barbarian and The Raven, a Sorcerer. They are level 40 and 50, respectively, and have excellent equipment. They'll cost you quite a bit, but if you took one of the three king's personal treasures, you should have plenty of money. Remember though, that your experience gets divided by more people if you do hire them, making your main party members gain levels less fast. So think it over carefully before hiring them. You may want to leave them there for now, and enlist their help if you want to clear an area real bad, but your main party members aren't strong enough on their own. But I'm going on way to long about this... just remember they're there if and when you need them. Oh, and The Raven has a Gold Master Key, as well. You can take it from him if you want to skip the Magic Cavern.
There's a dragon statue in this area as well, which will temporarily raise the party's resistance against fire by 60. Combined with your Protection from Elements spell, that should make you just about invulnerable to Fire attacks, which, seeing as you're on the Isle of Fire, is obviously very convenient.
Now go to the center area of the town, where there's another statue. Lizard Men will get in your way, as usual in this town, but they shouldn't be able to hurt you at all with all that Fire Resistance you have now. The statue will tell you there that the other statues in town will assist you in some way. As you've already found out, the statue in the east gives you Resistance to Fire. Now proceed west to find the statue which gives +60 Resistance against Electricity. There's nothing else in that area, so head for the northern area now, where you'll find the statue which gives +60 Resistance against Cold. The Tavern with the best rations money can buy is also located here. The other door leads to the Kennel, where you can beat up some Lizard Men and Mini Dragons in order to get to some treasure chests. You'll probably still get hurt, even with all your resistance against Fire, but nothing life-threatening. The chests have very tough locks and deadly traps on them, so you'll need a skilled Ninja or Robber to open them. If you manage to do so, you'll find 250200 gold and 5000 gems.
All that's left to explore now is the southern area. The first thing you're likely to notice there is another Statue, which will raise your resistance against Acid/Poison by 60. But remember, all of the resistance bonuses given by the statues are temporary. It may be a good idea to return to them when you think you'll need some additional resistance in the area you're about to explore. Anyway, first explore the southwestern part of the town. Mini Dragons roam this area, so be ready for them. After taking them out, you'll be able to safely reach the Magic Mirror, which is what you will most likely be using to leave the town, unless you have a very good reason for exploring the extremely dangerous Isle of Fire. There's also three treasure chests here. If you can unlock them, you'll find 75 gold, an Ancient Artifact of Good, an Ancient Artifact of Neutrality, and an Ancient Artifact of Evil.
Now for the final room, the one in the southeast. This is the Demon HQ, where the Major Demon that's taken over the town lives. Kill him and his Lizard Men flunkies and you'll have cleared out all enemies in Blistering Heights. There's two more chests in this room, one of which isn't even locked. Open this unlocked chest to free the spirit of Ornean the Warlock, who will give all party members free membership to the Eagle's Guild, where you can learn the most powerful spells available, providing your level is high enough. The locked chest contains 75 gold and five random items, which usually turn out to be pretty powerful.
And that's it for the final town... enjoy all it has to offer.
Adjacent areas:
| Area | How to get there |
| Blistering Heights Cavern | Climb down the hole at point 8 of the map |
| Isle of Fire: Southeast(D3) | Exit Blistering Heights through the town gates |
|
|