
 |
|
|
 |
 |
Baywatch Cavern Walkthrough
Corak's Notes on Baywatch Cavern:
Many prisoners have perished in the shackles of this cavern, but there may be some with life still flowing through their bodies who would join forces with any who frees them. Walk carefully through the corridors, for they are haunted by a Phantom that has made his home among the sewage.
Monsters in this area: Bubble Men, Screamers. Boss: Phantom.
Map of Baywatch Cavern:
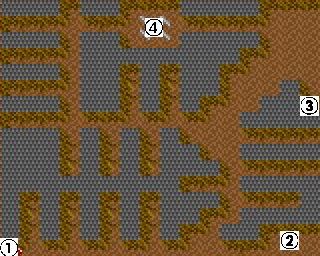
![]() Entrance/Exit to the
Cavern.
Entrance/Exit to the
Cavern.
![]() The Prison.
The Prison.
![]() Brother Alpha.
Brother Alpha.
![]() The Phantom's Lair.
The Phantom's Lair.
This area isn't maintained very well... there are many holes in the floor. Falling in these holes is deadly(the first two characters in the party will take 50 damage), but you can easily avoid them by casting Levitate. Those aren't the only traps around, through. The area is also rich in puddles of acid. The higher the combined resistance of your party against acid/poison, the less damage these traps tend to do. However, you can only avoid them by casting Jump when standing just in front of them; they can't be avoided with Levitate.
The Bubble Men that are all over the place shouldn't be too much trouble anymore. But the Screamers can be annoying if you can't take them out from a distance: They're so fast they'll usually hit you before you can hit them. That wouldn't be so bad if not for the fact that they can attack every party member at once with an Insanity attack.
When you first enter the area, turn left at the first opportunity (yes, that means into the puddle of acid) and bash through the wall in front of you. A Screamer will attack you and will probably cause some of your party members to go Insane, but don't worry too much about that... you'll retain control of the character, and it's not fatal unless it causes one of your stats to go below 1. Just don't forget to cure the insanity at the Baywatch Temple before resting, or it will aggravate, possibly causing a fatality.
After you beat the Screamer, search the skeletal remains behind it for a random item. As you can see on the map, there are three more similar areas ahead where you can bash through the wall and find some skeletal remains to search. But the ones in the next two of these alcoves hold nothing of value, just Screamers and Bubble Men. The fourth has two Screamers and the searching the remains there nets you some Jewelry. Jewelry is only good for one thing: You can sell it at the blacksmith for 500 gold. Along the way you may notice a message on the wall stating the Red Key unlocks Dark Warrior Keep.
After exploring (or passing) these four alcoves, walk on all the way to the southeast area(2 on the map), which is a prison. There are five easily beaten Bubble Men in there and two chained skeletons. Or so it seems. On close inspection, these aren't skeletons, they are Darlana the Cleric and Sir Galant the Knight. If you set them free, you can enlist their services as hirelings if you return to the Baywatch Inn.
As you can see on the map, you can only head north from here, and on the way there are four more of those alcoves; one on the left, behind a gate, and three on the right, behind thin walls. In the left one you won't find a thing, but in the right ones, from south to north, there's some Jewelry, a Lloyd's Beacon scroll and a Levitate scroll. On the way, you'll see a warning about the Fortress of Fear being filled with deadly creatures.
Now you can either go north or west. To the west are a lot more alcoves, while north leads to an open area filled with traps. It doesn't really matter where you go first. If you head north, just make sure you're levitating and avoid the acid puddles. Try to make it to the room marked 3 on the map. Brother Beta is here... just like the hirelings, he looks like a skeleton but he actually isn't. Silly, isn't it? Well anyway, if you visited Brother Alpha in Baywatch, he'll be expecting you and tell you a little more about the Rainbow Shells. He doesn't know much though, and suggests you visit Brother Gamma in Wildabar. Beginning to see a pattern here? He'll notify Brother Gamma of your coming. The text of the "Brother" Quest on the Quest List will change accordingly. He'll also give you another one of those mysterious Quatloo Coins.
There's a secret passage leading to the Phantom's Lair at the north end of the "trap area", but I suggest you ignore it and go west instead, to loot all those alcoves. Here's what they contain, in the order in which you pass them. The first one holds some more Jewelry, the second a Sacred Silver Skull, the third another piece of Jewelry, the fourth another Sacred Silver Skull, and the fifth a scroll with the ever-popular Lightning Bolt spell. Now, turning north, there's more alcoves on your west. The first contains a scroll of Turn Undead, the second a scroll of Power Cure, and the last two hold a Sacred Silver Skull each.
The only thing left now is the Phantom's Lair at point 4 on the map. You can enter it from the western door or by bashing through the eastern wall. However, you'll gain no benifit from this. There's nothing valuable at all in the Phantom's Lair, and beating it is completely optional. If you do decide to try and beat it, make sure none of your characters get hit by the Phantom's Aging Touch; every hit will increase the character's age by 5, and it will not be easy to get rid of this effect at this point at the game. Beating it shouldn't be too hard if you use Turn Undead from a distance, but be sure to save before you try.
After getting all you want from this area, head back to Baywatch.
|
|