
 |
|
|
 |
 |
Ancient Temple of Moo Walkthrough
Corak's Notes on Ancient Temple of Moo:
The halls of the Ancient Temple of Moo are filled with undead warriors that were once glory seekers come to witness the statue of Fire Mane, mascot of Moo. (The statue is said to transform wanderers into crusaders.) The bones of those strong enough to resist the re-animating magic of the Cleric of Moo litter the floor.
Monsters in this area: Skeletons, Zombies. Boss: Cleric of Moo.
Map of the Ancient Temple of Moo:
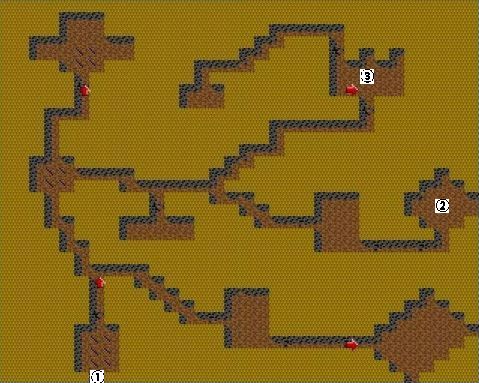
![]() Entrance/Exit.
Entrance/Exit.
![]() Statue of Fire Mane.
Statue of Fire Mane.
![]() The Cleric of Moo.
The Cleric of Moo.
Your main objective in this dungeon is to locate the Statue of Fire Mane to gain the Crusader skill. But there's plenty of other valuables to be found as well. There are two spells you may want to have before going here, though: Turn Undead and Levitate. Turn Undead will help you get rid of the Skeletons and Zombies quite easily, while Levitate allows you to avoid the numerous trap doors in this area. Especially the latter is crucial, since trap doors cannot be seen until you actually drop down one, which will result in 20 damage to your two lead party members. It may not sound like much, but it adds up quickly.
When you first enter, a couple of Skeletons will attack you. When you beat them, you'll notice there's even more bones around here: There's a pile of bones in every corner of the room. Searching them will get you a Sacred Silver Skull and a Light spell. Whyever you would want a Light spell at this point is beyond me. After all this place is so dark, you need the Light spell just to be able to find the scroll in the first place. Anyway, once you searched the bones, leave through the north gate. It may need some persuasion to budge (read: bash it down).
After a brief encounter with a Zombie, you'll see a message on the wall stating there's great treasure around here. Well, that's nice to know, isn't it? Now you'll have to decide whether to go west or east. Let's go east first.
You'll end up at a door, which you should be able to unlock with your Thief. A whole bunch of Skeletons will pour out of the room. After they're out of the way, the treasure chest in the room is all yours. Unlock it with your Thief and you'll find 500 gold. Not bad. But not very good either. Continue past the gate (and more Skeletons) to reach another door. Unlock it and quel surprise: More undead adversaries. This time, there's a LOT of them, though. This could be tough at a low level, but if you have Turn Undead, this should go smoothly enough. During the fight, you may notice Skeletons and Zombies like to hit Clerics more than anything. Keep this in mind.
After beating all undead, you'll find you're in a large room with lots of treasure chests and some bones littering the floor. Search the bones to find a Turn Undead scroll (very handy if you didn't have it yet) and a Sacred Silver Skull. One of the chests contains 3000 gold, another holds 83 gold and 100 gems, and the third has 149 gold and 4 random items inside. A suitable reward for your efforts.
There's nothing else in this direction, so head back to the crossroads and head west this time. You'll end up in a small room which has exits to the north and east. Before going anywhere, first search the bones in a corner of the room for a Suppress Poison scroll. Then head north. A message on the wall will let you know there's a secret code on the walls of the Cathedral of Carnage. The door to the northwest room you are approaching now is already open. Enter and take care of the Skeletons. More bones and chests. You can get a Pain scroll from the bones. One of the chests contains 1000 gold, the other holds 141 gold and 3 random items. Now, head back south towards the small room and go east this time.
Take a right as soon as you can. There's a door there leading to a small room filled with Zombies. After getting rid of them, search the bones on the floor to find a Suppress Disease scroll. Getting back to your original heading, you'll soon run into yet another fork in the road. On the wall you'll see the message "Evil things lurk in the dungeon of Castle Whiteshield". What's this message trying to tell you, you ask? Why, it's trying to tell you that evil things lurk in the dungeon of Castle Whiteshield, of course!
Me make joke. Ha. Well, when you're all done laughing, go further along the path to the south. The room up ahead contains a few undead and another pile of bones. This bone pile contains nothing but maggots, though. And no, you can't take the maggots with you. What kind of sick person would want to do that anyway? But once again, I digress. Moving further ahead past a gate, there will be a thin wall. Bash it down and you'll reach the statue of Fire Mane. Touch it and all your party members will gain the Crusader skill, allowing you to enter Castles. Don't forget to search the bones in this room; you'll find another Sacred Silver Skull and a Silence scroll.
Now all that's left is to kill the Cleric of Moo. To find him, go back to the fork in the road and head north. On the way there, a message on the wall will warn you that "All who challenge the Cleric of Moo will perish". And you very well might if your level is not too high yet. He's certainly not the easiest enemy you'll every face. Be sure to save before unlocking the door that leads to his chambers. After opening the door, a wave of undead will start shambling over to you. Take 'em out from a distance with Turn Undead before even setting foot in the room. When they're out of the way, you may want to cast Protection from Elements and choose Electricity protection; it helps a lot to prevent damage from the Cleric's Lightning Bolts. When you take once step into the room, the Cleric will immediately fire a Lightning Bolt in your direction. Quickly get in close and beat him to a pulp.
After beating him and the two Zombies behind him, search the bones on the floor to discover some Ancient Jewelry, which you can sell at a blacksmith for 1000 gold. Then open the two chests. One holds 2000 gold, while the other contains 143 gold and 3 random items. But wait, there's more! Bash down the wall behind the west-most chest to discover a secret passage. In this passage, you'll see the following enscribed on the wall: "North West North East South". I advise you to write that down, you'll need it later. Going further down the passage, you'll find a treasure room. First search the bones for some more Ancient Jewelry and a scroll which teaches the powerful Fireball spell. The two treasure chests contain a total of 6209 gold, 60 gems and 5 random items.
And with that, you've cleared the Temple of Moo. This was the easiest of the dungeons, so as they say: "You ain't seen nothing yet!"
Click here to return to area A1.
|
|