
 |
|
|
 |
 |
Maze from Hell Walkthrough
Corak's Notes on Maze from Hell:
Deep in Minotaur Marsh, the Maze from Hell is a very tricky catacomb. If not for the benevolent hand of Mr. Wizard, many an adventurer would have grown old in this legendary labyrinth. You must find the statue of Water Mane in the center of the maze, and the Hologram Key Card hidden in a crystalline box.
Monsters in this area: Medusas, Minotaurs. Boss: Minotaur King.
Map of the Maze from Hell:
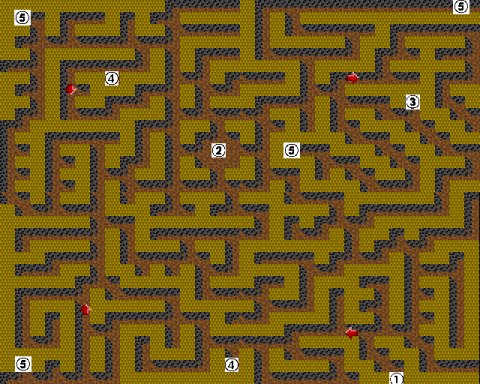
![]() Entrance/Exit.
Entrance/Exit.
![]() Statue of Water Mane.
Statue of Water Mane.
![]() Box containing Hologram Sequencing Card 006.
Box containing Hologram Sequencing Card 006.
![]() Box containing treasure.
Box containing treasure.
![]() King's Ultimate Power Orb.
King's Ultimate Power Orb.
Can't enter the Maze? First get the Gold Master Key from the Magic Cavern, or from the hireling The Raven.
The Maze from Hell is all too aptly named. It's a maze alright, and quite a hellish one. Some of the most deadly enemies in the game inhabit this area, and as such it should be one of the last places you visit. There are two things you must do here, and they're both mentioned in Corak's Notes. You have to reach the center of the maze and drink from the water surrounding Water Mane's statue, and you have to find the box containing a Hologram Sequencing Card. It would also be wise to collect the King's Ultimate Power Orbs hidden in the maze; they're worth a lot to the three kings, not to mention the fact that you need to find at least 11 of them to finish the game.
Now, be sure of what you're getting into before entering this place. You're going to need all the power you can get for this one, so you'll want to bring Lord Bruno and The Raven, the best hirelings in the game, whose help you can enlist at Blistering Heights. Also be sure you have enough money with you to keep them in the party for several days, because you'll probably need to rest often.
Since there's so many directions you can take, not one necessarily the best, I thought it best to mark everything important on the map, and give you some general pointers on how to survive this area.
First of all, the enemies you encounter. They are deadly, plain and simple. Minotaurs are nigh impossible to hit, with their incredibly high speed and armor class. They also have high attack power, and what's worse, their attacks may cause instant death. If at all possible, try to take them out from a distance with Implosion. It's still pretty hard to hit them with that, but it's a heck of a lot easier than trying to take them on with melee weapons.
The other enemies you encounter here are Medusas. They're not as fast and not as armored as Minotaurs, and they also don't hit you as hard. But they can attack from a distance, their attacks will hit all party members, and their attacks have the potential to turn your characters to stone. Unlike Minotaurs, you should be able to take these out with regular attacks if you have a couple of good melee fighters in the party, providing they don't get turned to stone before you can do anything, of course. Implosion works wonders on them also, but then there aren't many monsters that doesn't work well against.
It's hard to say which of the two monsters is more dangerous, they're both creatures you'd rather not be fighting at all. But on the bright side, whenever you beat one, you get a random item of the highest quality, plus a whopping 3 million experience points! That's more than you get for most sidequests! Therefore it's probably a good idea to Town Portal back every once in a while to visit the training grounds and raise your level. Once you're done here, you'll probably have gained well over ten levels, making other areas a lot easier. Of course, you have to manage to survive this place, first.
You'll probably notice a whirlpool in your way every now and then. You'll end up close to the north-western corner of the map if you step into one, which may or may not be helpful to you. You can avoid them simply by using Jump to pass over them. Enemies can pass the whirlpools unaffected, so be careful.
The part where these whirlpools get annoying is near the center area, where Water Mane's statue is. They block your way in such a manner that you can only approach the center from one side. Or so it seems. Because there's one more spell that will be of great use in this area - Teleport. If you want to take a shortcut, go ahead and (ab)use this spell to avoid enemies and get to where you're going faster. But remember, if an enemy spots you, it will follow you through the maze no matter where you go, so you may end up with a small army after you if you avoid too many enemies.
There is also not one, but a lot of crystalline boxes around. Most of these contain traps that kill, turn to stone or eradicate whoever opens the box. Only a few are safe; those are all marked on the map. Don't open any others! In the boxes containing treasure, you'll find a little gold and six random items of the highest quality. But the only one you absolutely need to get is the one containing the Hologram Sequencing Card 006, one of six cards you need in order to finish the game.
Speaking of things you need to finish the game, drinking from the water surrounding Water Mane's statue will not only give all your party members one million experience points, this will also make them Ultimate Adventurers, which will appear in their list of Awards. You'll need this, since only Ultimate Adventurers can enter the final area of the game.
The Minotaur King lurks near the King's Ultimate Power Orb in the northeastern corner of the map. This Minotaur's got an extra massive amount of HP, an additional attack, and resistance to Magic. Approach this corner very carefully. If you need to battle the King alongside any of his minions, you're pretty much doomed from the start, he's tough enough on his own. All you can do is fight him like you've fought any Minotaur and hope for the best. If you do beat him, you'll get enough Gems to last you through the whole game. Heck, it's enough to last you through two or three games. :)
That's all I can think of to help you get through this area, but no matter what, it's going to be tough. Make good use of the map, and I wish you luck. You'll need it.
Click here to return to area F3.
|
|