
 |
|
|
 |
 |
Fortress of Fear Walkthrough
Corak's Notes on Fortress of Fear:
The Mummy King hides in a secret vault deep within the walls of the Fortress of Fear. His command over the dead is equalled only by that of the Vampire King. Face the Mummy King and defeat him, for he guards a special hologram card that is essential to solving the mystery that lies beneath the ancient pyramids.
Monsters in this area: Plasmoid, Carnage Hand, Mummy. Boss: Mummy King.
Map of the Fortress of Fear:
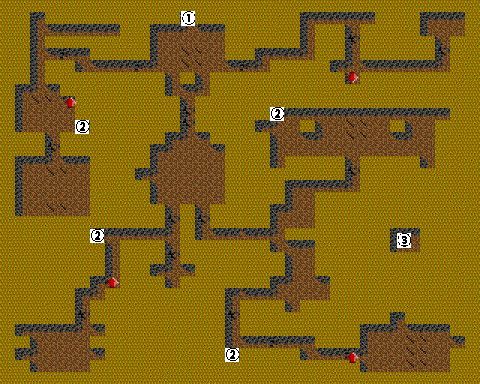
![]() Entrance/Exit.
Entrance/Exit.
![]() Pull these levers and
no other ones to solve the Stone Head puzzle; more details are in the walkthrough.
Pull these levers and
no other ones to solve the Stone Head puzzle; more details are in the walkthrough.
![]() The hidden tomb of the
Mummy King.
The hidden tomb of the
Mummy King.
Can't enter the Fortress? First get the Yellow Fortress Key from Arachnoid Cavern, or from the hireling Sir Galant.
If you read Corak's notes, you already know your mission here: Find and destroy the Mummy King and get his hologram card. Easier said than done. The hardest part is probably finding the Mummy King in the first place: It involves a lever-pulling puzzle which spreads through the entire dungeon. But more about that later... for now, just ignore every lever you encounter.
First thing you'll notice when you enter the dungeon is a huge acidic creature known as a Plasmoid. Well, that is if you cast 'Light' already... else the first thing you'll notice is that you can't see a thing. ;) Anyway, the Plasmoids are very annoying... if you attack them in melee combat, your weapon is likely to break. And if they attack you, your armor could very well break. Broken armor is useless until you repair it, but broken weapons can still be used, although they'll do much less damage than usual.
Get rid of any Plasmoids you encounter in the first area and go east at the first opportunity. Note that you entered the area from the north, so from 1st person perspective, the east is now to the left of you. There will be a breakable wall in the way. Bashing it down will reveal a Carnage Hand waiting for you. It can be pretty hard to hit, but you won't need many hits, since it doesn't have that many HP. However, they do loads of damage if they manage to hit you. A message on the wall ahead will let you know that the levers change the center room.
Continuing down the hall, you'll see another message on the wall, which tells you to beware of the Mummy King. Duh! Now open the door at the end of the hall and... AHHH! IT'S THE MUMMY KING!!! Just kidding, it's just an ordinary Mummy. Actually, if it really were so ordinary, it shouldn't be moving... Anyway, Mummies will always beat up on any Druids that happen to be in your party first, and anyone they touch becomes diseased. They have the potential to do a lot of damage, too. If you're having trouble, use fire-based spells to take him out, or Holy Word if you have it. Beating the Mummy, you're left with two coffins in the room, which are locked for some reason. The reason becomes clear when you pick the lock on them: They're filled with treasure! One contains 15000 Gold and an Ancient Artifact of Good, and the other holds 5 random items.
Return to the entrance and go west this time, bashing through another wall. Pull the lever in the room with the Plasmoids, and ignore all the others. At the far end of this passage is a room with another Mummy and two coffins. This time you'll find 25000 Gold and an Ancient Artifact of Good in one of them, and 5 random items in the other.
Return again to the entrance area and go in the only direction left, south. You will now enter the center room. You will see a collection of electric fields here, with a groaning stone head like the ones you saw earlier in one of the corners. Stepping inside an electric field is, of course, not the smartest thing to do. So what is the significance? Well, the idea is to create a certain pattern with the fields and the stone heads. You can activate stone heads or electric fields by pulling levers. If you get the pattern right, the square in the center of the heads and fields will teleport you to the Mummy King's hidden tomb. If not, you'll be transported back to the entrance. Sure, you could go around trying to pull the right levers and get the pattern in the center right, but since it took me so long I'll just give this one away. The correct pattern is:
H E H
E E
H E H
(H = Head and E = Electric Field)
Just follow the walkthrough and pull only the levers I tell you to and you should have no problems. The curious among you may wonder why some levers cannot be pulled. That's because for each position in the center room there are two levers: One to make a head appear and one to make an electric field appear. If a lever would make something appear that is already there, it cannot be pulled.
At the other end of the room are two doors. Take the right (west-most) one first. If you walk straight ahead you'll run into a thin wall which you can bash down to reveal three levers. However, they only activate electric fields, so they are of no use to you unless you make a mistake(which, thanks to me, you won't ;).
But when you continue down the passage, you will see another lever in an alcove. Pull this one. That's two down, two to go. Oh yeah, there's also a message on the wall somewhere around here which says something about the Eye Master living beyond the Blink of Destruction. This will probably make more sense to you when you visit the Halls of Insanity.
The passage eventually leads to a room with a bunch of Carnage Hands and two Mummies. You may have some trouble here if most of your weapons and armor were broken by the Plasmoids. If so, get them repaired first at a blacksmith. When you beat them, you are free to open the two coffins in the room. The one that's right in front of you when you enter the room contains 20000 Gold and an Ancient Artifact of Neutrality. But open the west-most one and you'll find there are three Mummies inside! How they all fit in one coffin remains a mystery, though... It can be tough having to fight three Mummies at once, but you may want to try anyway since they give pretty good experience.
That's all on this side, so go back to the center room and open the other door. When you come to a fork in the road, a message on the wall will tell you to check the center room after pulling levers. Time for another "duh"! Anyway, at this fork, take the right side first.
You'll run into a gate after a bit. Bash it down and you'll see a lever right in front of you. Pull this one. Only one more to go...
After bashing to another gate, you reach a door. Unlocking it will reveal a room with four Mummies inside. Walk slowly so you can take them two at a time instead of all at once. There will also be two more coffins here. One contains 2000 Gems and a Precious Pearl of Youth and Beauty. In the other one is a non-hostile mummy which tells you what I already told you: "When only the corners are set to moan, will the center make my master known." This refers to the pattern you need to set up with the stone heads in the center room. Still, that doesn't tell you anything about which levers you should pull, and since it could take you quite some time to figure it out on your own, I decided to just tell you which levers to pull. But now I'm repeating myself... let's move on, shall we?
Go back to the fork and go the other way. A message on the wall next to a door will let you know there are sixteen levers to pull. Going through the door you will enter a very large room with two Mummies, some Carnage Hands, two coffins and a lever. Pull the lever to make the final stone head you needed appear. There are three Mummies in both of the coffins. Fight 'em or leave 'em alone, whichever you prefer.
Now, when you re-enter the center room you should notice that the pattern I mentioned before (a stone head at every corner, and nowhere else) has been formed. Now, whenever you're ready, stand in front of an electric field and cast Jump so you can reach the center without having to pass through the field. You will be instantly transported to the Mummy King's tomb. However, there is no way out of the tomb other than teleporting out, so make sure you have Town Portal, Nature's Gate or Time Distortion, or cast Lloyd's Beacon so you can teleport back to it later. If you don't have any of these you'd have to call on Mr. Wizard for help, and that would cost you a lot of experience.
Anyway, once you enter the Mummy King's lair, you will have to fight him and another Mummy. (no, it's not the Mummy Queen... at least I don't think so... ;) The Mummy King has twice as many HP and one attack more than a normal Mummy, but other than that, he's just another Mummy. Shouldn't be too tough, especially not if you keep throwing powerful fire-based spells and/or Holy Word at him.
After beating the Mummy King, check the two coffins. You'll find the Hologram Sequencing Card 001, one of six cards you need to finish the game, and four random items. These will most likely be pretty powerful items. After collecting them all, use one of the spells mentioned above to get out of the tomb.
Click here to return to area B2.
|
|