
 |
|
|
 |
 |
Arachnoid Cavern Walkthrough
Corak's Notes on Arachnoid Cavern:
Arachnoid Cavern opens out of the western face of the Crystal Mountains. The Gargoyles once had their shrine in the corridors of this cave, before they were driven to the Land of the Gargoyles. Insects of all kinds now occupy the dark cave. Mages of all disciplines once came to this cavern to touch the power crystals that run under the mountains. Their decaying bones still litter the floor.
Monsters in this area: Giant Spiders, Dino Beetles, Toxic Wurms.
Map of the Arachnoid Cavern:
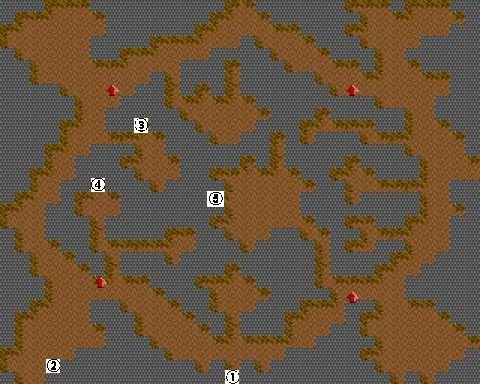
![]() Entrance/Exit.
Entrance/Exit.
![]() Yellow Fortress Key.
Yellow Fortress Key.
![]() Blue Unholy Key.
Blue Unholy Key.
![]() Brother Zeta.
Brother Zeta.
![]() Lord Might.
Lord Might.
There's plenty of reasons you could have for exploring this cavern, but exploring it is not a necessity. The only things in this cavern that are essential to your success are a couple of keys that will allow you to enter two important dungeons. But since you can also get those keys from certain hirelings, this remains an optional area to visit. However, as you will see, it can prove to be a very rewarding one.
The Giant Spiders and Dino Beetles you will encounter around every corner have lots of attacks, but they are not that powerful, so you shouldn't have too much trouble. However, there's a good chance you'll get poisoned multiple times, so try to have a Cure Poison spell ready. If you don't have it yet, don't worry: You can find a scroll of Cure Poison here.
Okay, first let's clear out all the bugs and collect some useful items on the way by walking in a circle. To start, turn left from the entrance. Along the way to the southwest corner you will find some bones, which, if searched, will yield nothing of value. But when you reach the large alcove in the southwest corner, be sure to search the four piles of bones there. Three of the corpses will have nothing on them, but one of them (it's marked on the map as number 2) has the Yellow Fortress Key, which will allow you to enter the Fortress of Fear.
Also in this alcove is a gong with a large beetle on it. If you wish, you can hit the gong to make more Dino Beetles appear. There's a gong in every corner; two summon Dino Beetles, and two summon Giant Spiders. There's no point to hitting these gongs besides fighting more monsters.
Now head north, to the northwest alcove. There's three more piles of bones with nothing on them on the way there. In the alcove you will find three more skeletons on the floor, two of which have nothing you can use. The third has a scroll with the useful Recharge Item spell.
After getting the scroll, head east. Two more piles of bones with nothing on them on the way to the northeast alcove. In the alcove are three more piles of bones, only one of which has something useful on it: A scroll of Cure Poison. Get it and go south, to the southeast alcove.
On your way there... you guessed it, two more piles of bones with nothing useful on them. Three more bone piles in the alcove, and again only one of them has an item you can use. This time it's a scroll of Deadly Swarm.
If you didn't hit any gongs on the way, you can clear out the last of the bugs by returning to the entrance by going west. Oh yeah, there's also two more piles of bones on the way, but again you'll find nothing useful on them.
Now take a look at the map. As you can see, there are a great number of passages you haven't explored yet. The entrance to each of them is blocked by a wall which you can bash through. First, bash through the wall opposite from the entrance. A Toxic Wurm will attack you. The speed of a Toxic Wurm is so high (60!) that it will most likely strike before you can, and will be pretty hard to hit. It can also poison your characters. Use magic if you have trouble beating it with just your weapons.
In this room is an unoccupied throne and two crystals. The throne is of no use, but the crystals are. If you touch one of them, one of your attributes will be permanently raised by 5, but it will work only once. One of the crystals in this room raises your Intelligence("you've gained understanding and wisdom"), and the other raises Personality("you've become a more charming individual"). Since these stats only matter for magic users, be sure they are the ones to touch them. A little reminder: Intelligence increases the maximum number of Spell Points for Sorcerers and Archers, while Personality does the same for Clerics and Paladins. Both Intelligence and Personality increase the maximum number of Spell Points for Druids and Rangers, but to a lesser degree. Also note that after a certain number, the increase of these attributes will not affect your Spell Points anymore.
After touching the crystals, go to the passage west of where you are now. (look at the map if you have trouble finding the passages) After bashing through the wall, a message on the wall will state that this is not the way to the Yellow Key. Well, duh, you already have it! ;) Turn right at this point as bash through another wall. On the throne in this room you will find someone called Lord Speed, who gives you the cryptic message: "I am Lord Speed; this is my clue, substract 449 is all you must do." You will find out what he's talking about later. For now, just touch the crystal beside him for a +5 bonus to your Intelligence. Beginning to understand why "Mages of all disciplines once came to this cavern to touch the power crystals that run under the mountains"?
Anyway, turn back and go west from the message about the Yellow Key, and bash through another wall, behind which is another throne. This one is marked as 4 on the map, since here you will finally find Brother Zeta. If you've talked to Alpha, Beta, Gamma and Delta already, in that order, he will give you the last bit of info on how to get the Sea Shells of Serenity... and another Quatloo Coin. Congratulations, you've just completed the "Brother" quest. Also, beside Zeta's throne, lies a skeleton holding a Fiery Flail scroll.
For the next passage, look at the map; make your way to point 5, Lord Might's throne. You will have to beat several Toxic Wurms in order to reach him. This may be a tough battle, so be prepared. Oh, there are also messages on the wall, telling you that the gongs summon more monsters, and that the Blue Key is in the northern catacombs.
When you do meet Lord Might, he says you must collect the clues to solve his riddle, but the solution will only be correct if you follow the clues "in an order Lord Word would find agreeable". He will also give you his clue: "Start with mine, it's two primes less than twice the crystals in this mess". He will then ask if you know the answer to his riddle. He will give you a great reward if you can solve his riddle, so try your best! Of course, you will need to get the other clues before you can answer correctly (unless you've played the game before ;). But first, touch all the crystals in Lord Might's chamber. Two of them will raise Accuracy by 10, two others raise Luck by 10, one will raise Intelligence by 10, and the last raises Personality by 10. Behind one of the crystals that raises Luck is a secret passage(bash it down), where you can find a scroll of Enchant Item.
Go out of Lord Might's chamber and head north. Bash down the entrance to the next passage on your way. There are two thrones in this small passage. Lord Magic and Lord Prayer are here, making life miserable for eachother. ;) Their clues are: "I am Lord Magic; this is my clue, substract the gongs, then multiply by fifty-two.", and: "I am Lord Prayer; this is my clue, multiply by the number of gongs to make your answer true." They will also offer to teach you some useful skills. Lord Magic will teach you Prestidigitator (Did I spell that right? I hate that word. ;) while Lord Prayer teaches you Prayermaster. Both of these increase the maximum number of Spell Points a character has, and the number he/she will gain when a level is gained. However, Prestidigitator will only benifit users of Arcane Magic (Sorcerers and Archers), and Prayermaster only affects users of Clerical Magic (Clerics and Paladins). The price to learn either of these skills is a rather steep 500 gems, but they're well worth it.
Continue on north, and bash your way into the next passage. You will find Lord Word here. "I am Lord Word; this is my clue, substract my price and you will be through." He will then state he charges 50 gems to teach a character the Linguist skill. Give this skill to one of your party members and you will be able to understand the ancient languages you will hear later in the game. There's also a pile of bones here, among which you will find a Nature's Gate scroll, and a crystal which will increase a character's Intelligence by 5.
Once again, exit and go further north, and bash down the entrance to the next passage. In the first section of the passage is a message on the wall, warning you about the Trolls in Castle Blood Reign. Continue on and bash down another wall. A message here warns you of the many trap doors in the Wildabar Cavern. Also, there's another Lord here, Lord Endurance, who will say: "I am Lord Endurance; this is my clue, count these thrones and add that too." Touch the crystal in this room to gain +5 Personality.
Exit the passage, and enter the only one you can access from the northern part of the cavern. You will be presented with a note stating that the shrine that was once in this room was moved to the Land of the Gargoyles. Now all that's left in this room is two Toxic Wurms, a crystal (raises Intelligence by 5) and Lord Luck, who speaks: "I am Lord Luck; this is my clue, add Lord Might's number, then multiply by two." There's also a secret passage at the north end of this room, which hides a Half For Me scroll.
Now there is only one passage left to check, the one which leads to point 3 on the map: The Blue Unholy Key, which unlocks the Cathedral of Carnage. There's also a Toxic Wurm here, a crystal (raises Personality by 5) and the final Lord, Lord Accuracy. His contribution to the riddle: "I am Lord Accuracy; this is my clue, add half the number there could be of you."
Now it's time to try and solve Lord Might's riddle! Put all the clues in the correct order, and you will discover Lord Might's "Magic Number". If you correctly solve the puzzle, you will be given 1 million experience points! Plus, Lord Might will now reveal his ability to recharge the crystals, enabling you to get all those stat bonuses again! However, this will set you back a whopping 5000 Gems, so you'll need plenty to spare. In the later stages of the game, this is a good place to trade in unneeded Gems for an extra stat boost before tackling a tough dungeon.
Can't solve the riddle, or just don't feel like bothering with trying to solve it? Then call 1-800-MATH-SUCKS now for the answer! Or you could just look it up in the Puzzle Spoilers section...
Click here to return to area B4.
|
|