
 |
|
|
Walkthrough
Like all the Castlevania RPGs, Aria of Sorrow is very open-ended, but items need to be found in a certain order to proceed (Except for Julius, who can proceed in whatever order he wants, since he begins with all abilities initially). That's what this walkthrough is for. This will show you the quickest way to get through the game, but that's about it. You should still explore the castle if you want all the goodies it hides. The Map Section is useful if you're just looking for a particular item or something. I have incorporated maps to show the locations of your major goals (represented by their soul icon) and bosses (represented by a skull).
Part 1 - Get the Grave Keeper Soul
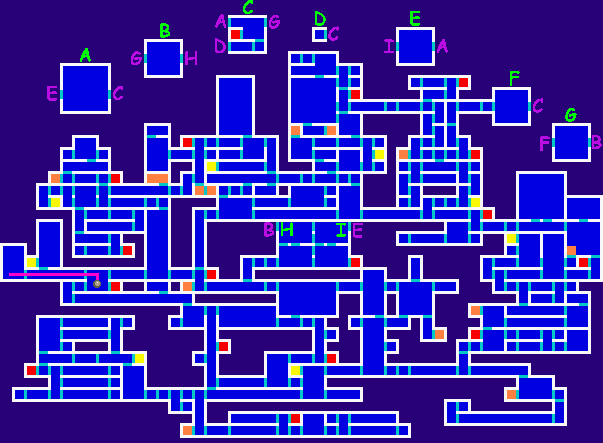
This is as easy as it gets. Just head to the right and down when you get to the water-filled room and you should stumble upon the Grave Keeper Soul. This soul is not really required, but since you'll probably get it on accident anyway, I decided to include it in the walkthrough.
Part 2 - Get the Flying Armor Soul
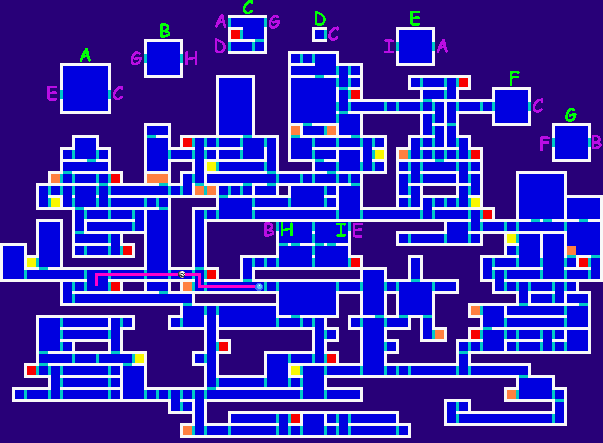
Now to get the Flying Armor Soul. This is also real quick and easy to get, but this time, you'll encounter a boss, the Creaking Skull. He is, how the French say, le easy. You should have no problems. So go get yourself the Flying Armor Soul.
Part 3 - Slay the Manticore
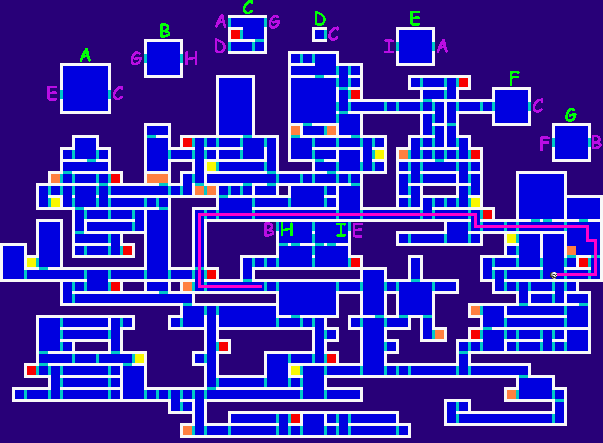
Nothing against the Manticore, it's just on the way to our next major goal. After getting the Flying Armor Soul (which you can use to slow down your descent after jumping, useful in making long jumps), backtrack to the vertical hallway, climb up it, and use it to jump to the right side at the top. Now for your LONG trek to the Manticore. In the meantime, you'll cross into the Chapel. At that point you know you're getting close. Get to the Manticore, give it what for and move on.
Part 4 - Get the Malphas Soul
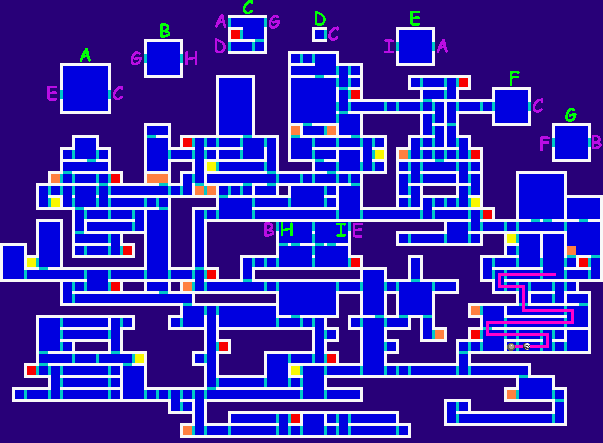
The Malphas Soul is your next goal. This is another long, straightforward hike, this time through the castle's Study. Guarding the Malphas Soul will be the Great Armor. He's not too much trouble if you fight defensively. Just before you grab the Malphas Soul, you'll meet up with Hammer. From this point forward, Hammer's shop will be open near Mina at the castle's entrance. Now grab the Malphas Soul.
Part . - Get the Skeleton Blaze Soul
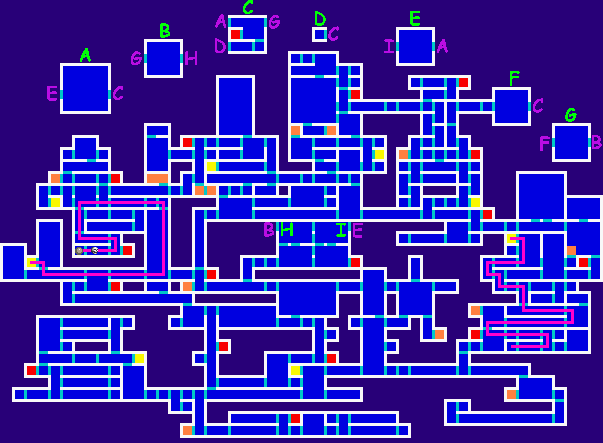
The Malphas Soul lets you double jump, and that's really, really useful, so rejoice. Now leave the Study and head back to the Chapel. At the top of the first vertical hall you come across, you should be able to make it to the top-left door by double jumping and using the Flying Armor Soul. Now follow the path to find a teleportation room. Aria of Sorrow is cool because it lets you pick where you want to teleport to, and that rules. Be sure to find all the teleportation rooms (they're marked in yellow on the maps). Anyway, you'll only be able to teleport to the beginning for now, which is exactly where you want to go. Follow the path, climbing up the large vertical room you come across (you'll have to zig-zag up, but I drew a straight line, because it's easier to draw). Follow the path to the Dance Hall, dropping down to the storage area. You'll eventually reach the Big Golem. Keep your distance, and attack his leg when he sticks it in front of his body. Beat him and you'll get the Skeleton Blaze Soul in the next room. This is the room that also has the Tsuchinoko in it, in case you can't find it.
Part 6 - Get the Undine Soul
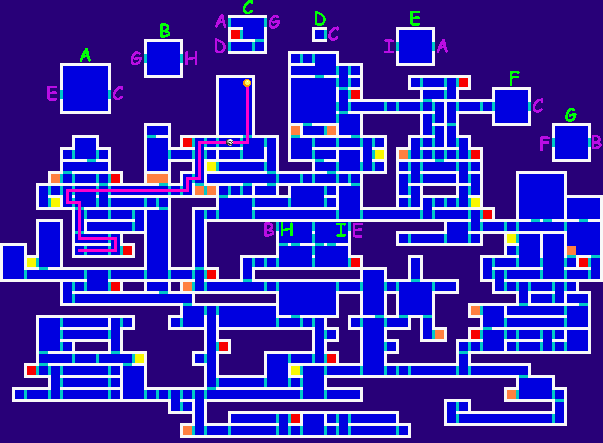
With the Skeleton Blaze Soul, you can slide, which will come in handy soon. Make your way back to the large dancing room, and head to the left and climb the vertical passage. You should, at this point, deviate from the path and activate the teleportation room for future use, then head right. When you come to the long hallway filled with Minotaurs, you can show off your Skeleton Blaze Soul by sliding under the barrier. Keep following the path to the Inner Quarters, and you'll come across the Headhunter. She is a three-part boss; the first part is very easy, the second part is a little tougher until you get the hang of dodging her magic. The third part is sometimes trouble, but nothing you can't handle. When you beat her, Hammer will update his inventory. Now just zig-zag up the large room to find the Undine Soul.
Part 7 - Get the Skula Soul
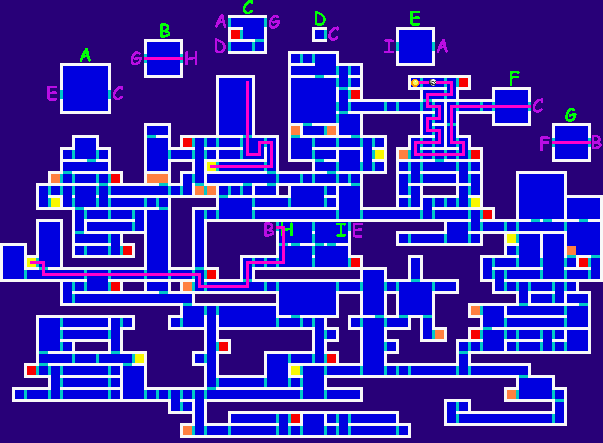
The Undine Soul lets you walk on water, which is useful in jumping to high ledges over water. Follow the path downward, and when you get to the room just below the Undine Soul room, you should be able to follow the path by equipping the Undine Soul to stand on the fountain's surface. Now head to the teleportation room, and teleport to the Castle Corridor again. Follow the path that led you to the Flying Armor Soul, only now you can walk on the water's surface, and therefore jump to the platform and advance upward. You'll end up in the Floating Garden. This place can be confusing if you don't know where you're going, but easy if you do know. To advance quickly, just ride the first platform up and keep doing that until you're as high as you can get. Now just go left. You should be transported to one of the floating sections of the castle. Don't worry about that. Just keep going left until you end up attached to the castle again (check your in-game map). You'll reach the Clock Tower. Like most Castlevanias, the Clock Tower can be frustrating, so take your time. The path's not very long, but it's winding, and fraught with danger. At the end, you'll meet up with Death himself. Death's not too bad, but he hits hard. Beat him and Hammer will update his inventory again. You'll also find the Stolas Soul.
Part 8 - Get the Galamoth Soul
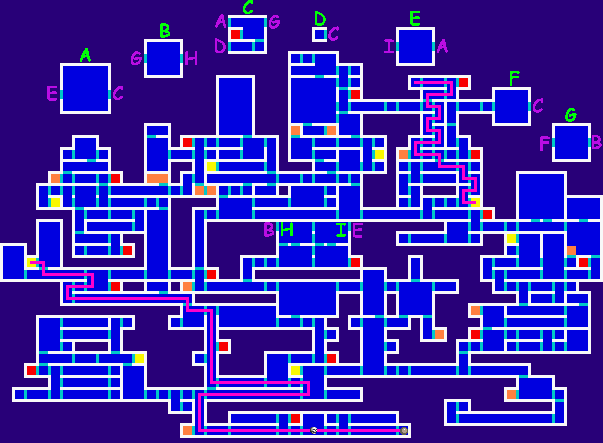
Now that you have the Skula Soul, you'll be able to sink to the bottom of any body of water and walk as if you were on land. Very useful in underwater exploration. Backtrack though the Clock Tower until you reach the break-away plank above some water. With the Skula Soul equipped, fall in, then head to the right. Make your way to the teleportation room, and (again) head to the Castle Corridor. Follow the path to reach the Underground Reservoir. There's a LOT to explore here, but none of it is required, so following the path shown is the quickest way through. Turn right at the bottom of the second long vertical hallway to reach the Underground Cemetary. Just keep going right until you encounter Legion. This boss isn't too hard as long as you keep moving. If you want Legion's soul, you'll need to defeat all its outer shells before you defeat the core. Now keep going right to find the Galamoth Soul. This isn't needed, really, but if you want to make it past the Chronomage and explore the castle completely, it's essential.
Part 9 - Get the Giant Bat Soul
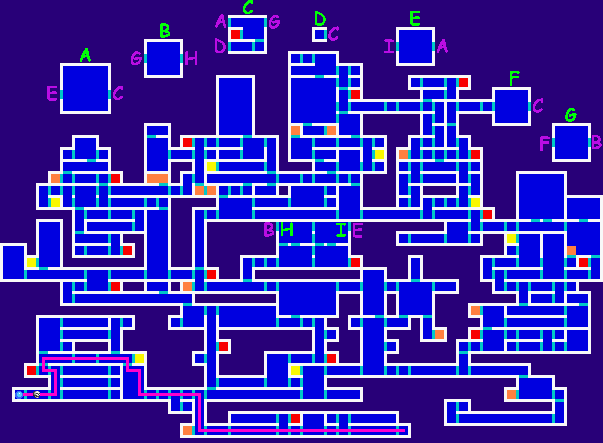
Leave the Underground Cemetary and climb up the vertical hallway. This time, go left. You'll end up in The Arena. As you might expect, this place is full of tons of tough monsters, so be careful. Follow the path and you'll reach an elevator shaft. At the bottom of the elevator shaft, to the left, is Balore. He's big, and he hits HARD. So this fight might be a bit tricky. The trick is to defeat him as quickly as possible, but you can't just trade hits with him, so avoid his hands as best you can. When he starts shooting fire from his eye, you know you've almost got him. In the next room, you'll find the Giant Bat Soul.
Part 10 - Get the Hippogryph Soul
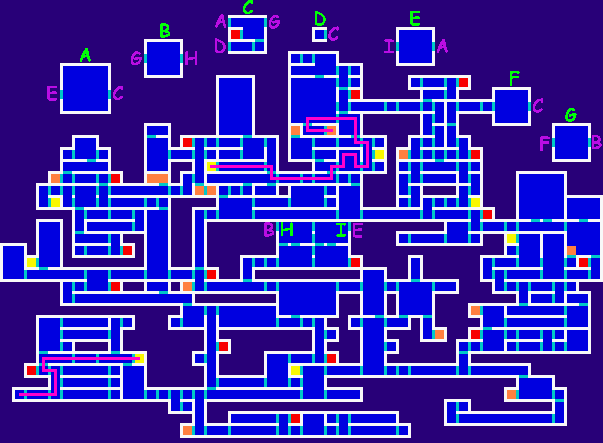
With the Giant Bat Soul, you can transform yourself into a bat. This means you can fly anywhere in the castle you want! Well, almost anywhere... Anyway, backtrack through The Arena and make your way to the Teleportation Room. Teleport yourself to the room in the Inner Quarters. Make your way to the down and to the right until you reach the Top Floor (it's a room full of clocks). With the Giant Bat Soul, you can fly through the hole in the ceiling to reach the rest of the Top Floor. Once you're there, head right and follow the path. Be very careful, because the enemies here are harder than any you've faced in the game thus far. Make your way up, then to the left until you reach the big, open room filled with Basilisks. Go to the left and drop down the hole. You should be in a room with an Iron Golem. If you have the Killer Mantle Soul, you can defeat the Iron Golem. If not, just jump over him. The wall behind him can be broken down, on the other side is the Hippogryph Soul.
Part 11 - Finish off Graham
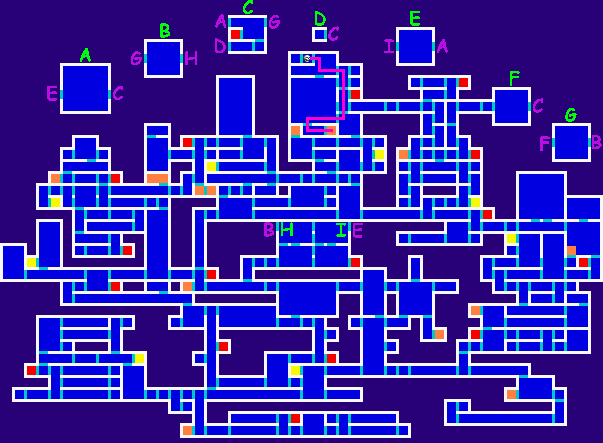
The Hippogryph Soul isn't required, but it's very handy. By pressing L in mid air, you'll fly upward. This makes the Giant Bat Soul obsolete for flying purposes. Now, it's time to fight Graham. You're already really close, so just follow the path. Make a decision whether you want the game to end or continue, because depending on how you beat Graham, you'll either get an ending or the game will continue. To make the game continue, equip the Flame Demon, Giant Bat and Succubus Souls. If you don't have them, you'll have to go back and find them. Succubi are found in the Top Floor, and Flame Demons in the Underground Cemetary. Veterans of Castlevania should be familiar with Graham's first form; he teleports around the room shooting fireballs. When he appears in the center of the room and starts spinning fireballs, you'll know he's almost about to go down. His second form is tougher. Hopefully you have the Claimh Solais. You can easily defeat this form by sliding to one side of the room, waiting for the halo to get above you, hit it with your sword, then quickly slide to the other side of the room and repeat. After the halo is gone, you can slide to the center of the room, duck and hack away at Graham. If you did everything right, the game will continue...
Part 12 - Find the Chaotic Realm
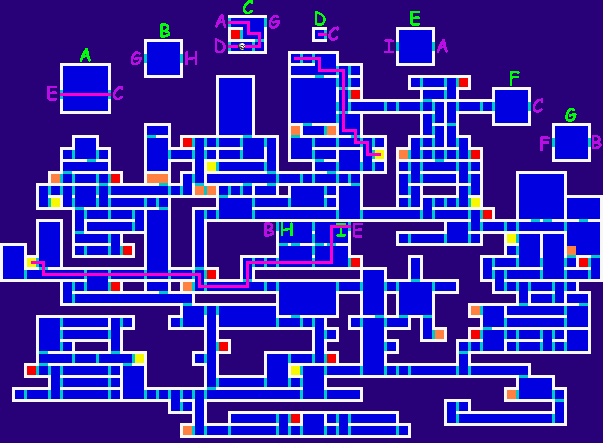
The first thing you'll want to do is head to the room just to the left of where you fought Graham. Here you can find the Dracula Tunic and Black Panther Soul, which helps you zip around the castle quickly. Now backtrack to the Teleportation Room on the Top Floor, and teleport to the Castle Corridor. Now work your way back to the Floating Gardens. This time, head all the way to the right before going up. Then continue to the right. When you reach Room C, head down. You can fight these Kicker Skeletons for the final Ability Soul if you'd like. When you're done there (be sure to save!), go down again, and you'll be able to cross the black-mist door. On the other side is Julius, who challenges you to a fight. Like any Belmont, Julius is tough, so keep your distance and fight defensively. When you beat him, just continue along the path and you'll end up in the Chaotic Realm.
Part 13 - Defeat Chaos
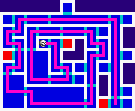
The Chaotic Realm is filled with the toughest enemies the game has to offer, so you'll need to be very careful here. It's also extremely linear, so you don't need to worry about getting lost. If you've collected all the souls, you can pick up the Chaos Ring in the upper-left room. This is the best accessory in the game, since it basically gives you unlimited MP. Follow along the path and when you reach the very end, you'll make it to Chaos. Chaos' first form shouldn't be any trouble, but your Souls will be sealed until you defeat the corresponding sections. His second form is a bit more difficult. To defeat him, you need to destroy its core, but it has insanely high defense. The trick is to take out the eyes on the four corners of the screen. The fewer eyes he has, the lower his defense will be. If you lose this battle, you'll get an alternate ending (not unlike losing to Lavos in Chrono Trigger), which is kind of cool, actually. This is the game's final battle, so do whatever it takes to win... Good luck!

|
|