Chapel Tower
To simplify the explanation just a little, I have incorporated a map system.
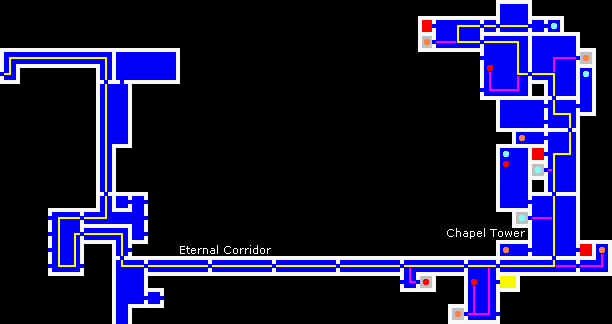
This is a map of the next section. The path to the boss is marked in yellow. Follow that path if you want to just beat the boss. To get all of the extra items along the way, take the lavender path. The gray areas are hidden rooms. You must strike the wall with your whip to access them. The red dots are Heart Max upgrades. The orange items are Health Max upgrades. The light blue items are Magic Max upgrades. You can only get the upgrades that have lavender lines going to them. The other ones you will need more Magic Items to get to. The red squares are save points. Always save your game at a save point. Not only can you save your game but you can also replenish 100% of your health and magic. Be aware that I will not tell you to level up. It will be your responsibility to do so. I will also not remind you to go back and grab any extra items that you may have missed. You can stray from this guide at any time to get extra items you missed.
Follow the yellow line until you get to the Eternal Corridor. There are quite a few monsters in here, so take your time. After getting through most of them creatures you will come upon a hole in the floor. drop down and get the first extra item. Follow the yellow line to the next room and grab the two extra items in here. Don't forget to activate the teleport. Heading into the next room, follow the lavender line to another extra item, then double back. Now, head up to the next room. Grab the extra item here and save your game. Continue on into the next two rooms. Grab the extra item from this room and head to the next room. Grab the extra item here and continue to the next room. Grab another extra item and save your game. Head over to the boss and show him who's boss. Head to the next room and jump on the switch. This switch will break all of the sarcophagus-like statues that you might have encountered if you strayed from this walkthrough.
| Part 1 | Part 2 | Part 3 | Part 4 | Part 5 | Part 6 | Part 7 | Part 8 | Part 9 |