
 |
|
|
 |
 |
Slithercult Stronghold Walkthrough
Corak's Notes on Slithercult Stronghold:
Guillotines mark the path to riches in the Slithercult Stronghold, where Cobra Fiends rule the halls. There is said to be a secret room where those strong enough to venture can test their luck and gain favor from the mysterious altars that eat Quatloos.
Monsters in this area: Cobra Fiend, Candle Creep, Evil Ranger. Boss: Cult Leader.
Map of the Slithercult Stronghold:
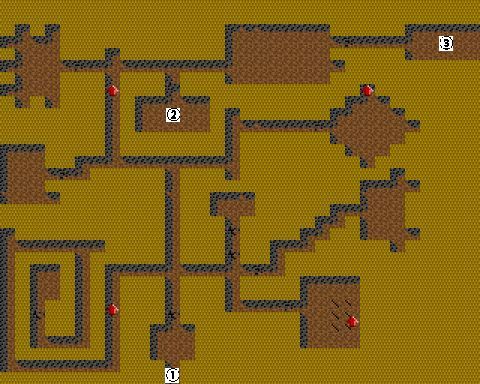
![]() Entrance/Exit.
Entrance/Exit.
![]() The Slithercult Saloon.
Trade your Quatloo Coins for permanent bonuses to your characters' statistics here.
The Slithercult Saloon.
Trade your Quatloo Coins for permanent bonuses to your characters' statistics here.
![]() The Cult Leader.
The Cult Leader.
First off, this dungeon is completely optional, so if you think it's more trouble than it's worth, you can leave at any time and never come back. You'll be missing out on some pretty good stuff if you do, though. You'll probably want to visit this dungeon when you've accumulated a lot of Quatloo coins, since this is where they'll pay off. And if you don't have any yet, don't worry; there's some in the dungeon itself as well.
As soon as you light up the darkness of the dungeon, you'll be greeted by a Candle Creep and a pair of Cobra Fiends. The Fiends don't pose much of a threat. Their ability to put a character to sleep is annoying, but hardly lethal. Still, their high speed and high AC (well, at least it's high for monsters in the early part of the game) could mean you'll have a little trouble hitting them. The Candle Creeps are probably more dangerous, though. Not only do they have two Fire-based attacks each turn, but they can attack from a distance as well. You can compensate with a Protection from Elements-Fire spell, if you have it.
After clearing out the first enemies, talk to the altar if you want for a warning you shouldn't ignore. The danger starts right away in fact: A gate with a guillotine in front of it. The only way to proceed is to walk right into the guillotine and bash down the gate (getting hit by the guillotine again in the process). Every hit by one of the many guillotines in this dungeon will cost every party member 10 HP, so try not to make a habit of that. You could also make use of Etherealise here to avoid the guillotine, but it has a high casting cost. Besides, if you can cast that spell already, you should be at the point where you probably won't mind a piddly 10 damage anymore.
As you proceed, another pair of Cobra Fiends will attack you. There's pairs of Cobra Fiends at just about every corner of this dungeon, so get used to it. At the crossroads, first head east.
In this hallway, it seems that the only way you can proceed is south. But actually, there are secret doors on the north and east sides as well. Past the north one, you will find a pool containing a suspicious-looking yellow liquid. Yep, it's acid alright. If you search it anyway (use the character with the highest acid/poison resistance) you'll find 5 Quatloo coins, which will prove useful if you can make it to the Slithercult Saloon. Past the secret door on the east you will find a group of monsters guarding another yellow pool and a metal lockbox set in the ground. The lockbox contains 45 gold and 4 random items, while in the pool you'll find a Sacred Silver Skull. You may notice a message on the wall nearby, telling you to seek out the wise men near the Valley of the Trolls.
Returning to the original path, you'll find a series of three guillotines ahead, sneakily placed around a corner so you can't use the Jump spell to avoid them. If you have Etherealise, it is possible to avoid a guillotine in a corner by casting the spell just in front of it, then sidestepping out from under it. Remember that you must sidestep in order for this to work, because if you turn you will still get hit by the guillotine. In this case, you can only avoid the first trap this way; sidestepping through the other two guillotines is the only way to proceed while taking minimal damage.
After passing the triple guillotines, it may be good idea to rest before opening the door up ahead. Behind that door is a group of Cobra Fiends and an Evil Ranger. The Ranger's pretty tough; he's hard to hit and has three attacks per round. However, if you have a Druid in your party, the Ranger is not likely to attack anyone else until he manages to off the Druid. So just keep the Druid alive and you'll be fine. If there's no Druid around, you're just going to have to rough it.
Having beaten the enemies, you can now loot this room. There are two metal lockboxes set into the ground, which, if you can unlock them, will make you 3000 gold and 3 random items richer. There are also two more acid-filled pools in this room. A character searching one of these pools will gain a permanent +25 resistance against acid and poison. Each of the pools will only give this bonus once, though.
If you have the Time Distortion spell already, now would be a good time to cast it, since it will take you back to the dungeon's entrance, so you won't have to walk through the guillotines again. In any case, return to the crossroads. If you have plenty of HP, go west this time. You'll pass through a long hallway filled with Candle Creeps and a guillotine around every corner. If you can make it past the first section, you'll encounter two more hissing altars who will tell you that "only the strong should proceed down the serpent's tail" (the nickname for the hallway you're passing through now) and "The Mummy King lies hidden in the Fortress of Fear. Solve the combination to discover his tomb", which is something you can fondly look forward to. ;)
Keep going down the "serpent's tail", beating more Candle Creeps along the way. When you reach the end, unlock the door. You'll be in a small room with a lockbox and a yellow pool. The lockbox contains 5000 gold. The pool is far more intresting however: It will increase the experience (and possibly also the level-without needing to go to the training grounds) of the character who touches it. Usually the bonus will be 1152000 experience, but I've found that if you enter the pool with a Human character, the bonus will be 1536000 experience instead.
After powering up here, cast Time Distortion or make your way back to the crossroads the hard way. Go north this time. Cast Jump to avoid the guillotine ahead. At the end, you'll see the message "Say the missing brother sent you". Turn east from here and you'll end up at a door. Open it up and you'll have more enemies to defeat, among which 4 Evil Rangers. In this large room is a lockbox which holds 50000 Gold. There's also another one of those yellow pools. If you search it, you'll find the mysterious Ancient Fizbin of Misfortune. Holding this vile artifact is never a good thing, so it's probably best to just leave it there.
Return to the spot where you read the message about the missing brother and continue all the way west(passing up a passage to the north along the way). Bash through the wall at the end and you'll enter another room filled with Cobra Fiends and Candle Creeps. There's also another lockbox (containing 10000 Gold) and a yellow pool (containing another one of those Sacred Silver Skulls).
Now take the northern passage you past last time and you will be stopped by an altar, who will ask you who sent you. Like you found out earlier, you need to tell him the missing brother sent you. But who is the missing brother? If you solve the quest of the brothers, (you can find the first brother in Baywatch) the game assumes you know. But if you're not familiar with the Greek alphabet, you may need to resort to the Puzzle Spoilers section to find out the answer.
After passing the altar, head west and open the door. You'll enter a room filled with Candle Creeps. The lockbox in this room holds 200 Gold and 500 Gems, while in the yellow pool you will find a Precious Pearl of Youth and Beauty, something which may prove very useful in the future if you happen to run into the Pirate Queen.
Now pass the altar again, going east this time. Before you encounter the guillotine, step into the alcove you pass along the way. Seth Squirm will appear and welcome you to the Slithercult Saloon. There are three altars in this room, who will ask you for Quatloo Coins. A character who gives a Quatloo Coin to one of the altars will get a permanent increase to his or her stats. If you give a Quatloo to the altar that's right in front of you when you enter, you will get +5 Endurance. The altar to the left of it will give +5 Accuracy, while the one to the right of it will give +5 Might for a Quatloo. Watch it, though: If a character carrying that accursed Fizbin of Misfortune tries to use any of the altars, he or she will be eradicated.
After spending all your Quatloo Coins at the Saloon (they serve no other purpose, so use all the Quatloos you have), leave again through the alcove.
Now for the most tricky part of the dungeon. Up ahead is a maze of guillotines and hidden teleporters. If you step on a teleporter, you're instantly transported back to the beginning of the maze. To illustrate, I've taken a piece of the map and noted the location of the traps.
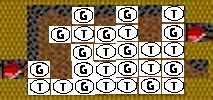
Okay, it may not be my best work ever, but it gets the job done. The object of the maze is to get from the arrow on the left side to the arrow on the right side. A T stands for a teleport trap, and a G for a guillotine. Here's the only safe way, starting from the arrow on the left: Cast Jump, move north, move west, move north, move north, move east, cast Jump, cast Jump, move south, and cast Jump while facing east to get to the other arrow. If you follow these directions, you'll make it through unharmed. Well, that is assuming the Cobra Fiends that wander around in the maze (note that they are unaffected by the traps) don't give you too much trouble. If you take the wrong path, you might end up at the altar, which is located in the alcove two spaces beneath the arrow on the right. That altar does nothing but laugh maniacally though... with all its four faces.
Anyway, once you've passed the maze, bash through the wall at the end. Proceed further down the hall and you will have to battle the Cult Leader one-on-one. The Cult Leader is nothing but a Cobra Fiend on steroids. More damage capacity and more HP, but other than that she's just a normal Cobra Fiend. You should not have too much trouble beating her if you're at a reasonable level (+/- level 10 should be enough).
After beating the Cult Leader, the last thing left to do is loot the treasures of the Slithercult! The three lockboxes contain a total of 21500 Gold, 1000 Gems and 4 random items. There's also another yellow pool here with an Ancient Artifact of Neutrality in it, which you should take back to Castle Blood Reign for a reward.
Click here to return to area B1.
|
|