
 |
|
|
 |
 |
F4 Walkthrough
Corak's Notes on F4:
Despite the unbearable heat of this fiery wasteland, there are a few oases that offer a break from the heat and provide pleasant place to rest. But don't be fooled by these brief havens, for vultures constantly circle in the skies waiting to attack any who pause long enough to unearth the possessions of unfortunate travellers buried in the sand.
Monsters in the area: Barbarians, Death Locusts, Vulture Rocs.
Map of F4
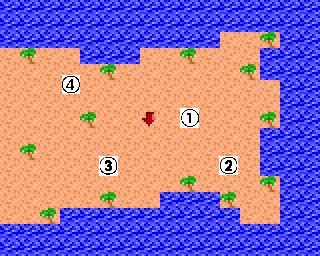
![]() Pyramid of Earth.
Pyramid of Earth.
![]() Well of Remembrance.
Well of Remembrance.
![]() Well of Experience.
Well of Experience.
![]() Well of Magic.
Well of Magic.
Note: You can't rest wherever you want in this area. You can only rest in the spots marked on the map with a palm tree.
Forsaken Sands, the area furthest removed from your starting point. For such a way-out place, which you think would be mostly abandoned, there's plenty of activity around here. Many Barbarians and Death Locusts will bother you as you trek through the desert. As always, it mostly depends on your level and equipment how dangerous these enemies are, and as always, if you find them very hard to beat, you probably shouldn't be here yet. There are no monster lairs here, but the enemies will keep respawning anyway if you haven't destroyed the ones in area E4 yet.
Now this is a place where you would actually expect a Pyramid to be, isn't it? Well, if you came here looking for one, you won't be disappointed. The Pyramid of Earth is one of the few reasons to go to this area.
Another good reason would be the items buried in the sand. These are all of the highest quality, and thus are likely to aid you greatly in your quest. You can find two in each of these locations:
* Two steps west and two north from the Pyramid of Earth.
* Four steps east and one north from the Pyramid of Earth.
* Seven steps west and two south from the Pyramid of Earth.
But be careful. If you dig up any of the items, a Vulture Roc will swoop down and attack you. This is one of the fastest enemies in the game, and they can both dish out and take a lot of punishment. Either high-powered weapons or the Implosion spell (preferably both) will be necessary to take them out. It's worth it to beat them though, since for every one you beat, you'll get 2 million experience and another high-quality random item. Be especially careful digging up the third in this list of treasure locations: Doing that will cause no less than three Vulture Rocs to attack you at once.
The last points of interest here are the three wells, which I've marked on the map for convenience.
The Well of Remembrance will let you know that "No one remembers you" if you toss in a coin. However, if you donated to the statues of Obeyer, Slayer, Soothsayer and Purveyor in area E4, the well will reveal a hidden treasure: 10 random items of the highest possible quality.
Finally, the Wells of Experience and Magic will each give you a substantial, if temporary, boost for a cost of 10000 gold. The Well of Experience will temporarily give a character 50 additional levels of experience(!), while the Well of Magic gives a character 500 extra spell points. The experience bonus will be lost when the day ends or when you rest, the extra spell points will remain until they are used or if you rest. Remember the locations of these wells for when you're about to tackle a particularly hard area.
Adjacent areas:
| Area | How to get there |
| Pyramid of Earth | Go to point 1 on the map |
| Minotaur Marsh(F3) | Go north from this area |
| Buzzard Bluff(E4) | Go west from this area |
|
|