
 |
|
|
Walkthrough Part 2
First head to the top left; go through the trees and check the grass for a TurtlShell and an Elixir. Next, enter the trees just above the only old man in the town; head right and check the grass above the Gurgan for a FenixDown. Now, see that house with an old man walking around inside? Just walk up the tree just to the left of the house, then right into the chimney. Go to the top right candle and press A to open a secret passage to an Elixir. This town is based on Conjurers; you can buy Call Magic here. I don't recommend it for right now, because my personal experience is that Black and White Magic are stronger and more predictable than Call Magic, at least until the very end of the game. Leave when you're done. The next town, Dastar, is on a small island southeast of Salonia.
First, search the grass in the top right of the town for an EarthDrum. Now go to the left and all the way up; that grass has an EarthDrum somewhere also. Now go to the armor store and buy two Rune Rings for your Wizards. Short on money? Why not sell those eleven worthless swords for some major cashola! When you're done, exit the town. You're ready for your next challenge. Fly over the Salonia Castle (yes, the thing I told you not to do before.) You'll get shot down. You now have to explore Salonia yourself. It's made up of four sections (NW, NE, SW, SE) and the castle in the middle-top. Start with the SW section.
First head into the pub (topmost building). You'll enter a fight with four GoldKngts; they aren't too tough. Allus will join after that. Now go around the place and talk to the two old men you see (one in the center of town, one on the lower left); they'll give you a Dragon Armor and Wind Spear. You'll have to enter the water to reach them. After that, enter the lower right house. Talk to the Conjurer there to get a free Fat Chocobo. That's not all, though - walk through the left wall for a treasure trove of eleven Carrots! You'll need the Fat Chocobo soon enough. When all is said and done, you'll want to have four Dragoons in your party! Now head into SE Salonia.
Enter the large tower in the middle of town. You'll be attacked here, so watch out. Go through the right wall of the room you're in; hug the far wall and walk through the right side of the right room. Now go through the top of this one and enter the right side of the one above it. Now walk through the left wall, down, right a step, down, left, and up through the bottom of the upper-left room. Keep going upstairs until you reach a larger room. Go down and open the chests for: two Dragon Helms, one Dragon Armor, two Thunder Spears, and one FenixDown. Go all the way up and open the chests for: two Dragon Helms, two Dragon Armors, a FenixDown, and a Thunder Spear. You now have the complete set of Dragoon equipment needed.
Now head back to SW Salonia and call the Fat Chocobo. Store all your current equipment with him, then make everyone into Dragoons and give them the Dragoon equipment you just got. I recommend buying two Wind Spears in NE Salonia first, and equipping them as doubles on two characters. When you're ready, head into Salonia Castle.
As soon as you talk to the guards, a scene will play out, after which you'll be thrust into a boss battle.
BOSS: GARUDA, 5000 HP; 3400 Gil, 550 EXP (also 61 Capacity)
Just have everyone Jump. You may finish this with only one character alive; that's fine.
*^_^* Note that if there are no characters onscreen at the start of the battle, Garuda
won't do anything at all that turn!
After the scene, head down. Go back to the bedroom and head to the right; the far right wall has three vertical spaces to it; the middle one is a secret passage to the Salonia treasure vault! Here you'll find the following: 5 Rusted Armors, 2 HiPotions, a Golem Staff, Scholar Hat, M.Gauche, Thor Hammer, Freezing Staff, and 20 Medusa Arrows. Now take the staircase down, and head right at the intersection (the other two are dead ends) for even more treasure: an Earth Bell, Viking Armor, Viking Helm, and Dragon Helm. Now head out of the vault.
First go to the lower left building in the castle and talk to any of the scholars; they'll build you an Airship Nautilus (super-fast)! Now go to the lower-right building. Go to the top right of the room (between the statue and the table), face the top wall, and press A to open a passage. Follow it and go down the stairs. Here go left, up, right, down, and left. Go down again. You can see Odin from here but you can't reach him. Open the two chests to get two FenixDowns. Now leave the castle. To revive your party, go to the top left house in SW Salonia. Now you can do a bit of exploration.
NW Salonia has a library with some interesting tomes. SW Salonia has some of the best armor in the game for Wizards: the BlackRobe, WhiteRobe, and Scholar Hat. NE Salonia's shops are now open, and wow do we have stuff to buy! Here's the must-have list: MAGIC: Bolt3, Cure3, Life. WEAPONS: two Rune Staffs, two of Ice/Fire/Light Rods. There's a good chance you won't be able to afford everything from SW and NE Salonia right now. My advice is to get the Cure3 and Life spells now, then worry about the armor, then the Bolt3 spell, then weapons. The Dragoon equipment MAY be useful for one more fight you'll have shortly. I personally didn't use it, but I had high levels. If you don't want to keep it, sell it all!
When you're done, get on the Nautilus and go east. Follow the shoreline south, then go west at the bottom. You should see a continent surrounded by mountains. Keep going west along the bottom of the continent and you'll see a narrow opening. Fly into it. You'll get attacked by fairly strong monsters here, so watch out. Go up at the intersection. Enter the castle you see. After a short scene, Dorga will join you. The Moogles own shops here; they sell awesome magic which you will in no way afford yet! *^_^* You can use a Carrot at the unlit candle to the right. Go up into the top room for jars which act as Revivification and healing springs; check the bookcase for a HiPotion. Touch the candle to open a secret passage. But at the end of that is... another Mini hole! Put everyone in the back row and get ready to run away from battles! WhiteWiz casts Mini on party and we're off to the Magic Circle Cave.
Magic Circle Cave
Have everyone besides BlackWiz try to run during battle; have BlackWiz use his best Black magic. WhiteWiz can also help out with Aero or Aero2. Go left at the first intersection and left again at the next one. Follow the path to the staircase. Go right when you come out. Follow the path to the staircase; go left when you come out. Go down at the next intersection; follow the path to a door. You're home free; walk up, watch the scene. You'll be warped to the overworld. Have WhiteWiz cast Mini on the party to restore status, then reenter Dorga's House.
Buy any more magic you can afford, heal up, and leave again on the Nautilus. I highly recommend building some levels until you have 10,000 Gil; then head east from the entrance to the Dalug Continent (the one you had to go through to reach Dorga's House). See that village enclosed by mountains? Land the Nautilus northeast of that village (where the east wall of mountains is flat). There's a string of discolored mountains you can go through; press A in the open spot at the end to rise and visit Dorga's Village!
This is thE place to buy magic. You can buy Level 1-7 Black and White Magic here, and Level 1-5 Call Magic. The BlackWiz at the bottom carries Level 6 Magic, and the one at the bottom right carries Level 7 Magic, at 20,000 Gil a pop! If you have 10,000 Gil, go to the Level 6 BlackWiz and buy Fire3. If not, build up some more levels until you have it! Now get out of here and back to the open world. Fly to the very southern part of the Salonia continent. Follow the shoreline for a short time till you see a land mass that looks like two horns jutting out. Land the Nautilus in the sea and you'll be right near the Temple of Time.
Temple Of Time
Follow the path. Use a Magic Key (or use a Thief) on the first door; enter it to find a Diamond Helm; give it to the Knight. The next door (which also need a Magic Key) holds a Diamond Ring; give it to either Wizard. Go into the water, left, up, and right. Ignore the waterfalls. Go down the staircase. The chest there holds a Defender Sword; give it to Knight in exchange for the IceBlade. It raises his attack dramatically! Go down the stairs. Head right and use a Magic Key to open a room containing the Diamond Armor. Equip it on Knight and go north. Enter the water. Go left and open the door to get a Diamond Glove and an Orialcon. Equip the glove on Knight and go to the right door. Open it and take the staircase down.
First go to the top right; you'll see a small mark in the right wall. Follow it all the way right and down to get a Lamia Harp and two Protect Rings; give the Rings to your Wizards, then go back out of the secret passage and go south. Open the left door and enter to get a Diamond Shield. Go back and open the right door to get Noah's Lute! Now have WhiteWiz use Exit to warp outside. I recommend spending some time now leveling up and getting treasure. For your first stop, sail back to Goldor's Mansion, on the large non- Salonia continent. Sail east and you'll see Triangle Island. Land on the sea south of that and you'll see the entrance to the Underwater Cave.
Underwater Cave
Treasure action, baby! Follow the path to the staircase. First go left and pick up a Diamond Shield, then go north and follow the path to get a Defender Sword. With two Defenders, your Knight's a powerhouse, with good defense to boot! Head back to the staircase; this time go right. Go south, then left and around to get a Tomohawk. Now go back around, right, and into the staircase. This is thE treasure room! First go down and pick up an Ancient Sword, then down again for a Diamond Shield, Diamond Helm, a BlackHole, and a Gods'Wine. Go back up to the staircase and go left now. Pick up an AirKnife, a Diamond Armor, a Loki Harp, and a Diamond Ring. Now go down for a FenixDown, Diamond Gauntlet, and Elixir.
Now look to the left for a dark mark on the left wall; enter it for a secret passage. The four chests inside hold great items, but monsters guard them. The top right chest has an Aegis Shield, guarded by a D.Zombie (960 Gil/1250 EXP). He shouldn't be too hard; use Cure on him if you want. The bottom right chest has a Triton Hammer guarded by an Eater (945 Gil/80 EXP). He's a bit tougher - he can split into two every round! He has 1150 HP. The bottom left chest has a Reflect Armor guarded by a DeathClaw (980 Gil/80 EXP). Don't use regular attacks on him; he'll split once for every non-fatal attack! Have WhiteWiz use Aero or Aero2, have BlackWiz use a high-level spell, and have the physical fighters Defend. He has 1400 HP. The top left chest has a Blood Spear, guarded by a Peryton (1200 Gil/800 EXP). He has only 730 HP, so a few strong attacks should finish him before he can move.
Now have WhiteWiz use Exit; heal up, sell any excess stuff or give it to Fat Chocobo in Salonia. The next place you'll want to go is pretty tough: land the Nautilus in the sea south of SE Salonia. You'll see a cave entrance; go into it to enter the Salonia Catacombs. Note that it's doubtful you'll survive this place if you're under Level 30. If you're not that high, I recommend just collecting the treasure outlined below, go all out on the normal enemies, then leave and rest in Salonia when you're running low on HP/MP; then come back and raise some more levels. 8-) These enemies give great EXP and Gil; you'll be able to buy some nice spells when you're done.
Salonia Catacombs
The enemies here are tough, so have some HiPotions and Cure spells ready! Follow the path to the staircase. Go right, up and left into the crevice to get a Golem Staff. Now go back right out of the crevice, and go up and left to get an Aegis Shield and a Gaia Robe. Now go all the way back down and left to the start, then go up and right into the crevice; pick up a Reflect Armor. Equip it on the Knight. Go back left and up to reach a Giyaman Bell and a staircase. Go up the staircase; go straight up then right at the top for a secret passage. There are four Elixirs and four FenixDowns here, but each Elixir is guarded by an Ouroboros (830 HP, 1680 Gil, 900 EXP) and each FenixDown is guarded by an Ion (1200 HP, 1600 Gil, 850 EXP). Once you're done, follow the path into the next staircase, which will land you in the basement of Salonia Castle. If you're ready for a very nasty fight, go up and talk to Odin.
BOSS: ODIN, 7000 HP; 5600 Gil, 1250 EXP
If you still have that Dragoon equipment, now's the time to use it! Have everyone
Jump. He uses basically the same tactics as Garuda, but his Atom Edge is much more
powerful. In addition, he'll sometimes use a regular attack which more or less wipes out
one member. If you're not all Dragoons, have the WhiteWiz continually cast Cure3 on the
party, and have BlackWiz cast Fire3, then Bolt3 when it runs out. It's all luck, really.
If you try two or three times and no dice, build up some more levels in here.
When you beat him, you'll get the Odin spell for your nonexistent Conjurer. Give it to the Fighter to hold for now, then leave the Catacombs. Rest up, then go and revisit Dorga's Village to buy any new spells you can afford. After you're done, head along the east coast of the Salonia Continent until you reach an opening to the west. Go in to find a cave; it's Unne's Shrine.
Unne's Shrine / Statues Of The Quest
Talk to the parrot, then go up to Unne, press B and select "Lute". After the short scene, talk to Unne to get her to join your party. You'll also get the FireFang. The first thing you want to do is get rid of those three Fangs cluttering up your inventory. Head to the north of Amur. See those statues? If you tried passing them by air before you were pushed back; by foot, you were instantly killed. 8-\ Now, go on foot and walk past the first three, and only the first three; the last one will still kill you! Now you have no more Fangs cluttering your inventory up. 8-)
Now go back to Salonia; fly over the river heading west, just south of the city. Follow it up, right, and left a bit. Land the Nautilus there, in a small clearing with a cave. The cave is the Ancient Ruins.
Ancient Ruins
Go up to the Adamantite rocks to have Unne blow them away. Go down and left. Enter the first door for a Reflect Armor. Exit the room and continue left. You won't be attacked in the next room. The three doors here are an inn (a welcome addition), and a weapons and armor shop, both of which are useless since you've gotten all the treasure in the Underwater Cave! Now go down the staircase. Warning! The enemies here will split. The Sirenos, Garb, Eater, and DeathClaw enemies will split when attacked physically; the Azrael enemies will split almost every round, making it seem like it lasts forever! The trick is that the clone can only have as much HP as the one who cloned it. So spread out your attacks among the enemies; eventually they'll go down. Don't shy away from healing the party! If you're really getting low on magic, use Exit or Warp. For the ones who split by physical attacks, use Karateka's BuildUp skill and use Defend and low-level magic for the other three characters. Now, follow the path to the intersection.
First go into the very lower left room for a BlackBelt. Go into the door just above it for a Chakra Hat. Now go to the door above-left of that one (above the passage you used to get here) for a Rune Bell. Head straight right for an Elven Claw. By now your Karateka should have better attack power with his fists (try de-equipping him and see how high his attack power is). Now go back to the main intersection and head all the way north. Follow the path past two staircases. Here just keep to the bottom floor (remember Goldor's Mansion?) to the next staircase. Follow the path past another three staircases and you'll be in the Airship Invincible!
Check it out! A free bed, vending machines with some of the best magic and armor there is, and you can land over any terrain besides mountains! The first place you should check out is Fargabaad. Just southwest of Salonia, you'll see a green passage leading to the west side of the continent. Towards the Salonia side, however, is a jumping point. It's a very narrow mountain range. To jump over it, face it and press A. Follow the path and jump south again. Go west a bit and you'll see a town. Press B to enter the airship interior; to land, go onto the ladder. Enter the town of Fargabaad.
Fargabaad / Fargabaad Cave
This town is M.Knight-oriented. First, enter the left side of the trees near the top of the town (where there are two rows of equal length above one another), and walk into the waterfall. Talk to the man to be thrust into a fight with a Shinobi. Beat him (he has under 2000 HP) to get 4000 Gil, 1100 EXP, and the Kiku sword. This sword can only be equipped on an M.Knight. Next, go out of the staircase and go right. You can now go down the river and up into the island. Check the four corners for two HiPotions, a Demon Armor, and Demon Shield. Now, de-equip your Knight. Change his Job into an M.Knight. Give him the Kiku and Demon Armor, then go into the weapon shop and buy him an Ashura sword to equip along with the Kiku.
Now enter the cave at the top of town. The gimmick with M.Knights is that their swords will not cause enemies which normally split to split. This cave is infested with those enemies, so use black magic and have the M.Knight pound away. Have the Karateka BuildUp in the meantime, and have WhiteWiz use low-level magic. Inside the cave, pick up the chest for a Thor Hammer, then go to the bottom right and enter the secret passage. Go five steps right, then up all the way, then eight steps right, down all the way, right all the way, and up to pick up another Demon Armor. Now either cast Warp/Exit or go back to the main room. Now go into the top right secret passage. Go right all the way, nine steps up, then right all the way and up to get a Kotetsu and an Ashura sword. Now cast Warp/Exit or leave.
Sell the two Ashuras and extra Demon Armor, then leave the city. Now's the time to head back to the Floating Continent. To get there, go to the cross-shaped land mass at the entrance to the Dalug Continent (where Dorga's House is) and go east. Once in the Floating Continent, head to the the Living Forest. That lake with the shadow on it near the Dwarf Cave is now accessible by jumping over the mountains north of the Forest. Get out of the Invincible at the only patch of land, at the very south of the lake. Take the canoe into the swimming shadow to enter Lake Dol.
Lake Dol
At the first intersection you come to, go south for four chests: a Gods'Rage, an EarthDrum, a FenixDown, and a NorthWind. Now go up. The four chests here hold three HiPotions and an Elixir. Go down the staircase. Go up at the intersection. The first chest you see has a WhiteScent; the next four have an Aegis Shield, a LamiaScl., a Gods'Wine, and a TurtlShell. Now go down and down the staircase. At the intersection, go to the top right for a BlackHole, a Thor Hammer, and a Reflect Armor. The last chest contains a DarkScent. Now head back to the intersection; go to the lower left for an ImpsYawn and a LilithKiss. Now head to the top left and down the staircase. Now follow the path to Leviathan; talk to him to begin the boss battle.
BOSS: LEVIAthAN, 7000 HP; 5700 Gil, 1250 EXP
Have WhiteWiz cast Cure3 on the party every round, have Knight and Karateka attack, and
have BlackWiz use Bolt3. If your HP average is above 1700, he should be OK. You'll get
the Levia spell when you win. Give it to Knight for now, then cast Exit and heal up on
the Invincible. Now go to the very east of the Continent, Gisahl Town. Just west of that
is a cave enclosed by mountains. Jump to get in, then enter the Cave of Bahamut.
Cave Of Bahamut
This is an excellent place to build up levels - you can always leave and heal up in the Invincible. Plus, chances are you won't be able to beat the boss at your present level. Level 37 is pushing it; I recommend at least Level 38.
Follow the path. The first two chests contain a Gods'Rage and an EarthDrum. Go north at the intersection for a FenixDown and NorthWind. Now follow the path down the stairs. The first chest you come to here will have a Golem Staff. The next two chests will have a Gods'Wine and a LamiaScl. The last two on this floor have a TurtlShell and a ChocoRage. Go down the stairs. The first three chests here have a DarkScent, FenixDown, and Elixir. The last one has a Kotetsu. Watch out - as soon as you walk all the way to the right wall (top square), you'll be thrust into an extremely difficult battle with Bahamut.
BOSS: BAHAMUT, 7500 HP; 3500 Gil, 700 EXP
Have WhiteWiz cast Cure4 on the party every round, and have the Knight and Karateka
attack. The BlackWiz can't do much; choose between casting Quake and Drain. If your levels
are above 37 you should do fine. When you win you'll get the Baham summon spell; give it
to the Knight. Reenter the Cave of Bahamut; you'll have to walk all the way back to the
Invincible.
Now change your Knight into an M.Knight and give him the Demon Armor, Kiku, and Kotetsu. You might want to stop by a few cities here and get him some White Magic spells like Cure, Cure2, and Exit. When you're done, fly the Invincible out of the Flying Continent and back to the continent with Amur in it. Just to the east of the Statues of the Quest is another opening. You'll have to make several jumps with the Invincible here to reach your next target. You'll be attacked by enemies, but the Invincible's cannon helps out a bit.
Cave Of Darkness
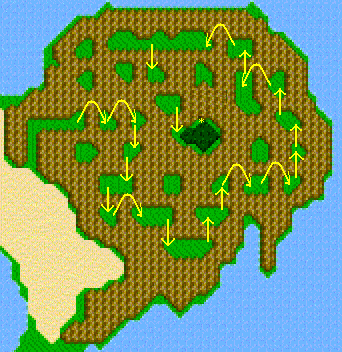
Check this map for a graphical version of the following instructions.
From the entrance to the jumping maze, do the following: Jump right twice, then down twice, then down from the left side of the clearing you're in, then right, down from the right side of the clearing, up from the right side, up, right twice, up three times, left, up, left, down from the middle of the clearing, and down. Now rest up if you need it, then enter the Cave of Darkness. The enemies in here are the same as in the Ancient Ruins, so use the same strategy. Unfortunately, this cave is a LOT bigger. If you find yourself running out of magic due to treasure hunting, you may want to Exit or Warp and try again.
For starters, head right into the secret passage, then up to pick up a LamiaScl., then head back to the main passage. Follow it into the wall and open the chest for a Gods'Wine. Talk to the M.Knight you see for a Kotetsu. Now go down the stairs. Go right, enter the secret passage, take four steps right, then go up, then right, then down and down the stairs. Follow the passage up, left, and up. Take the secret passage left, down, and left for a Paralyzer, then go back to the main passage. Go straight up into the wall until you reach the next visible passage, then head left. At the end of the short passage, go straight left all the way for a LilithKiss, then head back to the main passage. Now go down all the way, left all the way, and down into the stairs. You are now in what I will call Passage A.
Head left into the first secret passage you see (it's in a little dip). Now go left and down and into the top right secret passage (leading right). Follow it all the way right, down, right, and down to pick up a Genji Glove. Equip it on the M.Knight and go all the way back to Passage A. Follow the passage down, left, up, and right into another secret passage. Here, go down the second passage from the left; you'll enter B4F. Go into the bottom right secret passage (leading right) to enter B5F.
Take the far left secret passage (leading down) and follow it to pick up a Kiku. Exchange it for the M.Knight's Kotetsu. Now enter the secret passage on the right wall and follow it right, up, and right to get to a visible passage. Enter the secret passage at the bottom right and follow it right and down. Follow the passage until you reach three secret passages heading left. Take the middle one left and up to reach a visible passage, then head left, down, and left to reach the stairway. Take it.
Follow the passage till you reach four secret entrances leading right. Take the bottom right one and follow it right, down, and left for a Genji Shield. Now take the top right one. Follow it right, up, and right. Now head down and into the next staircase. Take the secret passage directly to the right for a Genji Helmet. Equip it on the M.Knight, then return to the main passage. Now take the bottom left passage (leading down), follow it down, right, up, and right. Now take the right passage and follow it up, then left into B8F. Here, go one step left and down. Follow the passage down to get a Genji Armor, equip it on M.Knight, and go back up.
Go left past the bridge, and go down to enter the water. Head right in the water till you reach some stairs heading down. Ignore the secret passage just below you. Go down a bit and enter the right secret passage (across from the two left ones). Follow it right, all the way down, left, and up. Go up to the Earth Fang. Have the M.Knight heal the party before picking it up and starting the boss fight.
BOSS: HEKATON, 6500 HP; 4900 Gil, 1200 EXP
This guy is a pushover. Have M.Knight and Karateka attack, have WhiteWiz cast Cure3 or 4
on whomever was last hit, and have BlackWiz use Fire3. When it's done and you get the Earth Fang, cast Exit. You can now choose whether you want to keep the M.Knight (he now has decent defense and attack) or go back to the Knight. Personally I kept the M.Knight, but either way works fine. Re-enter the Invincible, rest up, and retrace your steps back to the open world. You're technically supposed to head to Dorga's house now, but let's take a side path and get some great Jobs before doing so!
Head back to the Statues of the Quest to the west. Land the Invincible near the last statue and walk past it to destroy it. Re-board the Invincible. You'll have to fight enemies now, but they're the same weak ones as before. Fly up, jump right, then fly up and right. Land below the door to the large square edifice and enter it; it leads to the Ancients' Labyrinth.
For right now, just head straight up and enter the door. When you try to walk up, a boss fight will ensue.
BOSS: TITAN, 7800 HP; 4500 Gil, 1100 EXP
This guy's identical to Hekaton in more than just looks. Use the same basic strategy -
have M.Knight and Karateka attack, BlackWiz use Fire3, and WhiteWiz cast Cure3 on the
party until someone's visibly hurt, when he can cast Cure4 on that person. It'll take
longer than the last fight, but he won't be too hard. When you're done, talk to the Crystal
to gain three more Jobs: Shaman, Warlock, and Summoner! Change your BlackWiz and WhiteWiz
to a Warlock and Shaman immediately, then exit the Labyrinth. Now you'll have to regain
the Nautilus; you left it at the Ancient Ruins (check that section of the FAQ for
directions). Get on the Nautilus and fight your way back to Dorga's House. Enter and walk down and you'll automatically be transported to Dorga's Cave. (Don't worry, you can leave at any
time by walking back up the stairs. You can't enter Dorga's house and heal up/buy stuff, though.)
Dorga's Cave
Go down the left path. At the intersection, go down, then right. Enter the door. Pick up the chest you see for 20000 Gil. Follow the path to a staircase; pass it and pick up the chest to the right for another 20000 Gil. Now go down the staircase. At the (spacious) intersection, go up, then left. Enter the door for three Barriers. Now go back out and right; enter the door. Pick up the chest for another Barrier, then head down the staircase to reach B3F. Follow the path down and enter the door. Prepare yourself for a boss fight before stepping up. You'll have to fight two bosses in a row.
BOSS: DORGA, 4500 HP; 4000 Gil, 830 EXP
Have the fighters attack and Warlock use Fire3. Have Shaman use Cure4 on either the party
(if he uses Quake) or a single member (if he uses Drain). Have one of the wizards use a
Soft if he uses Break.
BOSS: UNNE, 4500 HP; 4200 Gil, 1000 EXP
Don't let your Warlock use magic; she'll cast Reflect on herself. Have the fighters attack and have Shaman use Cure4 on anyone she used WWind on. Her physical defense is lower than
Dorga's, so this fight will be shorter. After the two fights, talk to Unne and Dorga to get the Eureka and Sylx Keys. Now use Exit or walk out of the cave. Fly the Nautilus back to the Ancient Ruins to reclaim the Invincible.
Preparing For The Final Dungeon
A few words of warning here. The next while will be fairly challenging. You will not get any more Fat Chocobos. However, you will need to do a LOT of level building to beat the final boss, one of the hardest (if mindless) in the FF series. The layout of the final palace is as follows: the Ancients' Labyrinth surrounds the Sylx Tower. The first floor of the Sylx Tower contains the entrances to both Eureka and the rest of the Sylx Tower. At the end of the Sylx Tower is the entrance to the Dark World; once there, you can't return. There's lots of excellent treasure here, but as I said, no Fat Chocobo. My strategy is to collect as much treasure as you can, then head to the final floor of Eureka where healing springs and shops lie. You can heal up and sell the unwanted stuff. Then do it all over again, as many times as you need, for all the treasures in Eureka and the Sylx Tower. Another strategy is to leave the tower and the Ancients' Labyrinth and head back to the Invincible whenever your inventory is full.
If you still need more levels, build it up near the healing springs in the last floor of Eureka. One good thing is that all the enemies here give tons of experience. You'll probably come in at about level 40 and face the final boss at about level 60. If you are not using an emulator, you'll want to exit the Sylx Tower periodically to save your game. If you are, make sure you have an extra save slot available for the Dark World. First, you must stock up on essentials. Buy as many HiPotions as you can carry, and a few Potions as well (twenty or so) for good luck. Buy plenty of Softs, Antidotes, MaidKisses, and EyeDrops. Take my advice and give the Fat Chocobo all the useless battle items like ChocoRage, NorthWind, and LilithKiss.
Now you'll have to go shopping for magic. You can't buy any magic you want in Eureka, only the absolute best ones. For the lower-level ones, you'll have to be prepared. After completing Eureka you'll have two characters who can use ANY magic. Here is my recommendation for their magic list:
| Magician 1 | Magician 2 | |
|---|---|---|
| L.1 | Cure, Pure, Sleep | Cure, Fire, Sleep |
| L.2 | Bolt, Aero, Venom | Bolt, Aero, Venom |
| L.3 | Fire2, Ice2, Cure2 | Bolt2, Cure2, Exit |
| L.4 | Ice3, Confu, Break | Ice3, Confu, Break |
| L.5 | Bolt3, Cure3, Life | Bolt3, Cure3, Life |
| L.6 | Fire3, Bio, Haste | Fire3*, Bio, Haste |
| L.7 | Quake, Cure4, Heal | Quake, Cure4, Heal |
| L.8 | Flare, Life2, Baham | Meteo**, Life2, Baham |
* - you might want to switch Fire3 for Soft, and you may want to switch a Bio for Warp; this would allow you to switch the Exit with another 2nd-level attack spell, since Warp lets you completely exit a dungeon if you set the "floors to warp back" to the highest it'll go.
** - you might want to switch Meteo for Holy.
Of course, you may not agree with me; you may want to change some of the attack magic to summons if you like. You can buy the Level 8 magic at the last floor of Eureka, as well as copies of the Baham summon spell. You should HAVE all these spells but there's no point in equipping them yet - give the extra ones to your fighters. You should sell any equipment you don't need (get them from the Fat Chocobo and sell them at the vending machines) to maximize your cash. I recommend taking along the Elven Claw for a little while. Also make sure that you have a Carrot in your inventory if you want to return to the Fat Chocobo. Now it's time to retrace your steps to the Ancients' Labyrinth (where you got your last three Jobs).
Ancients' Labyrinth (Again)
Go left around the door with the Earth Crystal, and go up at the intersection. Then head right to pick up an Elixir, then back left and enter the door. At the intersection, go up for a LilithKiss and a Crystal Shield. Go back to the intersection and head left. At the next intersection, head up for a Crystal Armor. Equip it on your Knight or M.Knight, then go back to the intersection and left. Pick up the treasure chest you see for a DarkScent, then head back left. Go all the way up for a Crystal Glove; give it to the Knight or M.Knight, then go back left, down, and take the first (uppermost) right-hand passage. Follow it all the way into the next room. Here, take the first downward passage and follow it all the way down to reach a FenixDown, Break Sword, and Ultimate Rod. If you're using the Knight, give him the sword; give the rod to the Warlock. Go up and at the first intersection (the 4-way one) head left for a Crystal Helm; give it to your Knight or M.Knight. Head right for a GreatAxe. Now go back up and right into the next room.
At the first intersection here, head up and go all the way right for a Protect Ring,which you probably won't need. Go down and left at the first intersection to pick up a FenixDown. Go back right and down. Follow the path to the door. The two chests here contain a Holy Spear and a HellClaw. If you still have the ElvenClaw, see if your Karateka's power is better barehanded or with the Elven and HellClaws; if it's close, equip the claws. Go up into the exit. Walk upwards to enter the Sylx Tower.
For now, walk up into the door and up some more until something stops you. Press B and select "EurekaKey". Walk up into the mirror to enter Forbidden Land Eureka.
Forbidden Land Eureka
Head left, down, and right as soon as you can; pick up the two chests for a BombR.Arm and a Gods'Rage. Go down, all the way right, up, and left as soon as you can to pick up a NorthWind and an Elixir. Now go down and into the staircase to enter B2F. Here, go left and enter the door for a BombR.Arm. Exit and enter the room to the right of that intersection to get a Gods'Rage, NorthWind, and FenixDown. Go back to the intersection and down until you're one square above the bottom of the left chunk of wall. (It's exactly opposite a treasure chest; you can see the chest by going to the far left of the room.)
Head left and prepare yourself for a fight before opening the chest; a Ninja will step out. He's pretty strong, but when you win you'll get 4800 Gil, 1150 EXP, and a Ribbon. Equip the Ribbon on either Wizard, then go back to the intersection. Go down the staircase to pick up a Shuriken, then go back up. Now go right, past the right room, and follow the path to the staircase to enter B3F. Here, go left for an Elixir, then back right and down. Follow the path. The first chest you see has a Shuriken, the second has a FenixDown. Go down the staircase to reach B4F. Here, follow the path to reach a boomerang. Examine it to start a boss fight. (If you're following my advice, you'll leave it alone for now and hightail it to the bottom floor.) If you do pick it up, a boss battle will ensue:
BOSS: AMON, 7040 HP; 3450 Gil, 1050 EXP
Not a very tough battle. Bio works wonders against him. Have the Shaman Haste the fighters
and the fight'll be over quickly.
You'll get the FullMoon when you're done; give it to your Knight or M.Knight. Now continue down to B5F. Here, first go down, then left to get a FenixDown. Go back right. To continue on, go down; for another boss fight, head right and check the swords.
BOSS: KUNOICHI, 9000 HP; 5000 Gil, 1200 EXP
A bit harder than the last one because she'll cast Mindblast and freeze at least two of
your party members. If you're free, have WhiteWiz cast Haste on the M.Knight or Knight,
have BlackWiz cast Bio and have the fighters attack. She has fairly low defense and should
go down quickly. When you beat her, you'll get the awesome Masamune; give it to M.Knight to make him a super-powerhouse! Now go down the staircase (pick up a FenixDown first) to enter B6F. Here, go right for another optional battle; head left (see below the boss section for directions) to continue. If you go right:
BOSS: GENERAL, 12000 HP; 5200 Gil, 1250 EXP
He has a powerful regular attack, but that's it (at least in my experience). Have WhiteWiz
cast Haste on both fighters and have BlackWiz use Bio. When you beat him, you'll get the
almighty Excalibur. Give it to the Knight if you have him, then go back to the entrance
to this floor and head left over the broken bridges. Go all the way left, down, right,
down, right, and up (sneaky, huh?) to enter B7F. Here, head all the way up and into the
door to reach healing springs and some shops which sell the best magic in the game.
First heal up, then pick up the four chests for two Elixirs and two Shurikens. Head all the way up to the top of the wall and press A; a secret passage to yet another shop
(which sells all the Crystal equipment plus Shurikens) will open up. I advise you not to buy any armor from him, as the second Crystal set can be found in the Sylx Tower. Buy some Level 8 magic as advised above (or whatever you want). Now head back down out of this room and speak to the staff on the left to begin another boss fight.
BOSS: SCYLLA, 10000 HP; 5400 Gil, 1300 EXP
Go all out here; there's a healing spring right nearby! With your new Holy and Flare spells, this guy doesn't stand a chance. When you win, you'll get the Eldest Staff, as well as the two ultimate Jobs, Ninja and Sage! Now, switch your fighters to be Ninjas and your magic users to be Sages. Redistribute weapons, armor and magic to even out the levels. Go back
and heal, then talk to the sword on the right for the final boss battle of Eureka.
BOSS: GUARDIAN, 12000 HP; 5600 Gil, 1350 EXP
With your new abilities, this guy's a joke. Have the Ninjas fight and have the Sages
cast Baham. He'll cast Quake, but chances are you'll kill him before he can do you in.
You'll get the Ragnarok sword, the best in the game; now go and heal up. Sell all
extraneous magic (especially Odin and Leviathan), then open the secret passage and buy
as many Shurikens as you can afford. You'll hopefully be returning to this place after
cleaning out the Sylx Tower; you can buy some more then. Now I highly recommend building
your levels to at least Level 49; if you don't, the Sylx Tower will probably be too much
to bear. This is the best place for it, because of the healing springs. Actually, the
very best place is B4F, where the groups of Haokahs net you some excellent experience. The
healing springs are still very close, so when you think you're getting anywhere near weak,
just hop up to the springs, then back to B4F to build more levels. When you're done,
it's time to go all the way back to the first floor of the Sylx Tower (retrace your steps
to the entrance of Eureka, then step on the platform you arrived in to go back to Sylx
Tower). You can't use Warp or Exit, sorry.
Sylx Tower (Again)
The enemies here (especially FlameDevil) are a lot harder than in Eureka, so be careful! From the door to Eureka, go left, then left again at the intersection. Follow the path to a Barrier, then back left and up a bit; there's a secret passage in the left wall. Pick up the chest you see for a WhiteScent, then go up. Go up at the intersection for a ChocoRage, then back down and right. Make a detour at the door, press B and select "Sylx Key". Don't enter yet; go back down and right. Go up at the intersection for a LilithKiss. Go back down (the room is symmetrical so you'll be basically retracing your steps backwards), and follow the path for a ChocoRage and EarthDrum. Enter the secret passage to the left for a Barrier and a WhiteScent. Now go back to the door you opened and enter it to reach 2F.
For starters, go left, then left again at the next two intersections; go up for an Elixir. Now go down, past the passage you used to get here, and take the next passage right. Follow the path straight through a secret passage right; go up for a FenixDown. Go down and follow the passage; pass the staircase for another Elixir, then enter it to reach 3F.
Go up, then right into a secret passage. Follow the passage up and go right at the top into another secret passage. Follow this one down and go up at the intersection for an Elixir. Now go back down and enter the staircase to reach 4F.
Here, just follow the path; pick up the two chests you see for a FenixDown and another Eldest Staff; give it to whichever Sage doesn't have it. Follow the path to the staircase to end up back in 3F. Now, go left and up at the first intersection for a FenixDown. Head back down, all the way left, up, right through two secret passages, then up. The chests to either side of the staircase hold Elixirs. Enter the staircase to reach 4F again. Go down and enter this staircase to reach 5F.
Here, go left and down, then down again at the intersection. Head left at the next intersection and follow the path all the way to the next staircase. Enter it to reach 6F. The chest to the right and a bit up holds a Crystal Armor, while the one to the left and a bit up holds a FenixDown. Equip the armor on whichever Ninja doesn't have it, then go down to find the staircase to 7F. Here, head left and down for a Crystal Glove, then enter the water and go up to find a Crystal Shield. Give the Glove to a Ninja, then go back to the land and go right. The two chests here have a FenixDown and Crystal Helm. Give the helm to a Ninja.
WARNING! Behind the door is an automatic boss fight; after the fight, you CANNOT RETURN to the real world! My advice is to first head all the way back to the B7F of Eureka; heal up, then build up some levels in B4F. I recommend at least L. 53, and 55 or above will make it even easier. Then heal up again, and buy as much Shuriken as you can afford. After that, I advise to go all the way out of the Sylx Tower and the Ancients' Labyrinth, back to the Airship Invincible. Sell any unwanted stuff, stock up on HiPotions and status items, and get back any battle items you gave in (and if you got the Shuriken from the town of Gisahl, make sure to get that back too!). While you're there, remember that Sages can also equip books. You may want to switch one of the rods/staffs for a book.
When you're done and you think you're ready, head back up the Sylx Tower to the room you (hopefully) didn't enter. You may want to stop off at the shops in Forbidden Land Eureka for some HP refill and to buy more Shurikens. Shurikens will be your weapon of choice for the five tough battles you have ahead, and the more you have the easier your life will be. I recommend at LEAST 20, and 25 if you want the two toughest battles to be easy as hell. (Each Shuriken will disappear after you use it, but you can re-equip it using the Item command in battle. Press A on the Shuriken, then press left until the cursor is on the spaces for your two hands; press A again to equip another Shuriken.)
Don't use your HiPotions yet on the way up; rely on healing magic. If you're using an emulator, switch to another save slot now. Go up to the mirror for a longish scene; after it, walk up and talk to Zande for a boss fight.
BOSS: ZANDE, 21000 HP; 0 Gil, 0 EXP
Go all out on this one. Chances are you won't need to use your Shurikens just yet. Have
the Sages cast Haste on the Ninjas, then Bahamut. Zande will only move every two turns,
but that move will be Meteor, which even at level 55 can sap everyone for 2000 HP!
Have the Sages cast Cure4 on the party every turn from now on; the Ninjas can finish
him off.
After you beat him, you'll have to fight a sham battle against the Cloud of Darkness. You can't win, so don't try. Don't worry, after that you'll be completely restored. Walk up to enter the Dark World.
Dark World
You can walk straight up to try to fight the Cloud of Darkness, but it's not recommended. First you should enter the four corners to fight four bosses, each of which guard a Dark Crystal. The warriors from the Crystals will weaken the Cloud of Darkness when you do fight it. Also, each corner has a chest containing a fight with ZandeCln and a Ribbon. Since you already have one Ribbon, and I don't recommend giving Ribbons to the Ninjas, you should only pick up one of them. You can tackle them in any order; we'll head to the upper left first.
Here, take the left secret path and follow it left, down, and left. Head up and get the chest for a fight with ZandeCln and a Ribbon. ZandeCln is a weaker version of Zande, which means he'll attack once every two rounds. However, he also uses weak attacks besides Meteo, like Quake and Flame. He has 10000 HP. Try having a Sage attack him with the Golem Rod; sometimes it works and he'll be dead by the next round! 8-) Have the Sages use Bio or Quake, have the Ninjas attack and it'll be over fairly soon. You'll get 1150 Gil and 850 EXP when you're done. Give the Ribbon to whichever Sage doesn't have it. Now go back down and enter the secret passage to the right. Follow it all the way right, up, right, up, left, and up to enter the staircase. Heal up with your HiPotions and then walk up to start a boss fight.
BOSS: CERBERUS, 23000 HP; 6400 Gil, 1500 EXP
In this and the other three fights, it's up to you whether or not to use your Shurikens.
I recommend saving at least 10 of them for the final boss fight. Have the Sages cast
Haste on the Ninjas. Cerberus's only attack is Thunder, a relatively weak multi-attack.
Have one Sage cast Cure4 on the party every turn, have the other one cast Baham or another
strong spell. After you beat him, walk up to the crystal and press A. Now make your way
back to the main Dark World screen. This time, we'll try the lower left.
Here, walk all the way down to enter a secret passage; follow it left. You know how you pass through a blue block every so often in this passage? At the block just to the left of the staircase you see below you, head down to reach the piece of land where the staircase rests. Take the staircase, then use HiPotions to heal up. Walk up for your boss fight.
BOSS: ECHIDNA, 32000 HP; 7000 Gil, 2000 EXP
Have the Sages cast Haste on the Ninjas first round, then acting accordingly: If she
petrifies someone, have one Sage use a Soft while the other one casts Bahamut; if she uses
Quake, have them both use Cure4 on the party; if she uses Drain, have one Sage heal and the
other one use Bahamut or another strong spell. Once you beat her, go up to the Crystal and
press A. Now make your way out back to the main screen of the Dark World. Now we'll go to
the lower right.
There's a secret shortcut here: go up (or down) one step, then head right all the way to the staircase. 8-) Enter for your boss battle.
BOSS: AHRIMAN, 35000 HP; 7200 Gil, 4000 EXP
This guy only uses multi-attacks, but some are weak and some strong. If you're not using
Shurikens, have the Sages cast Haste on the Ninjas first round and then have them use
Cure4 on the party every round. This will likely be one of the toughest battles
strategically that you've had yet. If you only use Shurikens, it can take between 6 and 10.
Good luck! When you're done, go up to the Crystal and press A, then go back to the main
Dark World screen.
Finally, we'll head to the upper right.
Here, head up for a little bit. Look at the wall to the right. (Man, they're tricky!)
You'll see a dark spot on the RIGHT side of the wall (which is four blocks wide). Go right
through the wall at the same horizontal level as that spot is; it's a secret passage. Now
go up again and do the same thing a few steps up. The staircase to the boss fight is right
here.
BOSS: 2-HEADED D, 29000 HP; 6800 Gil, 1750 EXP
This is really tough. Don't cast Haste. All this guy will do is use a crazily strong single
attack every round. If your Sages are alive, have them cast Life (not Life2!) on the
dead character; if they're not, use a FenixDown. If both Sages are alive and there's only
one casualty, you can let the extra Sage cast Baham or another strong spell. Now's a good
time to use any Shurikens you have over 10! Keep resurrecting any dead characters! (This is
important because even if that character can't move yet, the Dragon should have as many
targets as possible.) Good luck! When you win, go up to the Crystal and press A. Now heal
any characters in critical condition (you'll probably want to use a Cure3 or two for this,
as the HiPotions will take way too long and too many). When you're done, hightail it back
to the main Dark World screen. Enter the center door, but it's not over yet! There's one
more maze to work through.
First walk up to the second square, then right all the way, up, right, up all the way, left, up at the intersection, right all the way, then up all the way and left to enter the final piece of land. Go up the staircase. This is it, man! My view is that you should use magic to heal up now, then give the Sages Elixirs to refill their magic. Now walk up and into the center room. Walk up for the final battle!
FINAL BOSS: DARK CLOUD, 65000 HP (each Dark Warrior you rescued takes off an additional 5000 or so HP)
Obviously, go all out here. Use all your Shurikens (make sure you reequip every round).
Have the Sages cast Haste on the Ninjas the first round (if you have 14 or more Shurikens,
you won't have to do that); after that, you'll probably have to have them cast Cure4 every
round. If it seems like you have a round of respite, cast Baham. If you run out of magic,
use Elixirs. Keep plugging at it and good luck!
|
|