
 |
|
|
 |
Trials of Truth and Wisdom
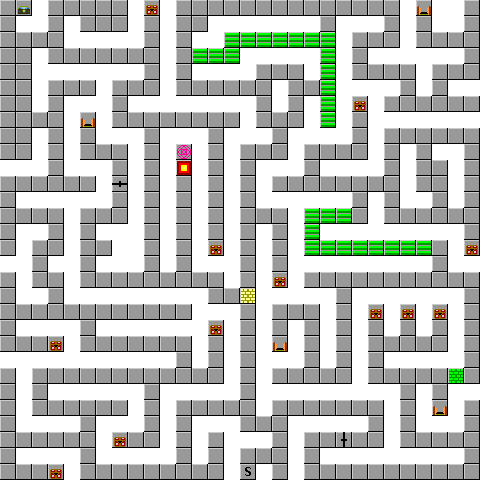
Back at Level 1, go to Coordinates (16, 20), use the Orb of Truth to reveal a Grim Wall. Pretty tough to start out with. Grim Wall is pretty tough, for now. It has about 60 HP, and can take out quite a bit of HP. Use a few spells and it should die within a few rounds. The Wall will disappear and a new area is open. The monsters here are the toughest on Level 1. Be careful of the slime, and try to avoid it. At Coordinates (27, 1), there are stairs that lead down to the Cave of Truth, making sure you are at around Level 16-17.
This Cave only has 1 floor, so no pesky stairways or trap floors. But, the new Water monster, the Sea Stallion. They have 100 HP, and is a hard hitter. The Chestbeaks are gone, and Ghost now haunt treasure chests. They are even stronger than Chestbeaks, and are harder to kill. Also, as a new introduction, are the Spinners. They rotate you 270ş from the direction you are facing. They take a bit to get used to. Grab the treasures here. There is another Chainmail and Wood Staff here. At Coordinates (26, 19) there is a False Idol. Make sure to grab it.
A little bit after the 4th spinner, there is a huge open area, or so you thing. I have the walls marked off, so that you can find the real pathway. Go east and to the false alter. Use the Orb of Truth to remove the wall. Continue until you hear a voice that says 'Woe is Me'. Turn to the Cell and the woman will say that she is Jessa. She asks that you put the False Idol into the Niche just a little further up. Just go up a bit and place the Niche in. Head back to Jessa and find out that it is not Jessa, but a strong monster named Doppler. It is not to tough to kill, but can hit hard. Kill it, and go a bit beyond it to get the Rune Key. Go a bit further. At Coodinates (28, 9) there is a Battle Axe. Give it to Milo. Go a bit further and the Alter is there. Enter the door and you will be right outside the Cave of Truth.
Rest at the Tavern. Update the equipment again.
Hiro: ![]()
![]()
![]()
![]()
Milo: ![]()
![]()
![]()
![]()
Pyra: ![]()
![]()
![]()
![]()
Hopefully, the Weapon shop now has the Thron Whip for sale, and the Armor Shop now has the Wood Shield for sale. If not, have Pyra with the Wood Staff, and have the other hand empty. The Thorn Whip is pretty powerful, and can put a hurting on a group of monsters. At Coordinates (8, 12) you can use the Rune Key you found in the Cave of Truth to enter the Cave of Wisdom, making sure that you are around Level 20 before entering.
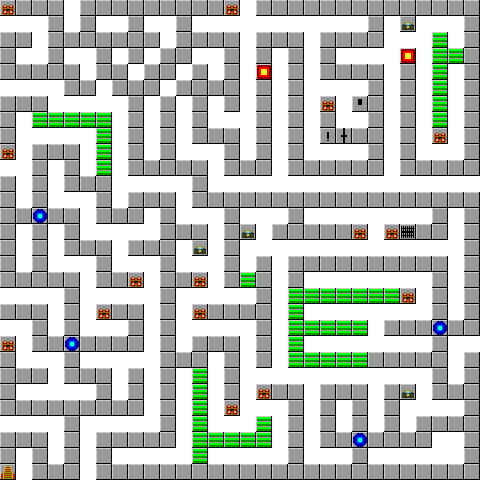
This cave will definatly be the toughest yet. If you have the Thorn Whip, this will be much easier. Keep an eye out for trap floors that appear out of nowhere. The monsters are tougher again, but nothing you cannot handle. When you reach the first 4 way crossing, go left and take the first right to recieve Map 1, which will show the trap floors in that area. Get past the area, and take the trap floor at Coordinates (5, 13). You should now be at the bottom floor. Take the treasure in that room, which is a powerful Fire Sword. Take the stairs back up and grab Map 2 from the chest in the area, before taking the door.
At Coordinates (9, 27) there you will meet Dai. If you have been following the storyline, Dai has been chosen to enter the trials. He seems to need help, so he joins up. Dai, like Gila, will attack once in a while, but will not be nearly as strong. At (17, 7) you will find a Steel Saber. If you do not have a Thorn Whip, give it to Pyra. They are both equally strong, but the Steel Saber does not attack a whole group. Use Map 2 to reveal traps in the 2nd large part of the cave. Make sure to get the Dark Block. Take the trap at coordinates (18, 10). Follow to the stairs going back up. You now have a couple of treasures left, one of them is the Mithril Ore. Find the Alter and finish your last Trial.
Once back in town, you will notice a Trader's Shop open. Hey has new and better equipment, and can forge equipment from Mithril Ore, or a Dark Block. Use the Mithril Ore you found in the Cave of Wisdom and have him make a Shield for Pyra for 10,000 Gold (sell some stuff, including the Wood Shield, and you should have enough). Exit town and come back to recieve a Mithril Shield. Give it to Pyra. Go back to Castle and you will notice the Melvyl has ran out. Interesting. Update equipment to this:
Hiro: ![]()
![]()
![]()
![]()
Milo: ![]()
![]()
![]()
![]()
Pyra: ![]()
![]()
![]()
![]()
For now, this should be enough. Enter the tavern and see a funny scene. Rest up and return to the castle. They will congradulate Hiro on passing the trials. Now comes the tough part. Be around Level 22 before going further.
|
|