
 |
|
|
 |
Deanna, Jaha, Eric, Slade, May, and Chester are on the ship trying to discus a way to control the ship. Jaha says that if Natasha was here, she would know what to do. May then tries to stop it, but a Bishop appears and announcese that it was a trap to seperate the Force. He then summons monsters to attack. Battle #11
Well, now with only 6 characters, it should be easy to Level up a bit. You shouldn't have any trouble getting everybody to Level 15 (or Slade to Level 20). When you get everybody to Level 15, Egress and Promote Jaha, Eric, and Chester. And when Slade hits 20, Promote him as well. Leave Deanna and May as they are, and wait for them to get to Level 20. (Note that when you promote Slade, doesn't he look somewhat like an Arab? Nevermind). Anyways, let Deanna and May kill all of the monsters to move on (even though the Promoted 4 can get good experience off this). After the battle, Claude comes to see if this group is ok. It seems so. He says that the other group is on their way to Iom, and then he joins the Force. He says that they will land at Port Demis, and then go to Algam Fort. You arrive at camp with NEW WEAPONS. Although at this point, Deanna cannot pick up a Broad Sword, unless you promote him early. But pick everyone else up a new weapon. If one of your fellow group members have the Running Pimento, use it on Claude. Do what you need, save and exit camp. You are now in the fields that lead to Algam Fort. Claude says that the ground is volcanic, so watch your step. Just then, a Sorcerer comes and starts his move. Battle #12
I hope you used the Running Pimento on Claude. If you didn't have it, then this will be harder than it already is. Remember to try to let Deanna and May take most of this battle to get them up in Exp. You can have everybody else weaken them enough for Deanna and May to kill them in 1 hit, which is what I would do. Get both Deanna and May up to Level 18 before killing the Sorcerer (which may take a while, considering an HP of 64). Kill the Sorcerer to continue. The Sorcerer will die, but after he does, holes start to form and the party falls in a huge hole... Could it be the end of Deanna? But meanwhile (cliffhanger, isn't it). Natasha's group hurries towards Algam Fort to save Nick. The group debates what to do, but Sarah says to climb the cliff. So they start to climb. Battle #13
This is not an easy fight, but then again, it is not tough. Remember that Natasha is in Deanna's spot right now, so if she dies, you lose. Hopefully, you have Dawn with the Power Spear. If not, this will be a bit tougher. Climb the first set of vines and go right across the bridge. Kill the Sketelons and the Pegasus Knights on the other side. Climb the vines all the way to the right and remember to take it slowly. I would level everybody up to Level 15 here. Luke should already be at 15, Randolf already promoted, and the other 3 should not be far behind (13 or 14). Egress (if you do not have enought MP for Egress, hopefully you have somebody on your team who has the Quick Ring) until everybody is at 15 and then Promote Dawn and Graham. Kill the Lizardman to continue. After the battle, from the town comes a Gladiator. He said that he knows the secret to the weakness of Algam Fort, and joins the Force (name is Rohde). You camp up. New weapons, just like the other party. Get new weapons, save and exit. The Force will move from a rope and drop down to the top of the Fort. Rohde says that the weak point of the fort is the top. They then look down and hear a Lizardman and a Bow Rider talking about Prince Nick being the next sacrifice to Iom. Sarah then yells out 'What?' and the group is discovered. Battle #14
Keep Natasha away from the front, but enough so that she can gain some levels. Just have Natasha and Luke kill the monsters. This will give them the experience they need. The others are already promoted, so do not worry about them yet. The best way to win this is to go straight down to the bottom and work your way around to the left. Work Natasha and Luke to Level 18 before moving on. Kill the Sorcerer (watch out for his Freeze 2), and move on. The Sorcerer mentions Solo as the leader of the Fort. Sarah says that he is the one to get. Once you enter the fort, however, the group cannot see anything. A Deadly Born then speaks and says that you have to get through him before you get to Solo. Battle #15
Well, some would call this battle pretty tough, but not me. Tough, yes, but I at least get you to Level 18 before stepping up. Only 3 monsters? Not really. After a couple of moves, 2 Zombies will appear. GET RID OF THEM, FAST! They are now equipped with Power Rings, which make them even stronger. And they can still poison. Blaze 3 can take out about 17 HP out of the Zombies. After a while, a Bow Knight and another Zombie will appear. Dispose of them. Also be sure to dispose of the Sorcerer quickly that comes down. If you split up the group like I did (Randolf, Natasha, Luke to the left, the rest up), then you can grab the Protect Ring and the Demon Rod. After a while longer, 3 more Lizardmen, a Zombie, a Bishop, a Sorcerer, and a Bow Knight will arrive. Your biggest worry is the Sorcerer. Kill it then kill the rest. Again, after a while, a Zombie and a Bow Knight will appear. If you get Natasha and Luke to level 20, do not Egress and Promote, or else you will have to start this whole thing over. Give Natasha the Protect Ring, and then go after the Deadly Born (in which a Bow Knight and another Bishop might appear again). Kill him and end this long battle. Sarah will say that it was a tough battle, but you don't think it was that hard, do you? I didn't even get killed once, nor did I Egress. Sarah says that they must catch up with Deanna in the Algam fields. You then go back to Deanna's group. Remember, the fell into the hole? Well, they are working their way to the Algam fields. They are in a cave surrounded by lava. A Hawkman talks with is troops and tells them that the Cypress Army is in the area. So they attack. Battle #16
Not too tough, I believe. Another thing to believe is that Slade has one of the highest attacks in this group (I had him with an attack of 45). After a couple of rounds, a piece of land will break off, meaning you have to find another route. Continue on for a while and another piece will break off, making you take a longer route. When you get to the end with the Hawkman and the Bishop. Have May and Deanna kill them. You should be able to get them both to Level 19. Although that may do very little against the Hawkman, who can take a lot out of anybody. Kill all of the monsters to continue. Mayfair then realizes that they have hit a dead end. She then sees light from a hole in the ceiling. Then, the same voice from before calls again. He lowers the rope and says that he will reveal himself later. The climb up the rope and meet the other group. The Shining Force is back together! Sarah then says to set up camp. Sarah will also join the fighting force. Here is what you want to do. Replace Eric with Randolf. Randolf will be much better, and Dawn is stronger than Eric. And replace Jaha with Rohde. Rohde should have a higher attack and defense rate. Save and exit. Outside, Mayfair will say that they are on the field that Prince Nick was captured on. The monsters are talking about ambushing the force, but another comes and says that the ambushing group has been destroyed. They are told to stall the Force to prepare for battle at Iom Castle. Battle #17
Give Deanna the Quick Ring. That way, if he runs out of MP, he can still use it to Egress. This should be the battle where you get the Luke and Deanna to Level 20. Kill the Deadly Borns until they both reach Level 20, then promote them. After that, have Natasha and May kill the tougher monsters. I didn't get Natasha or May to Level 20 at this battle, but they were around 19. Also, have Slade and Sarah keep using Heal to gain Exp. When Sarah learns Aura, have her use that. She will gain 25 Exp for each time she uses it. Anyways, this battle is not too tough. Once you get to the top, kill the Cleric immediatly (he can cast Heal 4, which is always a pain). Have Natasha and May kill the Cleric and the Ghoul (though you can weaken them enough so that they can kill them). Kill the Ghoul to continue. After the Ghoul is defeated, it will say that Ballon will avenge their deaths. This is a typo, as it means Death Ballons in the next battle. The Force then goes to camp. Save and Exit. Barbara will then doubt Solo's power. They then have a little battle against each other. After a while, Warderer and Hindel come out and end the fighting. Hindel asks about the revival attempts on King Emild, which worked well, but Warderer is bothered by something else, a traitor to the Iom ranks. Hindel then asks if he knows who it is. Just before Warderer is about to say who it is, Barbara spots the Cypress Army. Solo stays while the rest leave. Mayfair orders the Force to go after King Iom (Warderer), but Solo puts a stop to it, thus starting a fight. Battle #18
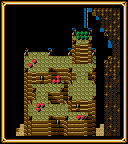
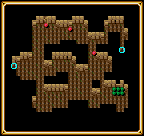
There is a lot of treasure to find here, and all of it is worth it. First thing you do is have Deanna search the wall in front of him. Higins will pop out and ask that you find him again. You have to go a while to find him, but search the middle-left pillar at the top level in the middle (see the blue circle), and you will find Higins again. And this time, he will join the force. Egress and put him in while removing Luke. Anyways, have May and 5 others go right to tackle the Cerberus. Make sure that she kills it (Freeze 3 works good on it), and have her reach Level 20. Have Natasha and 5 others go right to tackle the Ghoul. Make sure she kills it (Blaze 3 works the best on it), and have her reach Level 20. When they do, Egress and Promote. After a while, somebody will speak and reveal a Death Balloon. Solo will wonder who it is as well. These things will explode if attacked. They give good experience, but I just left them alone. Anyways, what I did was have Claude fly and grab the Critical Sword and the Running Ring, giving them both to him. I also had him fly a kamikaze mission to find Higins at the pillar near Solo. I also split up the group and sent them left and right. It doesn't matter who you send, just make sure it is balanced. Work your way to the middle near the top. Give Rohde the Heat Axe, Randolf the Halberd, and Higins the Running Ring. Once you are ready, go to the top part and start to tear appear the last of the monsters. Make sure to rid of the Cleric, as it is a real pain to have him casts Heal 4. Once Solo is left, have Claude, Dawn, Randolf, and Rohde surround him. Have Graham and Chester shoot from 3 spaces out. Have Slade and Sarah stand back waiting to heal, and have the rest use their best magic attack. That should kill Solo in no time, though do watch out for his Bolt 2 attack. Before Solo dies, he looks at Deanna in surprise. And then he said that he knows who is the traitor. The Force leaves but Mayfair stops Deanna to ask if he knows if he knows the traitor. And this ends
Save and Continue |

|
|