
 |
|
|
Bosses
Boss #1: Kalivos: The sealed Monster weapon
Hp: Body: 400
Claws: 200(right and left)
Strategy: Not much to it. Beat the crap out of him and you'll win.
If you care to risk it you could go for his claws for bonus EXP.
I strongly recommend that you don't. His normal attack is easy to deal
with; it does around 15 Hp in damage. Where as his laser attack once you slag his
claws does around 25-30. If you make one mistake in your judgment you'll be
dead. If you are going to go for his claws, then make sure you've beaten his
main body down to one hit until death. Otherwise you'll be in for a bumpy trip.
Boss #2: Gremalkin: The Parasite Colony monster
Hp: Gremalkin: 480
Belly: 200
Strategy: Again..not much to this fight. Just use your lock on ability combined
with your bazooka. Keep your hps up and destroy the belly for extra experience.
I hope that you didn't waste your ammo because if you did then you are going to
have a slightly more difficult time wasting this boss. If you did waste all of
your ammo just beat away at him and keep your Hps up.
Boss #3: Olivier: The Boundless Glutton Monster
Hp: Olivier: 300
Legs: 220
Strategy: This fight is the hardest of the three intro battles. Keep your eye on
Lilka's HP. Olivier has some pretty brutal physical attacks and if you aren't careful
he could finish off in just a couple of blows. The key to this fight is your magic.
Use your fire based spell on the top half and your ice based spell on the bottom.
Boss #4: Gaonim: The escapee capture robot
Hp: Gaonim: 2000
Claw: 1000
Strategy: This boss is exceptionally easy. Just beat away at him with Lilka's magic and
Ashley and Brad's ARM attacks and you'll have him beat very quickly. The only thing that
you have to worry about is Lilka's HP level. As long as you keep it high and have the
Personal skills I suggested to you in the walkthrough, you should win this fight with
barely even an effort.
Boss #5: Vagesta: The Mysterious Phantom being
Hp: Vagesta: 2,500
Claws: 1000(right and left)
Strategy: You should hopefully have picked up some Medicine before you either left
Valeria Chateau or before you left Damzen. This boss usually causes the disease
status effect like there is no tomorrow. Fortunately the attack misses extremely
often. Don't bother using ARMs since he uses his "distortion" tech to make himself
invulnerable to attacks for one turn. To counter this, just keep on beating away at
him watching your HPs if need be. Have Ashley use "Accelerator" plus attacking and
Brad just keep on beating away. When she isn't healing have Lilka use her Crest magicks.
This fight is easy...exceptionally so.
Boss #6: Ptolomea: The Special Cocytus Squad member
Hp: 3000
Strategy: Contrary to how POWERFUL the music makes this w33ni3 sound...he's not
all that powerful. His one dangerous attack is the "Ptolomea Dynamite" attack.
Have Lilka act as a healer and have Ashley and Brad beat away at him with ARMs
and normal attacks. If all of your characters are low on HP, have Lilka use her
Mystic ability and combine it with a heal berry. That should heal all of your
party members. Just keep on attacking and you'll have this guy defeated in
no time at all.
Boss #7: Elebart: The Thunderbolt battle monster
Hp: Elebart: 2,500
Claws: 1,200(right and left)
Strategy: Another pathetically easy boss. His attack is high but that is just about
his only advantage. Have Lilka heal. Don't waste her ability to heal using her
mystic skill. Just have Ashley and Brad take out his claws; because to really
damage you he needs his claws. Once his claws are gone and he is substantially
weaker...just finish him off with ARMs and attacks. He'll be down very quickly.
Boss #8: Trask: The Poisoned Dragonoid monster
Hp: Trask: 3,600
Crystals: 1,800
Strategy: This is starting to seem like a pattern. Strong bosses with high Hp that
have such a low level of speed it takes the whole difficulty of the fight away.
Use mystic and item combinations to heal and restore status ONLY if you absolutely
have to. Wasting FP isn't something you want to do. Considering Lilka is your healer
you don't want to waste FP with her. Anyway...just use the same old beating away with
ARMs and physical attacks and healing when need be....and you'll do just fine.
Boss #9: Trask: (refer to last Trask you fought)
His statistics are Identical to his previous statistics....
Strategy: One on one fight do the death! Knight Blazer Vs. Trask. Ashley's statistics are
doubled in this form. Something tells me whoever programmed Knight Blazers looks and
attack had been watching the movie "Gayver" and decided to st34l Gayver's looks and
attacks. Just fight and use Heal berries when necessary....your new techniques will be
very...very strong...! So just attack until your FP is up to snuff then use the attacks
and you'll win the fight eventually.
Boss #10: Undiness: The Elemental Spirit
Hp: Undiness: 4000
Belly: 2000
Strategy: Hang onto your ammo. Don't waste it against this guy. DON'T WASTE ANY
OF IT!
Beat away at him with Lilka as your DEVOTED healer. Unless you are at full health don't
risk using her to attack. This guy's Hooka dust attack could hurt you pretty badly so
don't waste your time. Heal right away. He's incredibly fast so don't waste time between
being attacked and healing. Have Ashley transform into KnightBlazer when you get the
chance.
Keep your Hps up and ready to heal and you should do fine.
Boss #11: Liz and Ard: The Lead Science researcher LIZ and his assistant ARD
HP: Liz: 2000
Ard: 3000
Strategy: This fight is pathetic. Ard is very strong, but he has low HP. Liz has even lower
HP and is an idiot. Sure he's a scientific genius but he throws "homemade bombs" which
hurt
not only your party but himself and Ard as well. If you followed my instruction in the
Undiness strategy
you're ARMs will be full...time to pull out all the stops. Lock on with Brad and fire...keep
on firing
with both characters until you are out of ammo. Lilka will be your healer as well as a
fighter.
Have her pump out as much offensive magic as she can, healing when necessary. This is
easy.
Boss #12: Alphael: Progenitor Bird with Wings of Light
Hp: 5000
Legs: 2,500(right and left)
Strategy: If you invested in the Personal skills I mentioned in the walkthrough, then this
fight
will be even easier then it should be. His HP is high but he is very slow and very weak. If
he
does attack, Lilka can easily heal it. Once you bust his legs, he'll switch tactics and start
using
a group attack. To counter this, you can either use mystic or have two people heal. In any
case, have
Ashley transform into KnightBlazer and Brad use his lock on tech plus ARMs. With that
said this fight
should end without any real trouble.
Boss #13: Reguleus: Compound Plant Monster
Hp: 5000
Strategy: Go all out. Don't hold ANYTHING back. Just keep on hitting him as hard as
you can and
he will fall quickly. Just pummel the heck out of him while keeping your HPs up and you'll
do fine.
This is one of the easier boss battles. If you put everything you've got into to slagging his
@$$
this fight should be no challenge. Oh...status effects are one of the most common things in
this
fight. Just keep status restores on hand....oh and you'll be unable to refill your ammo
before the
next boss...and the next boss Ashley and Co. fight is a doozy so you should hold onto at
least half
of your ammo or refill it with a bullet load. Because if you don't have enough ammo for
your next
boss battle...you will fail...that is not a maybe...YOU WILL FAIL! The up coming boss is
very powerful.
Boss #14: Gehenna Neros: The Transforming Ninja monster
Hp: 3000
Strategy: This guy is pathetic. He has an extremely low Hp rate. Tim is on his own but can
beat this boss in a matter of
turns. You should hopefully have earned first aid by this fight or during it because it is a
useful
tech for up coming fights. Once you have 50 FP just summon Grudiev(have that medium
equipped) and this
fight will be close to over if not over already.
Boss #15: Antenora: Special Cocytus Squad member
Hp: 6000
STrategy: This is not an easy fight. NOT EASY AT ALL!!! For a person who hates killing
people she
fights pretty damn well. She has a great deal of status effects. Have Lilka standing by to
heal.
Don't budge an inch. Hit Antenora with EVERYTHING you have! If you hold back at all
she'll beat
the living crap out of you. Have Ashley transform into KnightBlazer and Brad pummeling
away with
Lock on and his ARMs. If you let loose with everything you have while keeping your HPs
and your
status normal you should be able to win. The key word there is SHOULD if this strategy
isn't working
then try something else.
Boss #16: Judecca: Special Cocytus Squad member
Hp: 3,600
Strategy: I sure hope you took my advice and got the First Aid spell. Tim will need it. One
on One
with an Odessa member...not smart. Although this fight is easy...anyway...if you have First
Aid this
fight will be so easy it hurts. First Aid is a strong healing spell. Once you have enough FP
to summon
Grudiev AND still be able to heal yourself summon Grudiev for greater damage. Keep this
up and Judecca
will soon fall.
Boss #17: Blastadon: Explosive Red Thunder Toad
Hp: Blastadon: 6000
Pouch: 3000 (right and left)
Strategy: Well...after Four bosses...in a row...without ANY chances to refill your ammo
you are finally
facing the second to last one. Just use bullet loads if you have any. This fight isn't very
difficult. Somehow...
he's explosive...and weak to fire. Does that make sense to you? It sure doesn't make any
sense to me.
Anyway...Lilka gain functions as healer and attacker. Have Brad unleash whatever ammo
he has left combined
with his lock on ability. Have Ashley beat away until he is capable of transforming into the
KnightBlazer.
Once he does...keep on fighting until you've gained enough FP to use Banisher. Then
unleash that. Keep this up
while keeping your HPs up and you'll win this fight easily enough.
Boss #18: Ptolomea: Special Cocytus Squad member
Hp: 7,500
Strategy: This guy may hit you harder...but it's still just as easy as the last time you fought him. You don't even need to have any ammo left over because this guy is just that easy. All though if you aren't careful he will obliterate you. Just keep pounding away with physical assaults and KnightBlazer's Banisher and you should do fine. Keep your Hps up and keep on pounding away. He should fall rather easily.
Boss # 19: Liz and Ard
Hp: Liz: 3,500
Ard: 4000
Strategy: Yah...Liz is still an idiot. He diseases Ard. Why would you disease your own
teammate? Ah well...
Don't waste your ammo on these two buffoons. Just beat away at them while keeping your
HP up and using
KnightBlazer's Banisher tech. These two should fall rather quickly....and then Liz being
the little
twerp that he is brings in another monster for you to fight RIGHT after your fight with
them.
Boss #20: Trask version 2.0: Biogenic Draganoid
Hp: Trask: 5000 Crystal: 3,500
Strategy: Don’t waste your time going for a KnightBlazer transformation. Just pummel
him with ARMs. And he
will die faster then wasting it takes to build up enough FP to transform into KnightBlazer.
Beware because one of his attacks the
"Blink Around" tech can do up to or more then 1,000 damage. Too much for Lilka to
heal...and if he uses
it on Lilka she'll probably be dead. So just revive her or switch in Tim. Just keep your HPs
up and you
should do fine.
Boss #21: Kanon
Hp: 5,500
Strategy: Kanon is really fast. Her techniques are very powerful. Her normal attacks are
nothing much but her
Gat techniques are something to worry about. I hope that you have the second level heal
spell and the Quick spell
because it's a good idea to up everyone's speed to match Kanon's. That'll make the fight a
lot easier. Start
pummeling away with ARMs. You most likely have to the "Lock On" strategy memorized
by now so I'm going to stop
reminding you of it. Don't bother with Ashley being upgraded to KnightBlazer because
this fight should be
over before he can get any good attacks in. Accelerator is good for this fight so Ashley
can get in a
healing item before Kanon has a chance to kill that character.
Boss #22: Antenora: Special Cocytus Squad member
Hp: 7000
Strategy: Well...Bad ass Brad is gone for now...! He's gone for a loooooong while.
Anyway...
Tim is your replacement. You have no choice. Fortunately you have Ashley and his
KnightBlazer form which
more then makes up for Brad. Heck...when Brad was still on your team boss fights were a
bit stacked because
you had two power houses. Anyway back to strategy. Antenora is a little easier this time
around. Mainly because
you have Tim as a healer. You can now summon against her and Tim has his First Aid
spell so you can heal. First Aid ALWAYS
goes first so you should be able to heal yourself between her attacks. Cast Quick on Lilka
so she can get more
healing and status restorations in. When you have built up enough FP summon. Have at
least one team member equipped with
Odoryuk. Anyway...have Ashley attack so he can build up enough power to transform into
KnightBlazer. And then build
up enough power to use Banish. And keep this up while healing and she should eventually
die.
Boss #23: Caina: Special Cocytus Squad member
Hp: 7,200
Strategy: You want to die? She'll help you...it's not exactly a hard fight but if you're
not careful you'll find yourself
exceptionally dead. So remember...no one does ANYTHING involving fighting except for
Ashley. Well except for when you
need to summon Odoryuk. Then you should have whoever has that medium
equipped...make it to 50 FP while the other heals.
If you have it equipped on Ashley then you are not exactly intelligent...he has low magical
abilities. Equip to Lilka for
max results. Anyway...have Ashley build up enough FP to transform into the
KnightBlazer. Then keep on fighting until you have
enough FP for Banisher. Then use it and it'll either hurt her severely...or kill her dead...all
depends on how much damage you've
done. Anyway...repeat this process with an eye ON YOUR HP AT ALL TIMES...some of
her attacks are very, , dangerous.
Boss #24: Kanon
Hp: 8000
Strategy: Again with the green haired cyborg freak lady. Anyway...fight!!! Again keep
your HPs up. Don't waste your time with
Ashley's Bayonet attacks. Just fight until you have enough power to transform to
KnightBlazer. Your "Hot fencer"""Hot fencer"" attack with the
KnightBlazer is effective, as is Banisher. While Lilka uses spells such as shield and quick
when she isn't being used as a
healer. Tim should summon when he can but his main duty is healing. Just keep this up
and she will fall before your almighty
1337|\|355!!!
Boss # 25: Kanon
Hp: 9000
Strategy: Again...why won't she just go away? Reasons...if you haven't figured them out
yet you'll know at the end of the fight.
Anyway...this is the final battle against her. Same strategy as last time. Just have Lilka up
her own speed for a better chance
of healing.
Boss #26: Judecca: Special Cocytus squad member
Hp: 5000
Strategy: It's another one on one. Anyway...you've got to be careful in this fight. Its one
on one and Kanon doesn't have Personal
skills. You'll have to use berries to heal which are quite rare. Basically all you have to do is
fight and heal when necessary. And
an attack you should watch out for is his "Miriam" tech which does over 700 damage.
Then there is his "Douglas" tech which might
cause paralysis....which pretty much ensures your defeat. Anyway...just keep your HPs up
and hit him with everything you've got
and you'll probably come out on top...if you don't...do it again.
Boss #27: Liz and Ard
Hp: Liz: 4,500
Ard: 5000
Strategy: Ok...Tim is more of a hindrance then a help in this fight so have him on the
side lines. Ard's strength is way higher
then it was at your last encounter. But Liz being the nimrod he is poisons and diseases
Ard. His Bombs are stronger then before
and Lilka might be knocked out of the fight due to her low HP...DON'T LET THAT
HAPPEN! Her healing skills are vital to this fight.
Her Hi-Heal is a very powerful healing spell and will be very useful in healing your Hp. I'd
suggest using one of the two "carrot"
type items to up Lilka's FP. That way you can reach a the level needed to use Hi-Heal
faster. Have Ashley transform and fight...while
he builds up enough power to use Banisher have Kanon pummeling the snot out of one of
the two with attacks and Gats (if you have any).
This will be somewhat difficult but you should win.
Boss #28: Arms Killer: Robotic Monster assassin
Hp: Arms Killer: 8000
Claws: 3000
Strategy: Be prepared for intense pain. This "Robotic Monster assassin" can dish out over
1000 HP of damage. Kanon is good for this
fight for her Gat attacks. Ashley should as usual go for KnightBlazer and then Banisher.
Just keep Lilka healing. If she doesn't have
enough FP for Hi-heal...use normal heal. Just keep your Hps up you should win this fight
without much trouble.
Boss #29: Fake Brad
Hp: 5000
Strategy: This is incredibly easy. Just keep your HPs up and use Lock-On and your
strongest ARM. Yes you guessed it. You're in control
of Brad again in a one on one Brad vs. Fake Brad. This fight should be a breeze. I beat it
without even healing.
Boss #30: Drawdo: Shapeless slime monster
Hp: 9,600
Heads: 4,800 (right and left)
Strategy: Have Ashley fight until he can transform into KnightBlazer. You know the drill
by now. Have Brad use Lock On with his brand new
ARM. Rail-Gun. Rail-Gun does one Hella big amount of damage. Anyway...this guy does
a great deal of status effects. Have Lilka standing by to heal both HPs and various
status effects. If you don't have the spells "Restore" or "Hi-Heal" by now then you are
basically screwed because bosses do more damage then
"heal" can restore. Anyway...if you followed my walkthrough then you should have these
spells. Oh and by the way...this boss can put people
to sleep. Casting "Rise and Shine" on Lilka and the others will keep them from falling
asleep. This is handy since Lilka will be needed at all
times to restore HP and status.
Boss #31: Caina: Special Cocytus Squad member
Hp: 18,000
Strategy: Use the same basic strategy as last time. Go for KnightBlazer while Brad
unleashes all of his ammunition. Lilka heals and that is
pretty much all there is to it. She has a great deal of HP but she's still a push over.
Boss #32: Prisnum: Humanoid Mirage
Hp: Prisnum: 9,500
Chest: 9,500
Strategy: This is an easy fight. He does less then 1000 HP of damage so it is easy to heal
the damage he inflicts. Use our same old strategy
which I have been drilling into your heads for 22 bosses. While Brad uses his ARMs
combined with Lock On Ashley goes for KnightBlazer and
Banisher. Prisnum should fall rather quickly...don't waste all of Brad's ammo though.
Boss #33: Antenora: Special Cocytus Squad member
Hp: 16,000
Strategy: She is basically the same as before. Except she is fully capable of obliterating
most of your team mates in one hit. Your strategy should as usual be to go for Banisher
with Ashley
and for Brad to unleash EVERYTHING!!! Don't hold back a thing. She is the most
dangerous member of Cocytus. Just pummel the living hell out of her.
Cast Rise and Shine on Lilka so she won't start sawing logs from Antenora's status effects.
As before Lilka will be casting healing and status restoring
spells. This fight will be difficult but you should win.
Boss #34: Belleclaire: Explosive Emperor Monster
Hp: Belleclaire: 9,600
Drill: 4,800
Chest: 4,800
Strategy: ...All I have to say is GOOD FREAKING LUCK!!! This bastard may have a low
amount of HP compared to the bosses you've been facing but....
this guy hits harder then most previous bosses could...combined! He can hit for more then
3000 damage. His drill does 2000 or more but if you slag that
he'll use his 3000 and higher attack more often...to be blunt you NEED LILKA...although
she will almost ALWAYS die in one hit. Lilka heals and uses her
shield spell. Which is her only hope of survival against most of his attacks. Except for his
most powerful attack "Megaton" which always does 3000 or more...I really hope
that you have a large supply of full revives. You'll need 'em. Go for Banisher and Rail gun.
Due to the intense damage of these attacks he may fall in a
few hits but your only damn hope of winning is to survive his attacks! If you don't pull
these attacks off fast enough you will die a flaming death. And
you'll have to start the fight all over again. On the bright side he gives you 10,000 EXP.
and Gella.
Boss #35: Ptolomea: Special Cocytus Squad member
Hp: 20,000
Strategy: The same strategy as last time. Keep your HPs up and use Bazooka and Lock on
while goes for Banisher. Lilka is your healer. This fight isn't hard
or easy. If you make a mistake you'll all die. Just watch out for the "Ptolomea Dynamite";
it does 1000 or more damage to all characters. His "Iron Sword" does
1300 or more damage. Lilka can easily heal this if she is using Hi-Heal. Just keep your
HPs up and beat away at him and you'll come out on top.
Boss #36: Jasoul: The Aggressive Poltergeist
Hp: Jasoul: 9,200
Claws: 4,600
Strategy: A trained chimp could win this fight. If Tim has learned the "Turn Undead" spell
this fight is a piece of the proverbial cake. This can destroy Jasoul in ONE HIT. You learn
it from Odoryuk.
If not...just fight him normally...By normally I mean conserving your ammo. Don't waste it
considering you have the last Diablo Pillar coming up and your
final face off against Judecca. For the most part Jasoul uses a 300 or more damaging
attack. He has another attack which does 1000 or more and his final
attack which can do more then 3000 damage. Thankfully he rarely if ever uses it.
Boss #37: Magmalizer: The Red hot Lava monster
Hp: Magmalizer: 9,500
Head: 9,500
Strategy: Sure...he's weak to Ice...if you are STUPID enough to use "freeze" or
"Hi-Freeze" then your death is you own fault. His "Mirror Coat" reflects all
magic attacks from him back at you. That is about it. Just follow the usual boss
techniques. Of course don't waste all of Brad's ammo. Because you have yet
to deal with Judecca.
Boss #38: Judecca: Special Cocytus Squad member
Hp: Judecca: 22,000
Strategy: Same as always. Just watch your Hps and pummel the living snot out of him. As
usual have Brad use Lock on and his most powerful ARMs. Have Ashley
go for KnightBlazer and have him inflict as much damage as possible before using
Banisher....that is about it.
Boss #39: Vinsfeld Rhamadanthus: The Leader of Odessa
Hp: 24,000
Strategy: This guy is as expected...no push over. If you put your guard down for even a
second you'll end up dead. Some people think that Tim's is too easily
killed to be of any use in this fight...I say otherwise. If you have trained Tim as I suggested
in my walkthrough then he'll be your most valuable asset during
this fight. Vinsfeld can use an attack which does 1000 damage or more and might cause an
instant kill. If you've got the Personal Skill that avoids Instant Kill
then you'll be fine. Aside from Caina's "4d Hypo Blast" that is all he's got. Pummel the hell
out of him and he will eventually after healing A LOT he'll fall. Tim
will be fully devoted to healing. If he gets an opportunity have him summon. Once Brad is
out of ammo he should summon as well. If you need stronger healing just
switch Tim for Lilka. That is about it.
Boss #40: Vinsfeld Rhamadanthus: The Leader of Odessa
HP: 12,000
Strategy: ONE on ONE! Vinsfeld Vs. Ashley. To be blunt...this guy is way easier then he
was...five minutes ago. With half the HP and all his statistics are lowered.
He does half the damage, only 500 damage with "4d Hypo Blast" and he tends to waste
turns with support spells. Giving you ample time to work your way (while healing
when need be) up to Banisher. Unleash Banisher then continue. By this time in the fight he
should be near death. This is not a difficult fight at all.
Boss #41: Caina: Special Cocytus Squad member
Hp: 16,000
Strategy: This is another one on one. Gold Knight Blazer Vs. Caina. For a warrior who
used to be formidable...Caina has gotten really weak. With your upgraded
Blazer abilities this fight is a br33ze. Don't waste your time using Blazer's latest attack. It's
somewhat...crappy. Sure it does good damage but it puts your HPs
down to one. Which will basically lose the fight for you. Just use Gun Blaze and Banisher.
That should finish the final Odessa battle pretty quickly.
Boss #42: Grauswein: The Nuclear Dragon
Hp: Grauswein: 8000
Belly: 8000
Strategy: This is a difficult fight. Ashley is unallowed to fight in this battle thus your
offensive battle is cut by half. More then that considering in all of my
times playing through this section of the game Ashley did in KnightBlazer mode the same
damage with an attack as Brad did with a shot from his Bazooka. Most people
will tell you to use Lilka for healing. But if you have trained Tim like I suggested then his
First Aid will be more then able to cover the damage that Grauswein does.
Only use Time after Grauswein uses an attack that damages all. Anyway...hopefully you
have a good amount of Kanon's Gat attacks. Because she is your second most powerful
fighter next to Brad. If you don't have her stronger Gats...this fight is GOING to hurt you.
After a long battle of attacking when you get the chance and healing whenever
even remotely necessary you'll have won....hopefully!
Boss #43: Grauswein: The Nuclear Dragon
Hp: Grauswein: 8000
Belly: 8000
Strategy: This time it's once more Ashley on his own. THE ONLY WAY YOU'LL
STAND A CHANCE IN HELL IS IF YOU USE KNIGHTBLAZER! All other attempts
at defeating him will
end in failure. Keep your HPs up until you transform into KnightBlazer. Then while once
more keeping your HPs up unleash ""Gun blaze"" once or twice. Then if he isn't dead
already finish him with Banisher.
Boss #44: Lombardia: Dragon Caliber
Hp: Lombardia: 8000
Belly: 8000
Strategy: This is an easy fight. Just keep your hps up and watch out for his "Dragonic
Blaster" attack. Use your strongest ARMs and Ashley's KnightBlazer abilities and
you'll do fine...fine nothing you'll kick his ass :P!
Boss #45: Wing Knight: Spriggan
Hp: Wing Knight: 9000
Shield: 9000
Strategy: Another easy fight. Lilka's attack magic is useless in this and the next three boss
battles after it. Have her act as a healer, and when healing isn't needed
switch her with Kanon so you can inflict higher damage. With Kanon using her Gats and
Ashley and Brad doing their usual attack patterns. Just switch when healing you are
in need of healing and you'll decimate this Knight....oh watch out for it's high level
elemental spells. You shouldn't have much trouble with those though. Just heal.
Bosses 46,47,48 are identical to this one but of another element. That is about it.
Boss # 49: Larva: The Encroaching Parallel Universe
Hp: Larva: 10,000
Mouth: 10,000
Strategy: This guy LOVES status effects. It's not a difficult but it is somewhat perturbing.
He rarely if ever hits you for more then 1000 HP of damage. His "Arc en Ciel"
attack is really annoying. It hits you with multiple status affects. At the start of the fight
cast "Rise and Shine" on Lilka so she is immune to sleep. Have her
go all out healing and restoring status. Do your usual insane amounts of attack.
KnightBlazer and Lock On or Boost with Brad...he SHOULD fall quickly.
Boss #50: Grodine: The Saucer Organism
Hp: Grodine: 10,000
Left Claw: 8,000
Strategy: Don't use any ammo. Kanon is a good replacement for Brad since she doesn't
have ammo to waste and her GAT skills are quite powerful. While Kanon uses Gats and
Lilka heals have Ashley unleash KnightBlazer and use Banisher when he gets the chance.
If you keep your Hps up then you'll do fine. This is a pathetically easy fight...
especially considering it leads up to the final group of bosses.
Boss #51: Manufestu: Terrible Guardian monster
Hp: Manufestu: 10,000
Knees: 5000 (left and right)
Strategy: Again...don't waste your ammo. Similar strategy to the last fight. With that
said...that is about it. Keep your Hps up and that is all there is to it.
Boss #52-54: Roots: Encroaching Parallel universe
Hp: 15,000
IMPORTANT INFORMATION: Ok if you are just using my Bosses section and not my
walkthrough I will inform you of a very important detail...right now! Against the three
roots you have to send three warriors. Each Battle is a one on one. I know what you are
thinking, "Oh no that diminishes my forces by half!" (well 3/5ths if you don't
have Marivel)!!! Anyway...Send Brad, Kanon and Lilka against the roots, in no particular
order. That leaves you with Tim to heal against the FINAL boss and Marivel
to assist in fighting the final boss....I hope you have a lot of Big berries etc.
Strategy: As Brad you can end this fight in just a few turns. You can work your way up to
100 FP and use Boost...with Rail Gun. You'll get 7000 or more damage with
this. Keep your Hps up and repeat...Praying to GOD that you don't miss...and you'll beat
him...oh he can cause a few status effects so keep some status healing items
handy....oh and when you aren't attacking or healing...DEFEND!!!
As Kanon...it’s a different story. Defend. Don't stop defending until you have the power to
unleash the strongest Gat you have....drop your defense only to heal and
to attack. Keep your Hps up and beat away. This is very hard.
As Lilka...you are in for the fight of your life. This battle is nowhere near easy. I'd say it's
one of the hardest battles in the game. As you did with Kanon you
should also do with Lilka. Defend. Wait until your FP is up to 100 then use Dual cast.
You should use a combo of an Attack spell and Hi-heal. When need be drop your
defense to heal. Or to restore your status one of the two. If you are lucky enough have
high enough HP to survive use Dual cast and two attack spells...Oooh! That is
about it. This will be a long and grueling set of boss battles. You are fortunate...these
battles are the brunt of the final battles.
Boss # 55: Kuiper Core: THE encroaching Parallel universe
Hp: Kuiper Core: 40,000
Shoulders: 20,000 (left and right)
Strategy: Tim is your all out most important asset in this fight. He heals everyone and that is good. He allows your team to summon...and that is good. Anyway onto the strategy. Have Tim heal...and do nothing else. Unless there is to much damage for him to heal. Then he should summon Odoryuk. Have Marivel (if you have her. I'm assuming you do.) attack and summon when she is capable of doing so...by summon I mean her Force Abilities. Have Ashley go for Banisher. That attack can finish the Core in a matter of turns. Considering it can do over 10,000 in damage. Just keep your Hps up and fight for you life.
Boss #56: Lord Blazer: The Blaze of Disaster
Hp: Hella big number...no I'm not going to tell you...IT'S THE FINAL BOSS!! Does it matter?
Strategy: This is one of the EASIEST final battles ever!(next to the final boss in FFX) You have all new skills. Refresh heals you. And the only other one that matters is Impulse. Although I think one of the other abilities heals you to the max I'm not sure. If you don't want this fight to take centuries then you will have to use impulse. The actual reason I didn't tell you his HP is it's really high. And I don't know the number. Hell I don't even have an estimate for you. Anyway...Impulse uses the power of people you know the attack Lord Blazer. In laymen’s terms they channel their "friendship" to you and you turn the intense feelings into a formidable attack. Keep your Hps up while waiting until you gain enough FP to use Impulse. (only if you Hp is high enough to survive his attacks) After seven or so uses of Impulse you will finish him off. And that is that. You have defeated the final boss in Wild Arms 2. Congrats. You beat the game you m00k!
Boss #57: Ghost: The Remaining Poltergeist
Hp: Roughly 60,000 at my closest estimate
Location: Fiery Wreckage
Strategy: Easy as pie, use "Turn Undead" as Tim and Ghost will fall in one blow.
Boss #58: Titanius: Steel Dragon from the bowels of the Earth
Hp: Unsure of actual number Mid to high ten thousands
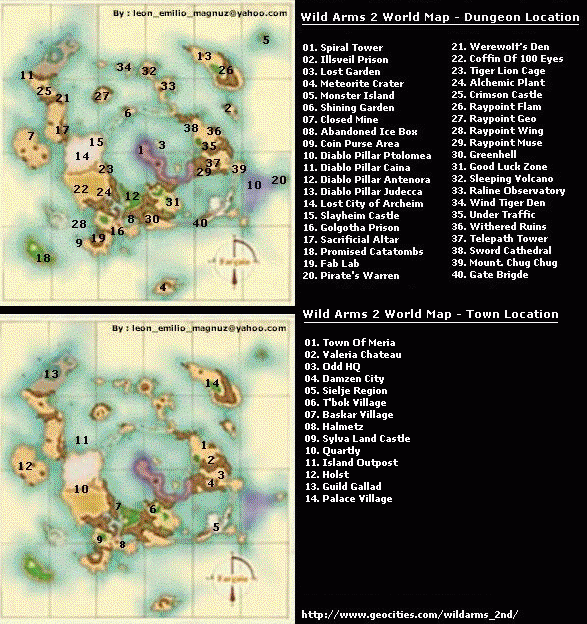
Location: Halmetz
Strategy: This fight can be either difficult or easy, all depends on what you are prepared for. You can either
prepare for a long and grueling battle or you can prepare for a short and simple battle. Titanius has a weakness for
Sudden Death attacks. So you can unleash all of your attacks which cause this effect.
Boss #59: Kobold King: The Kobold King
Hp: High ten thousands.
Location: Closed Mine
Strategy: This fight is insane. He has high Hp and has some incredibly strong attacks. His normal attack can do 1,500 damage, a critical
hit can do more then 3,000. His "Buried Alive" technique can do up to 2,000 or more damage to all party members. Kobold's ultimate tech
the "Tact less" can do more then 8,000 damage. Lilka will function permanently as your healer. Her "Hi-Revive" spell is your saving grace
in this fight. When Lilka is knocked out you will have to dive into your stock of revives. Keep Lilka alive to heal your team and lash out
with your most powerful attacks and Kobold should fall eventually.
Boss #60: Bulkogidon
Hp: Mid ten thousands.
Location: Fab Lab
Strategy: If you thought Kobold was hard...wait until you face Bulkogidon. If you aren't extremely high in level (mid fifties) you will fall.
Most of his attacks are strong enough to obliterate your team in one hit. My suggestion would be to use a "Full Carrot" on Ashley to up his
FP meter so you can use "Access". This is very important, because the "Gun Blaze" attack is does very good damage to Bulkogidon. In fact around
5-8 hits with "Gun Blaze" will kill Bulkogidon. Unfortunately you have to survive long enough to use it. Which is one hell of a task, Lilka heals
at all times...never let up with the healing spells.
Boss #61: Xenon
Hp: Low to Mid ten thousands.
Location: Slayheim Castle
Strategy: This boss is easy. He uses Light based attacks and these can be halved by the "Light Ring". Unfortunately if you equip one of these rings
he will absorb your physical attacks. Anyway have Lilka act as your devoted healer and unleash all your strongest moves. Have your team at least level
55, this way you'll survive his attacks easier. Keep your HPs as close to max as possible and use your most powerful techniques and you should survive this
fight...barely!
Boss #62: Zolinge
Hp: Mid ten thousands.
Location: Wind Tiger Den
Strategy: This is boss is one of the easier sealed monsters. Lilka as usual is your devoted healer. Up her defense before she takes this task though, you want
her to survive his attacks so she can heal. Have Ashley use "Access" and then make his way up to "Banisher" while using his other techs along the way. Have Brad go
ARMs crazy, unleashing all his most powerful ARMs. If you can manage to keep your Hps up and your team alive you'll win this fight quickly enough.
Boss #63: Zyclus and Zetrim
Hp: ???
Location: Mt Chug Chug
Strategy: These two are rather easy. Only one of their attacks does more then 3,000 damage. The rest do less then 2,000. Have Lilka heal, Ashley "Access" and
Brad use ARMs and they should fall soon enough.
Boss #64: Zavorg
Hp: ???
Location: Meteor Crater
Strategy: This boss is the "Scarecrow" of the sealed monsters. Stupid enough to waste a good number of turns on status boosting attacks...even after they stop
having any effect. His attacks range from 1,000 to 4,500 in damage. Lilka as usual will be your healer and Ashley and Brad should use their most powerful abilities
to inflict as much damage as quickly as possible. Keep your Hps up and your team alive and you should succeed.
Boss #65: Gatlorg
Hp: Low Ten Thousands.
Location: Pirate's Warren
Strategy: This fight is simple. Gatlorg does less then 1,500 damage for most of his techs and he is weak to fire. Just have Lilka heal when necessary and using height level
flame spells. Have Ashley "Access" and use "Gun Blaze", Brad will be there as a punching bag 'cause thats all he's good for and he's got the best odds of survival. Gatlorg should
fall really quickly. He is by far the easiest of the sealed monsters.
Boss # 66: Ragu O Ragula Hp: 99,999 Location: Aguelite Mine Strategy: This strategy was provided by: Dalton of Zeal. First, make sure Brad has about 7000 HP. Second, make sure you have the Guardian of Love, Raftina. Equip it on Brad. Also equip the Talisman accessory. Now go fight Ragu. Have Brad use Invincible with Raftina whenever you need to heal (the Talisman will restore HP every turn), and block every other turn until his FP reaches 100. Then, throw your strongest attack at him. Next turn, repeat the Invincible technique. The Talisman will restore a certain amount of HP each turn, which means Brad will never be killed! Just make sure his HP is around 7000 each time you attack. It takes a while, but it saves you all of your Scapegoats!
| |