
 |
|
|
 |
 |
Blistering Heights Cavern Walkthrough
Corak's Notes on Blistering Heights Cavern:
The cavern below Blistering Heights is not a natural formation. The Elemental War saw the creation of many monstrous beasts, and one was a giant spider that breathed fire like a dragon. The beast was felled on this isle and as the centuries wore on, a cavern formed around its decaying carcass. The feet of the spider are said to house altars of magical protection.
Monsters in this area: Scorpias, Fire Stalkers. Boss: Major Devil.
Map of Blistering Heights Cavern:
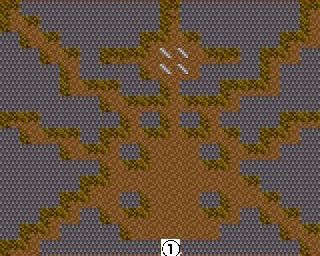
![]() Entrance/Exit to the Cavern.
Entrance/Exit to the Cavern.
This is a pretty straightforward area, but it can be dangerous. Not at first, though... Scorpia's will the only enemies you face in the entrance area of this cavern. Your way will be blocked in all directions by fire traps. If you haven't gotten a bonus to your Fire resistance from the statue in Blistering Heights, turn back and do so now. When you have the bonus, enhance it further by casting Protection from Elements(Fire). Now pass one of the fire traps by casting Jump, and choose any one of the six small passages to explore next. One or two Fire Stalkers will get in your way. They're immune to physical attacks, so you'll need to beat them with magic. Cold-based magic obviously works best. Further ahead will be another fire trap, which you'll either need to walk through, or use Etherealise to jump into one, then sidestep out of the way.
Anyway, once you get past the Fire Stalker(s) and the fire trap, you'll find an altar in at the end of every one of these passages, and they will all increase the resistance of all party members permanently. The southwest passage will give everyone a +20 bonus to their Energy Resistance, the west passage gives +25 Cold Resistance, the northwest +25 Fire Resistance, the northeast +25 Electricity Resistance, the eastern one +30 Acid/Poison Resistance, and the southeast one +25 Magic Resistance.
After getting all of these excellent resistance bonuses, go towards the "head" of the cavern, the chamber in the north. You'll have to beat a small group of Fire Stalkers first, followed by a Major Demon. After that, you'll be facing three treasure chests. The ones on the left and right both contain 1000 Gold and a Precious Pearl of Youth and Beauty. The one right in front of you holds a small fortune in gold: 1 million to be exact.
But that's not all, folks! There's still a door on either side of the room. The door on the west hides a treasure chest with 1000 Gold and a scroll of Incinerate, while behind the one on the east you'll find a chest with 1000 Gold and a Raise Dead scroll.
And that STILL isn't all, because you can also bash through the wall behind the spot where the chest with 1 million gold was to reveal yet another treasure chest. You'll need a very high Might rating for the leading two party members in order to bash it down, so you may need to use Etherealise to get through. This last chest again contains 1000 Gold, but also 5 random items, which will always turn out to be excellent ones.
And that's all for these caverns; you can now head on back to Blistering Heights.
|
|