
 |
|
|
 |
 |
Wildabar Cavern Walkthrough
Corak's Notes on Wildabar Cavern:
The Ogres that could not be driven from Locust Grove were captured by the Dwarves and placed in cells, where they are watched by the witches who use this cavern as a brewery. From here, the witches barrel their brew and send it to their coven in the Frozen Isles. But witches have been known to smuggle captured adventurers to their coven to use as sacrifices, so search the barrels for friends in need of help.
Monsters in this area: Phase Heads, Ogres. Boss: Wicked Witch.
Map of Wildabar Cavern:
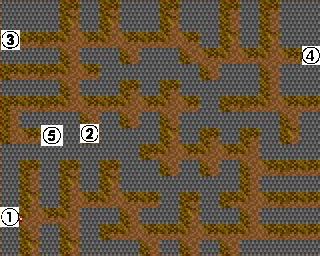
![]() Entrance/Exit to the
Cavern.
Entrance/Exit to the
Cavern.
![]() Wartowsan's cell.
Wartowsan's cell.
![]() Lone Wolf's cell.
Lone Wolf's cell.
![]() Brother Delta's
hideout.
Brother Delta's
hideout.
![]() The Wicked Witch's
location.
The Wicked Witch's
location.
In the halls of Wildabar's cavern will be many Phase Heads. They're pretty weak, but they have the ability to confuse party members. Walking though the halls of the cavern, you will see the captured Ogres, unable to get to you. However, a little further on you'll see a lever with a plaque reading: "Pull lever, Ogre kill. Have a nice day." You guessed it: Pulling it sets the Ogres free. Although this sounds like a bad idea, you'll have to do so or you won't be able to get to the worthwhile spots. Before doing so, be sure to cast Levitate, because pulling the lever will also activate the Dwarves' booby traps.
After pulling the first lever, walk back to the entrance of the cavern, beating Ogres on the way and checking their cells. You will find a barrel of witches' brew in one of them. The character who drinks it will get a permanent increase of 10 to his or her Might. Watch out, though: The Ogres' large hammers will very likely break some of your armor.
Return to where you pulled the lever and proceed through the cavern. Ignore the four barrels along the way, since they contain acid. You'll see more cells on the way. Like the last ones, these will be pretty much impossible to bash down, so you'll need to pull another lever. Keep an eye on your left side while walking so as not to miss it.
After pulling the second lever, turn around and beat the Ogres coming out of their cell. Behind them, you'll find another barrel. Drinking it will permanently raise a character's Endurance by 5. Now return to the passage where you didn't drink the four barrels containing acid. Turn right at the second barrel and you'll see another barrel in a now-open cell. Drinking this one will permanently raise a character's Intelligence by 5.
Return to the second lever and continue going through the cavern. Keep walking straight and you'll see another barrel. Drink this one to gain a permanent +5 bonus to a character's personality. Turning west, you will encounter more Phase Heads and two barrels, one to the left of you and one to the right. The left one holds a bonus of 5 to a character's Luck, while the right one will raise a character's Accuracy by 5. Of course, these bonuses are also permanent.
And the end of the passage is a door. Unlock it or try bashing it down to continue. Ahead, there will be a barrel in front of you and one to the right. Both contain acid, so drinking their contents would be a bad idea. In the passages is a message on the wall stating that "The Moo Cult is strongest in the Land of the Gargoyles". Which makes sense, since that's the location of their headquarters, the Cathedral of Carnage.
As you go along, it won't be long before you reach another lever, which will be to the right of you this time. Although it reads "Don't pull!', do it anyway. Turn back and go southeast until you get to a small open cell with nothing but a barrel inside. Open it up and... a Ninja will jump out. He will tell you his name is Wartowsan, a member of the Swamp Town ninja clan, and that he was captured while spying on the Wildabar ninja clan. For freeing him, he will offer his services as a hireling. If you wish to do so, go to the Wildabar Inn.
Now you're at point 2 on the map. As you can see, you're close to point 5, where a Wicked Witch resides. And since she's in the west of the area, that makes her the Wicked Witch of the West! .......(pauses for laughter, which never comes) Damn, my agent ensured me that joke would kill. Well, maybe it will, since because of it I'm dying out here.
In any case, you don't have to kill the witch if you don't want to. Especially since she has the nasty ability to curse your weapons and armor, you may want to think twice about going to kill her. Then again, at this point I'm usually strong enough to be able to take her out from a distance with a single Fireball.
Now head towards the northwest-most cell of the area (point 3 on the map) and open the barrel to free Lone Wolf the Ranger. From now on, you will also be able to hire her at the Wildabar Inn. After freeing her, turn around and go straight. Go into the second cell to your left and surprise, surprise... another barrel. Drinking from it will raise a character's Endurance by 10, permanently.
A little further on, there are more cells, which are still closed. Also, there's a message on the wall saying that the crystal shards beneath the Crystal Mountains hold great power. These shards are located in the Arachnoid Cavern and will raise your attributes.
But enough about that. For now, head to the very end of the passage and pull the final lever. After doing so, go to point 4 on the map to find Brother Delta, who (if you already talked to Brother Alpha, Beta and Gamma, in that order) will tell you the exact location of Rainbow Island, where the shells are hidden. However, there's a magic portal there who will release a Sea Shell of Serenity only once per year. Brother Delta says only Brother Zeta knows on which day of the year a shell is released, and tells you to find him in Arachnoid Cavern. And of course you could predict by now that this brother, too, gives you a Quatloo Coin.
Turning away from Brother Delta (who will insist on remaining in his barrel, the nutcase) walk straight ahead and go into the second cell on your right. There you'll find the final useful barrel in this area. Drinking from it will permanently raise a character's Speed by 10.
Now you can head back to Wildabar at your leisure.
|
|