
 |
|
|
 |
 |
Dark Warrior Keep Walkthrough
Corak's Notes on Dark Warrior Keep:
For many ages evil warriors have used this dungeon as their hideaway. Even the Dwarves that escaped defeat at Castle Whiteshield fled here. All that is required for sanction is to do the bidding of the Top Jouster, who guards two Ultimate Power Orbs which he believes embue him with power over his so-called subjects.
Monsters in this area: Mad Dwarves, Rangers, Jousters. Boss: Top Jouster.
Map of Dark Warrior Keep:
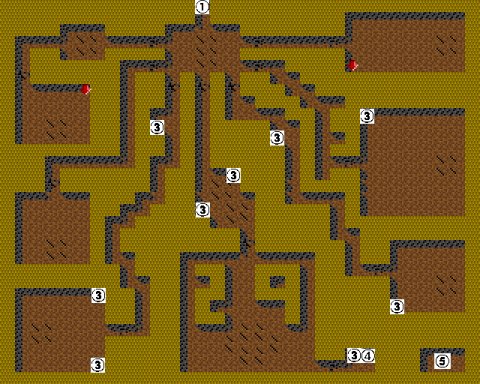
![]() Entrance/Exit.
Entrance/Exit.
![]() Chest containing Hologram Sequencing Card 003.
Chest containing Hologram Sequencing Card 003.
![]() Trapped chest.
Trapped chest.
![]() Statue of Ivory Billows.
Statue of Ivory Billows.
![]() Secret Ultimate Power Orb storage room.
Secret Ultimate Power Orb storage room.
Can't enter the Keep? First get the Red Warrior Key from Cyclops Cavern, or from the hireling Lone Wolf.
In this dungeon, your objective is to collect Hologram Sequencing Card 003, and, if possible, the two Ultimate Power Orbs. So, without further ado, let's get this show on the road.
The welcoming comittee consists of a small group of Mad Dwarves. If you have any trouble at all defeating them, then it's time to get the hell out of here while you still can. Because as the inscription of the statue Forture's Bane before you clearly states: there are some powerful warriors here. A number of gates block off all passages except one, which is blocked by a locked door instead. Every single passage blocked with a gate leads to a large room with a statue and some treasure, but of course you'll have to fight for it. Let's tackle these rooms easiest to hardest.
First, go through the first passage east that you come across after entering (note that turning east means turning left, since you're facing south when you enter). Bash through the gate, and unlock the door to the next room (or bash through it as well). There's more Dwarves here, and a couple of Rangers. The Rangers have ranged attacks and have more attacks than the Dwarves, but they should still be easy to defeat. Again, if you have any trouble, you're not ready to finish this dungeon yet - the Jousters you encounter later will butcher you. In any case, there's a shackled skeleton in this room, which, when examined, will grant the character who did so a permanent bonus of 10 to their Might. There's also a chest containing 3000 gold and 5 random items. Don't expect too much, the items are probably not all that good.
Take note of the statue, then go back, and bash to the gate directly ahead across the hall. A couple of Dwarves will get in your way, and you'll notice a message on the wall warning you about the Top Jouster. Unlock the door at the end and there'll be more Dwarves and a Ranger. Again, there's a skeleton, and a chest here. This skeleton also gives +10 Might to whoever examines it, and the chest contains 5000 gold and 5 random items of the same quality the items in the last chest were.
So far so good? Then proceed to the second passage on the west side. After bashing through the gate, you'll soon see a message on the wall stating that you can become an Ultimate Adventurer by facing the Minotaur God. Which is inaccurate in two ways: 1) It's the Minotaur King, and 2) You don't have to face him at all if you don't want to. See the Maze From Hell walkthrough for more details on how to really become an Ultimate Adventurer. Anyway, unlock the door at the end, and defeat the Dwarves. There's three Rangers in this one, and again there's a skeleton and a chest. This skeleton gives +10 Endurance, and the chest contains 8000 gold and 5 random items, still of pretty average quality.
Well, you know the drill, don't you? Return, bash through gate directly across the hall, unlock door, beat Dwarves and Rangers (four this time), and get the stuff... but wait! There's a Jouster here, and these guys are definately not easy pickings. They are fast and well-armored, and have the potential to do some major damage. Fortunately they only have one attack per round, but they can dish it out as well as take it pretty well. Implosion will take care of them easily, usually before they can even reach you, so use it if you need it. This guy will be the test to see if you can survive this dungeon. If you have serious trouble here, nearly dying before you defeat him, it's probably best to leave and come back later. But for now, you have earned some more treasure for beating the first Jouster. Hold it, not so fast! One of these chests is trapped, and blows up in your face if you open it, causing instant death! Look at the map to see where this chest is, and only open the other one, which holds 10000 gold and 5 random items. The skeleton here again raises Endurance, but this time by 20.
That was the easy part. But things are about to get ugly. Oh, if you're wondering about the inscriptions on all those statues... they'll serve a purpose later, when you reach the statue of Ivory Billows. That is, if you're strong enough to get that far. Beat the Jouster easily? Then proceed though the passage leading southeast, which in this case means you have to turn left after exiting the last room. Bashing through the gate, you'll kill a single Dwarf, and soon get to a chest. Don't open it, it's another trap. There's a little hint on the wall, telling you to "Study your map carefully". I'm sure that if you take a look at the map up there, you can see for what reason this is mentioned. You'll find out what purpose it serves later. For now, keep going, and face more Rangers and two Jousters in the room at the end. Then approach the skeleton for a boost of 20 to one character's Speed. Unlock the non-trapped chest in this room for 15000 gold and 5 random items. These are probably a bit better than what you've been getting in this dungeon so far.
Still okay? Well, you only have one gate left to smash back in the main hall, so go do that now. Ignore the chest next to the Mad Dwarf you run into, it's another trap. In the room at the end, there's - surprise surprise - more Dwarves and Rangers, and three Jousters this time. Have you noticed only one Jouster can face you at once? No other enemies can get close when you're fighting one, so at least that makes it somewhat easier. Two trapped chests are in this room; avoid them and get the other one, containing 25000 gold, and again 5 random items. The skeleton here grants a permanent Might boost of 25 points, very nice to beef up your best melee fighter with.
Okay, that only leaves the central passage, the only one blocked by a door rather than a gate in the main hall. Of course, I saved the toughest area for last, as this one leads straight to the Top Jouster. If you think you're tough enough to handle him and his lackies, unlock the door and proceed. First, some Rangers will get in your face, and they'll try the ol' trapped treasure chest trick again, twice. Don't fall for it, and proceed to the inner chamber. Right after entering the room, if you go straight you will run into the flunkies. There's six of them in all, three appearing at once if you take things one step at a time. If you're able to beat all of them, you can get to the skeleton in the corner, which will grant the one to examine it a bit over 2 million experience points! There's also a row of chests behind where the Jousters used to be. These contain 1000 gold each, as well as a special item. In two of them you will find an Ancient Artifact of Neutrality, and in the third is the Hologram Sequencing Card 003 you've been looking for!
If you're facing east when opening this final chest, congratulations - you've just attracted the attention of the Top Jouster. Otherwise you'll just have to make him notice you. You wouldn't want to leave without beating this guy up, would you? Basically, he's just like a regular Jouster, except he has much more HP and can somehow do a jousting attack twice in one pass. Pretty impressive! But I'm sure that if you came this far, he won't be much harder to beat than any regular Jouster, leaving him to be a bit of a disappointment.
Wait a moment, don't move on just yet! You can see the "9" in this room on the map, right? If you use the Teleport spell to get into the little closed-off space within this number, then face east, you'll find a hidden chest there. It contains 100000 gold and 6 high-quality random items.
Teleport back out of the hidden room, then go all the way to the southeast. Bash through the gate and you'll end up in a small room with a trapped chest and the statue of Ivory Billows. It will put your math skillz to the test. If you can solve this, a secret passage will open leading to the room with the two King's Ultimate Power Orbs. If you're stuck, there's two ways to get there anyway. 1) Check out the Spoilers section for the correct answer, or 2) Use the Teleport spell to get into the room instead.
After collecting the Orbs, you're all done here. Onward to new adventures!
Click here to return to area B3.
|
|