
 |
|
|
 |
 |
Blood Reign Dungeon Walkthrough
Corak's Notes on Blood Reign Dungeon:
Giant worms inhabit Blood Reign Dungeon, and their digging has revealed the power crystals that run beneath the Crystal Mountains. Touching the crystals will prove a permament bonus to he with the courage to reach out his hand. And speaking of reaching out a hand, there may be friends to be found among the hanging prisoners.
Monsters in this area: Sonic Ninjas, Draconi, Dragon Worms.
Map of Blood Reign Dungeon:
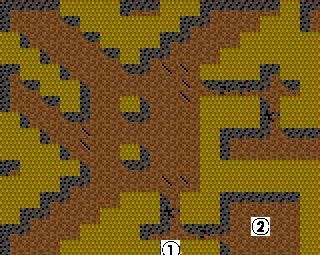
![]() Entrance/Exit.
Entrance/Exit.
![]() The Prison.
The Prison.
As soon as you enter, try to unlock, bash, Teleport or Etherealise through the eastern door to get to the prison, which is full of Sonic Ninjas. Defeat them, and free the two prisoners: Son of Abu and Charity. The former is a Robber, the latter is a Paladin, both are hirelings. Once you've freed them, they'll be waiting for you in the Swamp Town inn. These two aren't that bad as hirelings go, but don't get too attached to them... the two best hirelings are yet to come. But I suggest you hire them at least long enough to take their equipment; they've got some pretty good stuff on them. For example, Son of Abu's Pirate Ring really helps on those tough-to-pick treasure chests. Take Son of Abu's Black Terror Key only if you wish to skip the Cursed Cold Cavern, where you'd have to find it normally. Anyway, back to the dungeon.
You can either use the Teleport spell to get past the purple flame trap and the gate blocking your way north, or you can bash your way through, getting hit by the trap at least twice in the process. This doesn't have to be as bad as it sounds; the trap shouldn't hurt you very much as long as you cast Protection from Elements(Fire) first. The Draconis ahead aren't too powerful; defeat any who get in your way as you proceed north. Stop when you see more purple flame traps in the distance, and turn east instead, where you'll find another gate you can choose to pass in any way you prefer. Behind it, you'll find a door, which leads to another room filled with Sonic Ninjas. Defeat them all and walk straight ahead into the room to see the message: "Seek the crystals hidden within these walls". That's meant literally. If you look at the map of this area, you will see three areas which seem to be out of your reach. You'll need the Teleport spell to get there. Don't do that just now though, I'll give you more details later.
In this room is also a hanging skeleton. Approach it, and you will see a message written in blood: "The first is - In." This is the first clue to the password which seals King Tumult's personal treasure chests. The rest of the clues are scattered on the skeletons hanging in the main hall, where the Draconi are. So turn back now and sweep the large central area (don't get too close to any of the purple flame traps), clearing out the Draconi. Checking out all the skeletons will give you the remaining five clues. They are: "The second is - Oh.", "The third is - Are.", "The fourth is - Tea.", "The fifth is - Eye", "The sixth is - Sea". The perseptive among you should have figured out what the password is by now. If you don't get it, you can look in the Puzzle Spoilers section for the answer, if you wish. With the password, you can now leave and get the contents of the four chests near King Tumult, but remember you'll have to face a bunch of Sorcerers if you do.
Past the four large purple flame traps in the central area, there are Dragon Worms: Powerful, fast and poisonous creatures, who can hit all party members for massive damage. If you want to get all of those crystals I mentioned, you'll have to beat the one in the north-east corner of the dungeon. You'd better cast Protection from Elements(Acid) first, it gives some extra resistance to its powerful attack. However, even after that this could still be a pretty tough battle. Well, at least you can take comfort in the fact that you don't have to beat the other three Dragon Worms if you don't want to. Now, if you manage to beat the Dragon Worm in the north-east, use Teleport to get into the little secluded space on the north-eastern edge of the map. The crystal there gives a character a permanent +50 to his/her Speed. Give it to the character you wish to be able to act first in combat; from now on, this character will be able to attack even before one of those speedy Dragon Worms does.
For the other two crystals, you don't need to defeat any Dragon Worms, since you can teleport into the secluded areas on the northern and western edges of the map just fine from the central area. The crystal in the north boosts a character's Accuracy by 50 permanently, while the crystal in the west gives +50 Luck. And that's all of value in the Blood Reign Dungeon... time to get outta here.
The only way out of here is back to Castle Blood Reign.
|
|