
Battle 7:
Mikhail vs Librof
This battle is divided into 3 stages with a break between the first and second. Personally, this is my favorite campaign. Also, make sure you hired mercenaries before this battle!
Stage 1:
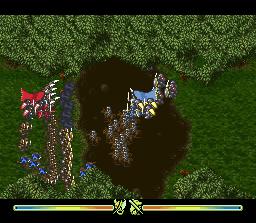
Lure the enemies out of the swamp. At the swamp, moving ability decreases, and physical ability also decreases. Please fight wisely using this special property of the swamp.
Mikhail (4000) vs Vlad (4000, Marsh Block)
Vlad uses the Marsh Block formation, one that you cannot obtain. Note: try NOT to fight on the swamp. You're men will quickly lose morale and start to rapidly die. The same thing happens to the enemy if they fight on the swamp. Vlad starts out using All Defense to lure you into the swamp. This battle can be handled in two ways:
Using Decoy:
First off, make sure you're using the Gush Wind formation. Now use Spd Atk Fwd to quickly get across the swamp. Use Decoy to force the enemies to use All Charge. Now use your own All Charge, and the enemies will quickly start dropping. This is why you need Gush Wind- to get out of the swamp quickly. If you get stuck in the swamp, then you'll probably lose this one. This tactic is kinda risky.
Mercenaries are nice- they're really essential in the next battle though.
Using Intel L 2
Yes, I love Intel L 2 and Gush Wind. To preform this method, begin by Using Spd Atk Fwd. Cross the swamp and keep on using it until they call All Charge. Now move back across the swamp and use All Defense until they get near the edge on your side. Use Intel L 2 to force them to defend. Now use Fwd Atk, and you should be able to do a good amout of damage to them. They'll use Move Back right after the Intel wears out which gives you another good chance to hit them in their backs. They use All Defense once more once they get out of the swamp. Now once you meet them, use All Charge to wipe out any remaining resistence.

No more resistence from them...
Stage 2&3:
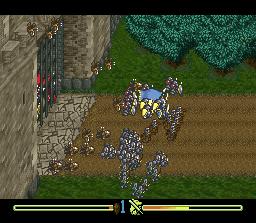
Dodge the throwing stone attacks of the enemies. Try to break open the castle door.
Now this is fun. You're laying seige to Librof.

Also, if for some sadistic reason, you removed Move Back, equip it- unless you enjoy pain.
Mikhail (4000) vs Razal (2500, City Block)
The main purpose of this battle is to force the gate open by using forward attack. As you can see, if you bought mercenaries you'll have Archers with you and an extra tactic: Archer Team (4). The Archers can be used to shoot at the Rock Throwers which will, of course, throw rocks on your army to do massive amounts of damage. Here's how to intrepret where they're throwing:
-
Number 1 Shoot- the right-hand side of the screen.
-
Number 2 Shoot- the middle of the screen.
-
Number 3 Shoot- right next to the gate.
Now they might also suddenly switch during the calling. It goes something like: "Number 1 Shoot! No wait... that won't due... Number 3 Shoot!" Usually this will actually help you by targeting the location you aren't at. If you don't want to be hit by Number 2, make sure you're either right next to the gate or at the far right edge of the screen. Don't use All Charge to attempt to open the gate; it won't open any faster, and you'll have wasted it. Just use Fwd Attack then Move Back. Attacking the gate quickly drains morale, and when your morale hits bottom, you won't be able to attack the gate anymore. Also, use Intel L 1 to make them also attack the gate. It'll kill their morale, and it seems to do a bit of damage to the gate as well I believe. Now about the Archer Team: the Archer Team is used to kill the Rock Throwers. The maximum number of Rock Throwers at a time is 100. Each time you kill them, 100 more will be replaced from their soldiers. I recommend using the Archer Team right before the Rock Throw hits to maximize the length of time between throws. The perfect spot to hit them is seen below:

Hitting them from right here generally wipes out all 100.
This is always a pleasant site to behold...
After moving back, just use Fwd Attack again and repeat the process until they open up the gate. A good indicator of how far you've come in the destroying of the gate are the various messages you get from the enemy commander. Also, if you've already used your Archer Team completely, you're probably close to breaking down the gate.
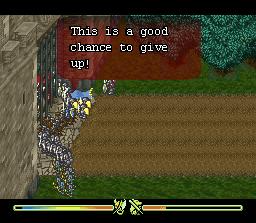
Once you start getting messages like this, you'll know you've almost broken through.
When the gate is very close to being broken open, Razal opens the gate and calls an All Charge. The Rock throwers will keep going and you can use this to your advantage by having them kill Razal's troops. Or you can just defend and for a bit to avoid the Rock Throws and use All Charge to push them off the screen.

Isn't Gushwind perfect for pushing people around?
Mikhail (remaining) vs Byahl (2500, Bot Charge)
You shouldn't have lost more than 1000 men in the last battle. This battle is fairly simple, use Intel L 1/2 early on so that you can kill the fake commander and not suffer the consequences. Otherwise, you'll be subjected to the White Flag tactic which will lower your attack power. After this tactic is used, the real commander appears. If you've used Intel L 1/2, then you won't have to suffer. Its best to use Intel L 1 though, your All Charge to wipe out their forces in no time.

Erm... that was easy... wait that's not what it usually says.

Wore out just now... with almost nothing left to kill.
After winning the battle here, Librof now belongs to Loanne. Your prestige rises to Solid (if you hadn't adjusted it any yet). You're given the choice of who should be left to control the fort: Bradley- Balance, Collins- Fast, Patton- Charge. Now usually I'm a fan of speed in the war games (which is obvious in the fact I always use Gush Wind...), but Bradley is the only one that has Move Back. Well, here are each of their tactics:
-
Bradley: Fwd Attack, Move Back, All Defense, All Charge, F Row Exchg, Recover Frm
-
Collins: Fwd Atk, Spd Atk Fwd, All Defense, Spd Atk Exc, Recover S, Recover Frm S
-
Patton: Fwd Attack, R Row Chrg, B Row Chrg, All Charge, All Defense, Recover W
![[Image]](pict4.jpg)
I choose Bradley mainly because of the Move Back option.