
 |
|
|
Chain of Memories Bosses
| Traverse Town | Wonder Land | Agrabah |
|---|---|---|
| Olympus Coliseum | Halloween Town | Monstro |
| Atlantica | Neverland | Hollow Bastion |
| Twilight Town | Destiny Islands | Castle Oblivion |
*Just so y'all know, the boss fights that appear between worlds are lumped in with the world that came before them.*
Traverse Town:
Guard Armor:

The Guard Armor is basically a 2D version of its 3D counterpart from Kingdom Hearts. Don't waste your cards on sleights as you have a limited supply of cards at this point. Focus on one piece of armor at a time ,and when you card break the Guard Armor you'll get a green card with the Mickey logo on it. Throughout the game you'll get these cards during the boss fights that signal the end of every world. They have a negative effect on bosses, giving you an opportunity to inflict heavy damage while the effect lasts. For Guard Armor it breaks the armor apart and causes it to lose the ability to move for a short period of time. This is your chance to do as much damage as you can. Use the green cards as soon as you get them in this fight. The Guard Armor will fall quickly, all you have to do is go berserk when attacking.
Axel:

Axel is a fair amount more difficult then the Guard Armor. You'll get no green cards when fighting him, and he is capable of using sleights. Just keep the attack up and don't waste all your cards on sleights. When Axel is using sleights he'll either create walls of fire or attack with a combo. Beware his ability to teleport around, he tends to bounce around the area and then either unleash a sleight or throw his chakrams at you. Just be sure you heal yourself, if you have any cure cards, and keep your attacks as constant as possible.
Once Axel is down you'll see a scene, once it's over head up the stairs. After another scene you'll be in a room with a large door, a save point and a bluish black orb which allows you to return to previous levels. Talk to Donald and Goofy if you wish and head to the door. You'll be give a selection of worlds to choose from. Lets go with Wonderland first. You don't have to go to Wonderland first, but it's what I'm gonna continue onto in this walkthrough.
Wonderland:
Trickmaster:

Like the Guard Armor, Trickmaster is very similar to the boss of Wonderland in Kingdom Hearts. If you card break him he'll be knocked down for a few seconds, making him easier to hit. Also, when you card break him sometimes he'll release a green Mickey card. This card does something rather stupid, it makes a table appear in the center of the battle arena. It's supposed to open the boss up for more attacks but the odds are by the time you've gotten the card you'll already have pounded a hole in his HP so large that using it would be almost pointless.
Agrabah:
Jafar:

This battle is basically a 2D version of the battle with Genie Jafar in Kingdom Hearts. You're on three platforms that randomly rise and lower as the battle progresses. Iago is flying around above the arena carrying Jafar's lamp. You need to attack him, so dodge and card break Jafar's attacks until the platforms have you within range of the lamp. When the green Mickey card appears it will raise all of the platforms up to the highest position giving you complete destructive access to the lamp. Ensure you have some cure cards as you'll need them if Jafar lands too many of his attacks on you. He also has an easy-to-dodge fire breath attack, just roll out of its way. Jafar's last attack is where he throws a giant rock at you. This attack is hard to dodge unless there is a lower platform than the one you are on. Drop down to that platform once he throws the rock to dodge it. He'll also try to punch if you if you remain too close to him, so try to stay on the back and middle platforms. He also tends to switch sides every once in a while so to avoid being surprised by this keep to the middle. Just keep your attacks constant and your HP up and Jafar will fall quickly enough.
Olympus Coliseum:
Cloud:

Cloud is extremely similar to his Kingdom Hearts incarnation. He mainly just moves around the arena attacking, but he's also capable of using flight-based attacks and heavy sword swing sleights. He's extremely dangerous and does heavy amounts of damage to the unprepared. Keep your HP up, never stop moving and keep a couple zero cards handy for breaking his sleights and you should win eventually.
Hades:

Hades is similar in attacks and strategy to his Kingdom Hearts counterpart, save for that stupid flaming spin move. He doesn't have it this time around thankfully. This will likely be your hardest fight yet, as Hades is not only a heavy hitter but moves quickly as well. Hades tends to circle around you, and then either strikes with short range flames or long range fireballs. He's more than just a little bit trigger happy with his sleights, so keep a few zero cards handy. Keep your HP up, keep moving and make sure you don't waste too many cards with sleights, as you don't really have any good ones yet, and Hades will eventually fall.
Halloween Town:
Oogie Boogie:

Oogie is very similar to his Kingdom Hearts counterpart save for the facts that you're not on a spinning surface and you don't have to line yourself up with certain areas to attack him. He throws dice which either explode or summon Heartless, various blades, or etc. to attack you. To attack Oogie you'll first have to slag the dice. Out of the three dice that he throws, one holds a green Mickey card. Use it to lower the fence blocking you from attacking Oogie and let loose on him. He'll throw you down and reraise the fence after a fair amount of attacking. Just rinse and repeat until you've slagged him.
Monstro:
Parasite Cage:

Parasite Cage...Parasite Cage was easy in Kingdom Hearts. In Chain of Memories...it's like trying to climb a mountain with a thing of dental floss and one of those hammers doctors use to check your reflexes. For starters, you're on spinning platforms, the floor beneath the platforms is acidic so you can't hope to survive that and attack, so you're limited to how often you can attack. When you card break you sometimes get a green Mickey card. This removes the platforms and allows you to walk on the acid without getting burned. Be sure have lots of healing cards 'cause the platforms sometimes fall beneath the acid if you've been on one for too long. Keep your HP up, keep moving from platform to platform to keep the platforms from falling, and you should eventually break the Cage. Be wary of the Cage's bounce and breath attacks. Other than that your biggest problem is the acid.
Larxene:

This woman is cheap. She attacks quickly, attacks often, moves quickly, does high damage, and has no qualms about sleighting the crap out of you. Ensure that your HP is always high, have a lot of zero cards to counter her attacks with and a good supply of healing cards, and you'll do fine. Her main sleights are a lightning bolt that sucks you in and stuns you, lightning from above, and a series of energy blasts. Don't take any thunder cards into battle, she's of the thunder element so she absorbs their damage and her health is restored. I suggest limiting the Donald cards you use, as his spells are randomly cast and you never know when he's gonna pull out a thunder spell.
Atlantica:
Ursula:

Ursula is absolutely nothing like her Kingdom Hearts incarnation. Her attacks are easy enough to dodge. She has a lightning attack which is easily dodged by rolling to either side and she spits homing bubbles which die after a few moments. She as a flame breath attack which is difficult to dodge, but she uses this one far less then others. To defeat her you have to attack the tentacles near her face to either reveal a green Mickey card or to allow the target lock to switch to her face. Just dodge her attacks as best you can and keep pounding on her, and she'll fall quite easily. When you use the Mickey card she'll lower to your attack level, but she tends to move around at half health. At this point pay attention 'cause it can waste perfectly good attack cards.
Riku I:

Fighting Riku is very much like fighting Ansem-Riku from Kingdom Hearts. He has the basic sword attacks as well as the ability to launch energy balls at you. His two-step attack can stun you so try to ensure that you card break him before he gets a chance to do so. Keep your HP up, keep moving, and don't waste too many cards on sleights 'cause you'll need 'em to keep him under wraps. It's not a difficult fight, so just keep on attacking and he'll go down soon enough.
*Note: If you're going through the game in the same order I did then the 100 Acre Woods is the last level you completed and as there are no bosses there I didn't mention it. So if you're going in a different order there would be a world here.*
Riku II:

It's Riku again. It's extremely similar to your previous encounter but he has more HP and is stronger. He uses sleights more often so make sure you have zero cards to counter them with. Other than that...it's the same as before. Easy.
Neverland:
Hook:

If you have a weak deck, Hook is hell. If you have a strong deck of highly damaging keyblades he goes down in about thirty seconds. Be wary of his sword sleights and be even more careful when the ship starts to tip to one side of the arena. He's more likely to unleash his explosive sleight at this point. The higher the card combo the more heavily damaging explosives he throws. Have a good supply of powerful keyblade cards and a good amount of cure cards and he'll go down hard.
Hollow Bastion:
Malifecent:
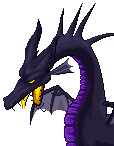
Malifecent is an extremely difficult boss if your deck is poorly set. She spits massive amounts of flames, bites when you get too close, and smashes the ground, damaging everything. After she breathes fire there'll be green flames left over. Attack the flames to reveal a green Mickey card. Use it to gain a platform to stand on and attack her more easily with. The platform will slowly disintegrate when she smashes the floor so make the best of it.
Vexen:

Vexen is just about the most annoying boss in the game. He's an easy opponent with weak attacks but he has a shield that guards against all frontal assaults. What makes it worse is if you're not quick he'll turn around before you can land a single hit. His attacks are ice-based, he uses blizzard, and an iceberg that'll pop out of the ground that you'll have to roll to dodge. He has a few physical attacks to go along with these specials. Keep some zero cards handy to break his sleights and try to land multiple hits on his back at once 'cause his defense is low and once you've hit him you're likely to be able to finish a combo on him.
Twilight Town:
Vexen II:

It's Vexen again. He's the same as before but slightly stronger. Just keep moving and have a good supply of zero cards as he's a lot more sleight-happy. He also has two new attacks, the first of which is a sleight that causes ice patches to pop up on the ground. These'll make you slide and leave you open to an attack, so be careful. The second he often uses with the first. It's a wave of ice spikes that spin out from his current position and can only really be dodged by running. If you're lucky, there won't be any patches of ice in your path, if not...say goodbye to a good chunk of your HP.
Riku III:

It's Riku...for the third time. Is it just me or are the bosses getting repetitive? He's just like before but stronger.
Destiny Islands:
Darkside:
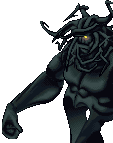
Well, this is the first boss with a Kingdom Hearts counterpart in a while. Darkside is very, very similar to his Kingdom Hearts form. It's basically a 2D version of the Kingdom Hearts fights. He has the same moves and everything. Ok, he has the chest energy blasts which are dodgeable by running and rolling and the ground punch which sends out a shockwave. You have to jump to dodge that one. He summons Shadow Heartless which reveal green Mickey cards and he has an energy rain attack which can be dodged by running and rolling. When you get the Mickey card, use it to reveal a platform you can ride up to his face. This allows constant damage instead of just when he has his arms down. So use it when you get it. There's also a large amount of wind in this battle. The wind'll blow you back every once in a while and when you pound him down to less than half HP, the wind becomes constant. Keep your HP up and attack as best you can, and he'll go down soon enough. Oh, and don't waste your time on sleights. It's a bad use of cards, as this could be a very long battle.
Riku IV:

It's Riku...for the fourth time. He's just like before but stronger and has one new attack. He can now unleash Ansem-Riku's strongest move from Kingdom Hearts. He'll shoot around the arena in a difficult-to-dodge attack that he'll finish off with a randomly-placed blast of energy. Aside from that and his newly extreme levels of HP and attack power...he's just as easy as before. A good supply of zero cards would be a good idea though.
Larxene II:

It's Larxene again. She's just as cheap as before and waaaaay stronger. After multiple easy battles in a row and a slightly challenging rehash of earlier fights...we get a challenge! Larxene's attacks are all the same but she's way more sleight-happy and they do far more damage. She attacks even faster than she did before. A powerful deck, proper ability cards, and good healing cards'll make this fight easier. I would go so far as to call this the toughest boss in the game. It's freaking insane. She attacks so quickly you'll have a hard time card-breaking. One second she's using a three card, the next she's using a 9. It's nuts.
Castle Oblivion:
Axel II:

Axel is a pumped-up version of your previous encounter with him. He has a new sleight he goes nuts with though. He throws two fireballs at you that will spin around you getting ever closer until they hit you. The only way to dodge this is with a well timed jump or with a zero card. Thats about all there is to it.
Marluxia:

Finally, a member of the Organization you haven't fought before. Marluxia is the one behind all the crap that went down while Sora was in Castle Oblivion. He has high HP, high strength, defense, etc. He's got a good range of normal attacks as well as a few powerful combos and sleights. His two main slights are an undodgable rose petal attack, the only counter to which is a zero card, and a large energy scythe. The energy scythe is highly damaging but fairly simple to dodge once you get the hang of the timing you need to roll away with. He'll use a short-ranged energy wave if you're near him for too long, and he also has a scythe attack where he springs forward and disappears. As long as you aren't in front of him when he uses it he'll miss you. Just have a good deck of strong attack cards and a few healing cards and he'll fall easily enough.
Final Boss - Nobody Marluxia:
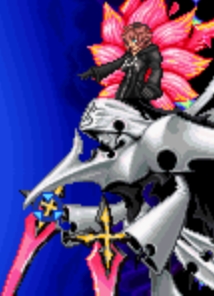
This final battle is almost laughable. After you destroy his two swords you may find yourself wonder why you can't hit him. Well it's because to damage him you have to card break him. So ensure you have a good amount of high level cards. Once you card break him he'll be open for damage for a short period of time. Inflict as much damage as you can quickly. His attacks are few and they are as follows: a flying dash attack which is undodgeable, summoning three bits that shoot lasers at you, and a jump attack which causes shockwaves and can be jumped. He still has his petal burst attack from the last fight but that's of no real concern. Just keep on card-breaking, keep your HP up, and he'll fall after a long but simple fight. Oh and don't waste any of your cards on sleights.
|
|